بعد سنوات من شحن لفات شبكة الروطان من مصانعنا في فوشان وإندونيسيا، يبرز سؤال واحد باستمرار من عملائنا بالجملة ومن المستخدمين النهائيين على حد سواء: ما الذي تحتاجه بالضبط لتركيبه؟ أوتاد خشبية أو أكريليك 1؟ يمسك العديد من المتحمسين للأعمال اليدوية ومصانع الأثاث ورقة من القصب المنسوج مسبقًا بشكل جميل فقط ليجدوا أنهم يفتقدون أداة أو مستلزمات حاسمة، مما يؤدي إلى تشقق الأوتاد، وشبكة فضفاضة، ومواد مهدرة.
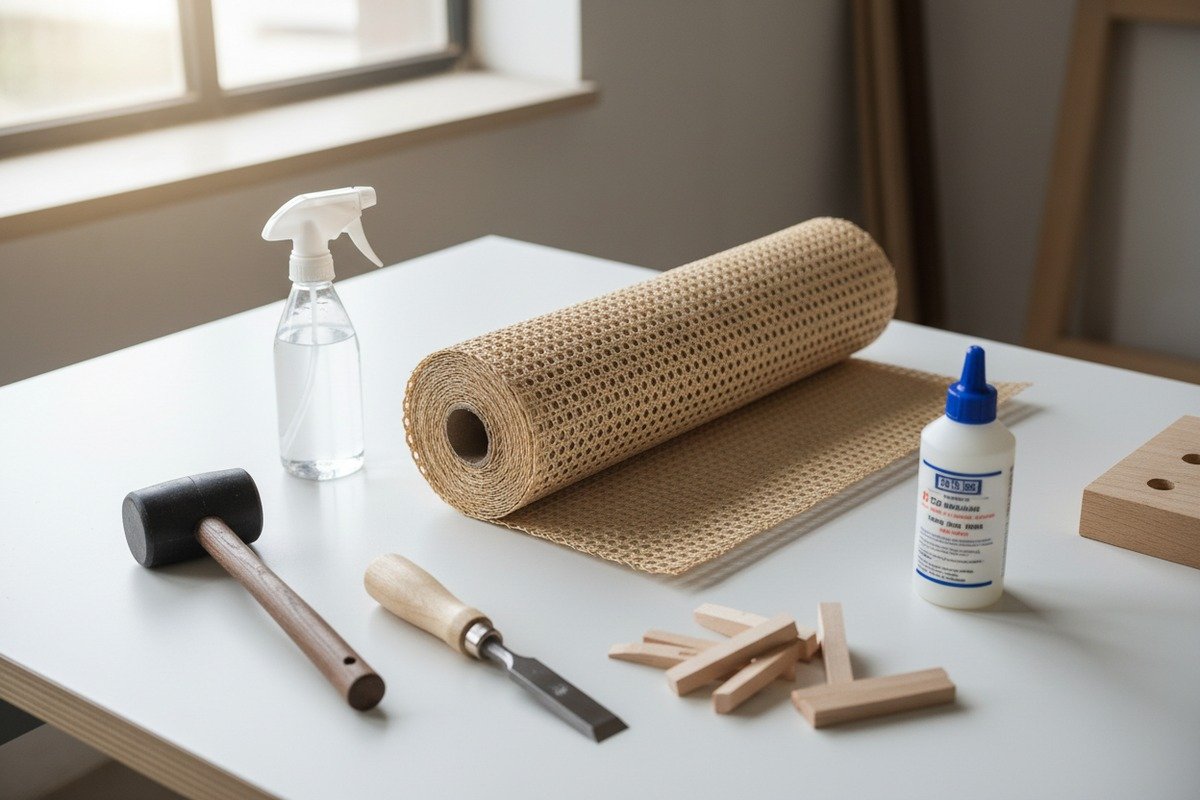
يتطلب تركيب شبكة قصب الروطان الطبيعي ألواح قصب منسوجة مسبقًا، وشرائح قصب متطابقة مع عرض الأخدود الخاص بك، وغراء خشب، وأوتاد خشبية أو بلاستيكية، وأداة ضغط الشرائح، وإزميل، ومطرقة مطاطية، وسكين متعدد الاستخدامات، وزجاجة رذاذ أو حوض نقع لترطيب القصب قبل التركيب.
هذا الدليل يرشدك خلال كل أداة ومستلزمات تحتاجها، من مرحلة النقع إلى التشذيب النهائي أداة ضغط الأوتاد 2. سواء كنت مشتريًا لمصنع أثاث تخزن للإنتاج أو تاجر جملة ينصح عملائك بالتجزئة، فإن التفاصيل أدناه ستساعدك على إنجاز كل عملية تركيب بشكل صحيح من المرة الأولى.
ما هي الأدوات الأساسية التي يجب أن أدرجها في مجموعة أدوات تركيب قصب الروطان الخاصة بي؟
عندما نحزم مجموعات شبكة القصب لعملائنا المصدرين في الولايات المتحدة وأستراليا، فإن الشكوى الأولى التي نسمعها تتعلق بالأدوات المفقودة أو ذات الحجم الخاطئ. يمكن أن تتحول ورقة جميلة من قصب الروطان السداسي إلى فوضى محبطة إذا لم يكن لديك المجموعة المناسبة جاهزة قبل أن تبدأ.
يجب أن تتضمن مجموعة تركيب قصب الروطان الخاصة بك أوتادًا خشبية أو أكريليك، وأداة لف أو ضغط، وإزميلًا ضيقًا أو مزيلًا للأوتاد، ومطرقة مطاطية، وسكينًا حادًا متعدد الاستخدامات، ومقصًا قويًا، وزجاجة رذاذ، ومشابك أو أوزان لتثبيت الشبكة في مكانها أثناء التجفيف.

قائمة الأدوات الأساسية
دعنا نقسم هذا إلى ما تحتاجه حقًا مقابل ما هو اختياري. كل أداة تؤدي وظيفة محددة في عملية التركيب. تخطي واحدة، وتخاطر بإتلاف القصب أو الإطار.
| أداة | الغرض | خيارات المواد |
|---|---|---|
| أوتاد (مجموعة من 5) | ادفع القصب في الأخدود مؤقتًا | خشب، أكريليك، أو بلاستيك |
| بكرة الأوتاد / أداة الضغط | ثبت مقعد القصب والأوتاد بإحكام في الأخدود | بطرف أكريليك أو خشب صلب |
| إزميل ضيق (1/8 بوصة) | إزالة الشريحة القديمة وتنظيف الأخدود | شفرة فولاذية، مقبض خشبي |
| مطرقة مطاطية | طرق الشريحة في الأخدود دون إتلاف | رأس مطاطي، مقبض خشبي |
| مشرط 3 / سكين حلاقة | قطع القصب الزائد وتشذيب نهايات الشريحة | شفرة فولاذية قابلة للسحب |
| مقصات شديدة التحمل 4 | تشذيب شبكة القصب بالحجم التقريبي | فولاذ مقاوم للصدأ |
| زجاجة رذاذ | الحفاظ على رطوبة القصب أثناء التركيب | بلاستيك |
| مشابك أو أوزان | تثبيت الشبكة مشدودة أثناء التجفيف | معدن أو كيس رمل |
أوتاد خشبية مقابل أوتاد أكريليك
هذا نقاش نراه كثيرًا بين عملائنا بالجملة. الأوتاد الخشبية التقليدية تعمل بشكل جيد. إنها رخيصة وسهلة الاستبدال. لكنها تنتفخ عند تعرضها للبلل. بما أنك تعمل مع قصب رطب، يمكن للأوتاد الخشبية أن تتمدد داخل الأخدود وتلتصق. الأوتاد الأكريليكية لا تمتص الماء. تبقى بنفس الحجم. كما أنها تسمح لك بالرؤية من خلالها إلى الأخدود، مما يساعد في المحاذاة. توصيتنا للمناطق المناخية الرطبة أو بيئات الإنتاج هي الأكريليك. للاستخدام المنزلي العرضي، الخشب مناسب تمامًا.
أدوات ضغط الشرائح: ما الذي تبحث عنه
تتميز أداة الضغط الجيدة بحافة مسطحة على جانب واحد وحافة منحنية على الجانب الآخر. الحافة المسطحة تثبت القصب في الأخدود المستقيم. الحافة المنحنية تتعامل مع الزوايا والمنحنيات. تحتوي بعض الأدوات على عجلة دوارة مدمجة، مما يسرع العمليات الطويلة على أبواب الخزائن أو ألواح الرأس. لقد رأينا مصانع أثاث في هولندا وإسبانيا تتحول بالكامل إلى أدوات ذات نهايات أكريليكية لأنها لا تترك علامات على القصب الرطب بالطريقة التي تفعلها الخشب العاري.
أدوات تنظيف الأخدود
قبل أي تركيب جديد، يجب عليك تنظيف الأخدود القديم. أدوات طب الأسنان، الأزاميل الضيقة، وحتى مفكات البراغي المسطحة الصغيرة تعمل هنا. الهدف هو إزالة كل قطعة من الغراء القديم وشظايا الشرائح. الأخدود المتسخ يعني أن الشريحة الجديدة لن تستقر بشكل صحيح. غالبًا ما يتخطى المبتدئون هذه الخطوة، وهي أكبر سبب لانفصال الشرائح بعد بضعة أشهر.
حماية سطح العمل الخاص بك
حصيرة مبطنة غير قابلة للانزلاق أو بطانية قديمة تحت قطعة الأثاث الخاصة بك تمنع الخدوش على كل من القطعة وسطح عملك. يبدو هذا بسيطًا، ولكن عندما تقوم بالطرق بالمطرقة عشرات المرات، يمكن أن تتحرك القطعة وتنزلق. سطح مبطن بسيط يحافظ على كل شيء ثابتًا وخاليًا من الخدوش.
كيف أنقع وأجهز شبكة الروطان الطبيعي الخاصة بي بشكل صحيح لتناسب مثالي؟
من خلال خط إنتاجنا في إندونيسيا، نقوم بمعالجة الروطان الخام إلى ألواح شبكية جاهزة كل يوم. أحد الدروس التي تعلمناها بالطريقة الصعبة هو أن النقع غير السليم يفسد المزيد من تركيبات القصب أكثر من أي خطأ آخر. القليل جدًا من النقع يتسبب في تشقق القصب. الكثير منه يجعله طريًا ويفقد هيكله.
انقع قش الروطان الطبيعي الخاص بك في ماء دافئ لمدة 20 إلى 30 دقيقة قبل التركيب. هذا يجعل الألياف مرنة بما يكفي للضغط في الأخدود دون تشقق. انقع أيضًا شريط القصب لمدة 10 إلى 15 دقيقة. لا تتجاوز أبدًا 30 دقيقة، لأن النقع الزائد يضعف ألياف القصب بشكل دائم.

عملية النقع خطوة بخطوة
ابدأ بملء حوض استحمام، أو وعاء كبير، أو حوض بلاستيكي بالماء الدافئ. ليس ساخنًا. ليس باردًا. دافئ. حوالي 80-100 درجة فهرنهايت (27-38 درجة مئوية) مثالي. ضع ورقة القصب المقطوعة مسبقًا بشكل مسطح في الماء. تأكد من أنها مغمورة بالكامل. إذا كانت الورقة تطفو، ضع وزنًا نظيفًا عليها. طبق أو لوح تقطيع صغير يعمل بشكل جيد.
اضبط مؤقتًا لمدة 20 دقيقة. تحقق من القصب عند علامة الـ 20 دقيقة عن طريق ثني زاوية بلطف. يجب أن تنثني بسهولة دون أن تتشقق أو تنكسر. إذا كانت لا تزال تبدو صلبة، امنحها 5 دقائق أخرى. ولكن لا تتجاوز 30 دقيقة إجمالاً.
لماذا النقع الزائد خطير
يصبح القصب المنقوع أكثر من اللازم طريًا جدًا. تفقد الألياف شدها الطبيعي. عندما يجف هذا القصب بعد التركيب، قد لا يشد بشكل صحيح. بدلاً من سطح أملس ومشدود كطبلة، تحصل على لوحة مترهلة وفضفاضة. لقد أعاد لنا عملاء الجملة صفائح القصب مدعين أنها معيبة، ليكتشفوا أن المثبت نقعها طوال الليل. هذا وقت طويل جدًا.
تحضير الشريط اللاصق
ال أوتاد القصب 5 يحتاج أيضًا إلى النقع، ولكن لوقت أقل من لوح القصب. حوالي 10 إلى 15 دقيقة كافية. تريد أن يكون الشريط اللاصق مرنًا بما يكفي للانحناء حول الزوايا دون أن ينكسر، ولكن ليس طريًا جدًا بحيث ينضغط بسهولة في الأخدود. بعد النقع، امسح الشريط اللاصق بمنشفة جافة لإزالة الرطوبة السطحية.
قص القصب حسب الحجم قبل النقع
قم دائمًا بقص لوح القصب الخاص بك بحوالي 2 بوصة أكبر من فتحة الإطار من جميع الجوانب قبل نقعه. توفر هذه المادة الإضافية ما يكفي من القصب للإمساك به باستخدام الأوتاد. بعد التركيب، ستقوم بقص الزائد. القص بعد النقع فوضوي وغير دقيق لأن الألياف المبللة زلقة.
| معيار النقع | نسيج القصب | شريط لاصق من القصب |
|---|---|---|
| درجة حرارة الماء | 80–100 فهرنهايت (دافئ) | 80–100 فهرنهايت (دافئ) |
| مدة النقع | 20-30 دقيقة | 10-15 دقيقة |
| أقصى وقت للنقع | 30 دقيقة | 20 دقيقة |
| خطوة ما بعد النقع | ضع بشكل مسطح، لا تعصر | امسح لتجف بمنشفة |
| خطر النقع الزائد | لوحة مترهلة وفضفاضة | الشريط اللاصق ينضغط بسهولة شديدة |
الحفاظ على القصب رطبًا أثناء التركيب
بمجرد إزالة القصب من الماء، يصبح لديك نافذة عاملة. مع جفاف القصب، يصبح أكثر صلابة. بالنسبة لمقعد كرسي قياسي، عادة ما يكون لديك 30 إلى 45 دقيقة قبل أن يصبح القصب صعب التعامل معه. احتفظ بزجاجة رذاذ قريبة ورش القصب برفق إذا بدأ يشعر بالصلابة أثناء ضغطه في الأخدود. لا تعيد نقع ورقة مثبتة جزئيًا. هذا يسبب توترًا غير متساوٍ.
اتجاه الحبوب مهم
قبل النقع، تحقق من اتجاه حبيبات ورقة القصب الخاصة بك. معظم القصب المنسوج مسبقًا له جانب أمامي وجانب خلفي. الجانب الأمامي أكثر نعومة وتوحيدًا. يظهر الجانب الخلفي المزيد من الألياف الخام. قم دائمًا بالتركيب مع توجيه الجانب الأمامي للأعلى. ضع علامة على هذا قبل النقع، لأنه بمجرد أن يصبح القصب مبللاً، يصبح التمييز بينهما أصعب.
هل يجب أن أستخدم دباسة أو شرائح وغراء لتثبيت شبكة الروطان الخاصة بي؟
يطرح هذا السؤال باستمرار، خاصة من مصانع الأثاث الجديدة التي تتطلع إلى تسريع الإنتاج. قام فريق الهندسة لدينا في فوشان باختبار كلتا الطريقتين على نطاق واسع على مقاعد الكراسي وأبواب الخزائن وألواح الألواح الأمامية. تعتمد الإجابة على نوع مشروعك، ولكن طريقة واحدة تتفوق بوضوح في معظم التطبيقات.
لشبكات الروطان المنسوجة مسبقًا المثبتة في إطار مشقوق، استخدم شرائح القصب وغراء الخشب - وليس دباسة. تقوم الشرائح بتثبيت القصب في الأخدود للحصول على تشطيب نظيف واحترافي. الدباسات مناسبة فقط للتطبيقات ذات الإطارات المسطحة حيث تلتف الشبكة حول الجزء الخلفي من الإطار بدون أخدود.

الشريط اللاصق والغراء: الطريقة القياسية
طريقة الشريط اللاصق والغراء هي المعيار الصناعي للإطارات ذات الأخدود. إليك سبب نجاحها. الأخدود في إطارك هو قناة ضيقة مشكلة في الخشب. تقوم بضغط القصب في هذه القناة باستخدام أوتاد. ثم تقوم بتطبيق خط رفيع من غراء خشب 7 على طول قاع الأخدود. أخيرًا، تدفع الشريط اللاصق المصنوع من القصب فوق القصب في الأخدود. يقوم الشريط اللاصق بتثبيت القصب على جدران الأخدود. يجف الغراء ويثبت كل شيء بشكل دائم.
تمنح هذه الطريقة تشطيبًا متساويًا تمامًا. لا توجد مثبتات مرئية. لا توجد رؤوس دبابيس لتصدأ أو تعلق النسيج. يجلس سطح القصب بشكل مسطح ومشدود عبر فتحة الإطار.
كيفية اختيار الغراء الخاص بك
اختيار الغراء مهم أكثر مما يدرك معظم الناس. هناك ثلاثة خيارات شائعة.
| نوع الغراء | الأفضل لـ | الإيجابيات | السلبيات |
|---|---|---|---|
| PVA (غراء إلmer الأبيض) 8 | مشاريع DIY العامة | سهل العثور عليه، يجف شفافًا، رابط قوي | قد يصفر بمرور السنين، غير قابل للعكس |
| غراء خشب شفاف 9 | بيئات الإنتاج | أقوى من غراء PVA الأبيض، مقاوم للرطوبة | أصعب في التنظيف |
| غراء الجيلاتين 10 | ترميم التحف | قابل للعكس بالحرارة/البخار، تقليدي | يتطلب التسخين، وقت عمل أقصر |
بالنسبة لمعظم العملاء بالجملة ومصانع الأثاث، نوصي بغراء الخشب الشفاف. إنه يربط جيدًا، ويقاوم الرطوبة بشكل أفضل من غراء PVA الأبيض، ويجف بشكل شبه غير مرئي. بالنسبة لأعمال ترميم التحف، يعتبر غراء الجيلاتين هو الخيار الصحيح لأنه يسمح بالإصلاحات المستقبلية دون تدمير الإطار.
متى يكون استخدام الدباسة مناسبًا
للدباسات مكانها، ولكن ليس في الإطارات ذات الأخدود. تستخدم بعض تصاميم الأثاث إطارًا مسطحًا بدون أخدود. في هذه الحالات، يلتف نسيج القصب حول الجزء الخلفي من الإطار ويتم تدبيسه مباشرة على الخشب. ثم يتم تغطية الحافة المدبسة بقطعة زخرفية، أو شريط مزخرف، أو قالب زخرفي.
هذه الطريقة أسرع. إنها تعمل مع الألواح المنجدة حيث يقع النسيج خلف القماش. وهو شائع في مساند الرأس والألواح الجدارية الزخرفية. لكن التشطيب أقل دقة. يمكن أن تسحب الدبابيس القصب إذا كان النسيج تحت الشد. يمكن أن تصدأ أيضًا في البيئات الرطبة، مما يلطخ القصب.
تحديد حجم الشريحة: احصل على هذا بشكل صحيح
مطابقة الشريحة لعرض الأخدود الخاص بك أمر بالغ الأهمية. إذا كانت الشريحة رفيعة جدًا، فلن تثبت القصب بشكل آمن. سميكة جدًا، وتخاطر بشق الأخدود أو كسر الإطار. قم بقياس عرض الأخدود باستخدام الفرجار قبل طلب الشريحة.
عرض الأخدود الشائع لمقاعد الكراسي هو 3/16 بوصة إلى 1/4 بوصة. شريحة 1/8 بوصة تناسب أخدود 3/16 بوصة. شريحة 1/8.5 بوصة تناسب أخدود 1/4 بوصة قياسي. عند الشك، اطلب عينة صغيرة أولاً. نبيع الشرائح بالقدم لهذا السبب بالضبط - حتى يتمكن العملاء من اختبار الملاءمة قبل الالتزام بطلب بالجملة.
تطبيق الغراء بشكل صحيح
ضع طبقة رقيقة ومستمرة من الغراء على طول الجزء السفلي من الأخدود بعد تثبيت القصب ولكن قبل إدخال الشريحة. لا تغمر الأخدود. يخرج الغراء الزائد على سطح القصب ويخلق بقعًا مرئية يصعب إزالتها تقريبًا من الخيزران الطبيعي. زجاجة ضغط صغيرة ذات طرف دقيق تمنحك أقصى قدر من التحكم.
ما هي المستلزمات التي ستساعدني في تشذيب وإنهاء حواف مشروع الروطان الخاص بي؟
مرحلة التشذيب والتشطيب هي المكان الذي يصبح فيه التركيب الجيد رائعًا. لقد رأينا العديد من الأعمال الصلبة الأخرى تُفسد بسبب العمل الهامشي غير الدقيق. من تجربتنا في تصدير مجموعات نسيج القصب إلى العملاء في أوروبا والشرق الأوسط، فإن التعليقات متسقة: يلاحظ العملاء الحواف الخشنة على الفور.
لتقليم حواف قصب الروطان وإنهاءها، تحتاج إلى سكين حلاقة حاد أو سكين متعدد الاستخدامات، ومقصات قوية، ومطرقة مطاطية، ولوح مسطح أو قطعة خشب رقائقي لمقعد الشرائح النهائي، وورق صنفرة ناعم أو مبشرة لتنعيم حواف الأخدود، وقطعة قماش مبللة لتنظيف الغراء الزائد.

تشذيب القصب الزائد
بعد تثبيت الشريحة وتطبيق الغراء، سيكون لديك قصب زائد يبرز فوق الأخدود من جميع الجوانب الأربعة. هذا هو التداخل من القطع الأولي بحجم 2 بوصة. لإزالته، قم بتمرير سكين متعدد الاستخدامات حاد على طول الحافة الخارجية للأخدود. حافظ على الشفرة قريبة من الشريحة. استخدم ضربة واحدة ناعمة بدلاً من النشر ذهابًا وإيابًا. النشر يؤدي إلى تآكل القصب ويترك حافة فوضوية.
استبدل شفرتك بشكل متكرر. الخيزران الطبيعي قاسٍ بشكل مدهش على حواف السكين. الشفرة غير الحادة تمزق بدلاً من القطع. لبيئة إنتاجية تعالج عدة كراسي في اليوم، نوصي بوجود 10 شفرات احتياطية على الأقل في متناول اليد.
قطع نهايات الشريحة
حيث تلتقي نهايات الشريحة - عادةً عند زاوية - قم بقطع كلا الطرفين بزاوية 45 درجة. هذا يخلق وصلة مشطوفة تبدو احترافية ويمنع نهايات الشريحة من الارتفاع. استخدم سكينًا حادًا، وليس مقصًا، لهذا القطع. المقص يسحق ألياف الشريحة بدلاً من قطعها بشكل نظيف.
التثبيت النهائي للشريحة
بعد التشذيب، قم بتمرير الشريحة بأكملها مرة أخرى باستخدام مطرقة ولوح مسطح. ضع اللوح فوق الشريحة واضربه برفق بالمطرقة. هذا يضمن أن الشريحة متساوية تمامًا مع سطح الإطار. بدون هذه الخطوة، قد يكون لديك أقسام حيث تكون الشريحة بارزة قليلاً عن الإطار، مما يخلق سطحًا غير مستوٍ يلتصق بالملابس أو الجلد.
تنعيم حواف الأخدود
قبل البدء في التركيب، يساعد شطف الحافة الداخلية للأخدود باستخدام مبرد أو ورق صنفرة ناعم (حبيبات 180 إلى 220). يمكن أن تقطع حواف الأخدود الحادة أو تمزق القصب أثناء التركيب. شطف طفيف - مجرد تمريرة أو اثنتين بالمبرد - يلغي هذا الخطر. هذا مهم بشكل خاص على الإطارات الخشبية الصلبة حيث يمكن أن يكون للأخدود الموجه زوايا حادة جدًا.
مستلزمات التنظيف
| التوريد | الغرض | متى تستخدم |
|---|---|---|
| قطعة قماش مبللة | امسح الغراء الزائد من سطح القصب | فورًا بعد تثبيت الرباط |
| ورق صنفرة ناعم (حصى 220) | قم بتنعيم أي بقع خشنة على الإطار | قبل وبعد التركيب |
| روح معدنية (كمية صغيرة) | قم بإزالة بقع الغراء الجافة العنيدة | بعد أن يجف الغراء، 24 ساعة |
| شمع الأثاث أو الزيت | قم بحماية وتشطيب سطح القصب | بعد التجفيف الكامل، 24-48 ساعة |
| شريط لاصق | قم بحماية تشطيب الإطار أثناء التشذيب | أثناء خطوة تشذيب السكين |
التجفيف والمعالجة
بعد التركيب، اترك المشروع ليجف لمدة 24 إلى 48 ساعة قبل الاستخدام. مع جفاف القصب، ينكمش قليلاً ويشد عبر فتحة الإطار. هذا ما يعطي لوحة القصب المثبتة بشكل صحيح مظهرها المميز المشدود كالطبل. لا تستعجل هذه الخطوة. الجلوس على كرسي تم تجديده حديثًا قبل أن يجف الغراء ويجف القصب يمكن أن يتسبب في تحول الرباط.
أثناء التجفيف، يمكنك وضع أوزان خفيفة أو مشابك على الإطار للحفاظ على كل شيء مسطحًا. تجنب أشعة الشمس المباشرة أو مصادر الحرارة، والتي يمكن أن تجفف القصب بسرعة كبيرة وتسبب التشقق. بيئة درجة حرارة الغرفة مع رطوبة معتدلة مثالية.
أخطاء التشطيب الشائعة
الخطأ الأكثر شيوعًا في التشطيب هو القص المفرط. إذا قطعت في نسيج القصب أسفل الشريط، فإنك تضعف اللوحة. خطأ آخر متكرر هو عدم تنظيف الغراء فورًا. يجف غراء الخشب شفافًا ولكنه يترك طبقة لامعة على القصب الطبيعي تبدو غير مناسبة. قطعة قماش مبللة تستخدم في الدقائق القليلة الأولى تعالج هذا بسهولة.
خاتمة
وجود الأدوات والمستلزمات المناسبة قبل البدء يجعل تركيب نسيج القصب المصنوع من الروطان مباشرًا ومجزيًا. من النقع المناسب إلى قياس الشريط والقص الدقيق للحواف، كل خطوة مهمة للحصول على نتيجة احترافية.
ملاحظات سفلية
1. أدوات تفصيل متخصصة للموردين، بما في ذلك الأوتاد، لتركيب القصب. ↩︎
2. يصف وظيفة وتصميم أداة مخصصة لضغط الشريط في نسيج القصب. ↩︎
3. يوفر إرشادات السلامة والاستخدام السليم للسكاكين متعددة الاستخدامات في تطبيقات مختلفة. ↩︎
4. يشرح الغرض العام وأنواع المقصات، بما في ذلك المقصات الثقيلة. ↩︎
5. يشرح دور شريط القصب المصنوع من الخيزران في الحرفة التقليدية لتنجيد الكراسي. ↩︎
6. يوفر نظرة عامة على الروطان، الذي يُشتق منه نسيج القصب. ↩︎
7. توفر ويكيبيديا نظرة عامة شاملة وموثوقة على أنواع مختلفة من غراء الخشب. ↩︎
8. يعرف بولي فينيل أسيتات (PVA) واستخداماته الشائعة كمادة لاصقة للخشب. ↩︎
9. هذه صفحة منتج رسمية لعلامة تجارية معروفة من غراء الخشب الذي يجف شفافًا بشكل خاص. ↩︎
10. تحتوي صفحة ويكيبيديا الخاصة بالغراء الحيواني على قسم مخصص وموثوق به حول غراء الجلد. ↩︎

