سنوات من الشحن rattan cane webbing 1 to furniture factories worldwide taught us one hard truth. Even the finest Grade A webbing can crack, wrinkle, or sag if you skip proper preparation before installation.
Preparing rattan cane webbing before installation involves soaking it in water for 30 minutes to 3 hours to achieve pliability, accurately measuring and cutting with 1–2 inches of extra material on each side, inspecting the webbing for defects, and optionally applying a protective finish to extend its lifespan.
Each step in the preparation process matters. Skip one, and you risk damaged material or a loose, uneven finish. Below, we walk through every stage so you get a perfect result on your first try.
How long should I soak my rattan cane webbing to make it pliable for installation?
Across our three factories, we process thousands of meters of rattan webbing each month. The single most common mistake we see from first-time buyers is either skipping the soak entirely or leaving the cane underwater far too long.
Soak natural rattan cane webbing in warm water for 30 minutes to 1 hour for flat stapling projects, or up to 3–4 hours for grooved spline installations. Cool water is gentler on natural fibers, while warm water speeds up the softening process for machine-woven sheet cane.

Getting the soak time right is the single most important step in rattan preparation. Dry rattan is rigid and brittle. It cracks easily when bent, stretched, or pushed into a groove. Soaking lets water penetrate the الألياف الطبيعية 2, making them flexible enough to handle without breaking.
Why Soaking Is Essential
Natural rattan cane 3 is a dried plant material. When it leaves our processing facility in Indonesia, it has been dried and woven into rolls. In this state, the fibers are stiff. If you try to staple, fold, or press dry webbing into a spline groove, you will hear it snap. Soaking restores the natural flexibility of the cane.
There is also a second benefit. Wet rattan shrinks as it dries after installation. This means the webbing tightens on the frame, giving you a taut, drum-like finish without any sagging. This "shrink-to-fit" property only works if you soak the cane first.
Water Temperature Matters
Not all soaking methods produce the same result. Water temperature plays a key role.
| عامل | Warm Water (30–40°C) | Cool Water (Room Temp) |
|---|---|---|
| Best for | Machine-woven sheet cane | Natural hand-woven rattan |
| Soak time | 30 minutes – 1 hour | 1 – 3 hours |
| الإيجابيات | Faster softening, flattens curled rolls quickly | Gentler on fibers, less risk of warping |
| السلبيات | Can cause brittleness if too hot | Takes longer to achieve pliability |
| Avoid | Water above 50°C / 120°F (damages fibers) | Ice-cold water (ineffective softening) |
When we advise our wholesale clients in the US and Europe, we always recommend starting with cool-to-warm water. Never use hot or boiling water. High heat breaks down the natural lignin 4 in rattan and makes it fragile after drying.
Soak Time by Project Type
Different installations need different soak durations. Here is a quick reference guide based on the feedback we gather from furniture factories across our export markets.
| Installation Type | وقت النقع الموصى به | ملاحظات |
|---|---|---|
| Flat stapling to a frame | 30 دقيقة | Cane only needs surface flexibility |
| Gluing to a flat panel | 30–45 دقيقة | Ensure cane lies flat, no curling |
| Cabinet door panels | 1-2 ساعة | Needs deeper suppleness for trimming |
| Grooved spline chair seat | 2-4 ساعات | Must be very pliable for tamping into groove |
| Large wall panels | 1-2 ساعة | Prevents cracking during stretching |
After soaking, remove the webbing and gently shake off excess water. Do not wring it. Lay it flat on a clean towel or drape it over a dowel until you are ready to install. Work quickly once the cane is out of the water. It begins to dry and stiffen within 20–30 minutes depending on ambient temperature and humidity.
One Important Warning
Over-soaking is a real risk. If you leave natural rattan in water for more than 6 hours, the fibers can become mushy. This leads to a weak, saggy finish after drying. In humid climates, over-soaked cane can also develop mold if not dried properly. The sweet spot is always between 30 minutes and 4 hours depending on your project.
Also, synthetic rattan webbing does not need soaking at all. It is made from plastic or resin and is already flexible. If you are unsure whether your webbing is natural or synthetic, check with your supplier. At our company, we always label and classify the material clearly on every roll we ship.
How do I properly measure and cut the rattan mesh to ensure a perfect fit for my project?
When we prepare custom-cut rattan webbing orders for furniture factories in the Netherlands and Australia, precision is everything. A single centimeter off on a bulk order can mean wasted material and delayed production lines.
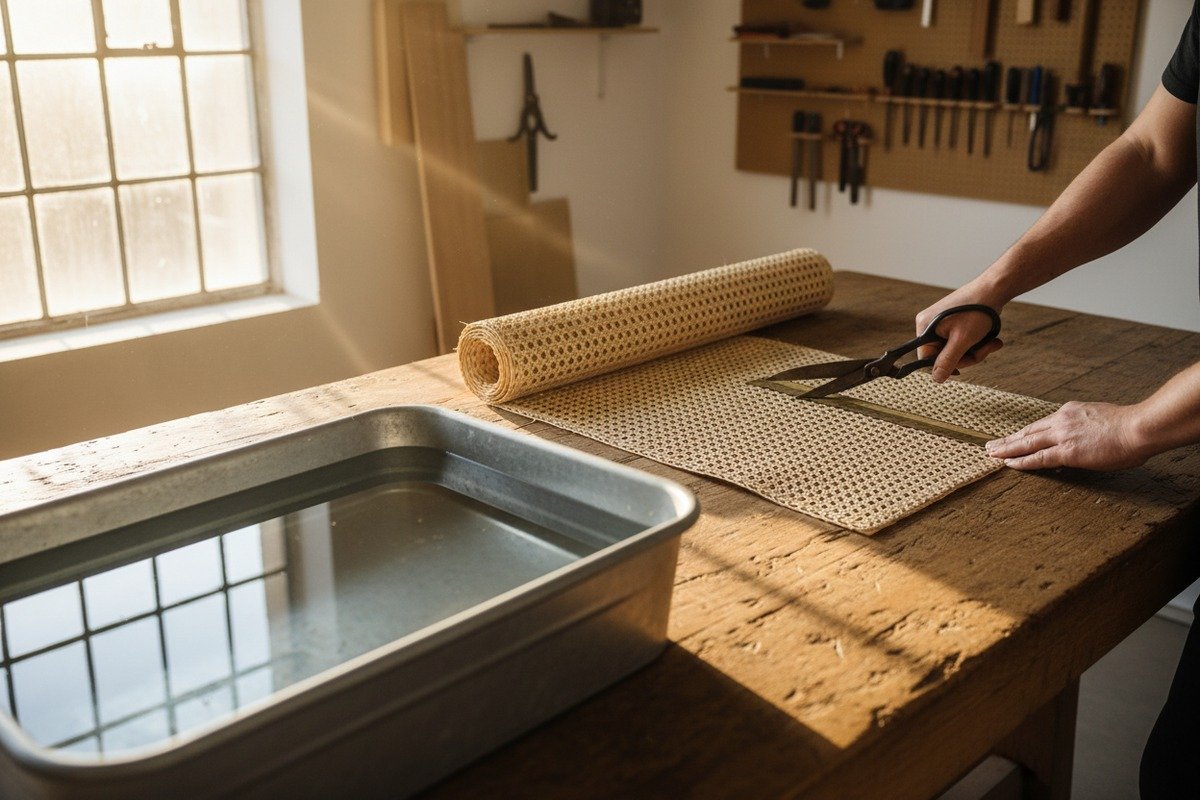
Measure the exact dimensions of your frame opening or panel area, then add 1 to 2 inches of extra material on all sides before cutting. Use a sharp utility knife or heavy-duty scissors to cut along the weave lines, and always do a dry test-fit before soaking the cane.

Cutting rattan webbing is not like cutting fabric. The woven structure can unravel at the edges if you cut carelessly. And unlike fabric, you cannot sew it back together. So every cut needs to be clean and deliberate.
Step-by-Step Measuring Process
First, measure the frame opening where the webbing will sit. Use a metal measuring tape for accuracy. Measure both the width and the height. Write the numbers down. Do not rely on memory.
Next, add your overlap allowance. For flat stapling or gluing, add 1 inch on each side. For grooved spline installations 5, add 1.5 to 2 inches on each side. This extra material gives you room to grip, stretch, and secure the cane.
If you are working with a round or irregular opening, use a piece of paper or cardboard to create a template. Trace the shape, then add your overlap before transferring the dimensions to the webbing.
Cutting Tips That Prevent Waste
Lay the webbing flat on a large, clean surface. A workbench or the floor works well. Smooth out any curls or wrinkles. Use weights or clamps to hold the edges down if the roll wants to curl back.
Mark your cut lines with a pencil or chalk directly on the webbing. Cut along a row of weave if possible. This keeps the edge tidy and prevents fraying. A sharp سكين متعدد الاستخدامات 6 with a straight edge gives the cleanest cut. Heavy-duty scissors also work, but they can pinch and distort the weave if they are not sharp enough.
Dry Fit Before You Commit
This is a tip we always share with our B2B clients. Before soaking, hold the cut piece up to the frame. Check that it covers the entire opening with even overlap on all sides. Look at the pattern alignment. Most rattan webbing has a "right side" — the shiny side — which should face outward. Confirm this during the dry fit.
A dry fit takes two minutes. It can save you from cutting a second piece and wasting material. For large or complex installations — like full wall panels or multi-panel cabinets — a dry fit is essential.
Common Cutting Mistakes
Cutting too close to the edge without overlap means you have nothing to grip during stretching. Cutting at an angle to the weave causes fraying. Using dull scissors crushes the fibers instead of slicing them. All of these lead to poor results. Take your time, use sharp tools, and always cut slightly larger than you think you need.
What is the best way to clean and inspect my rattan rolls for quality before I begin?
لدينا quality control team 7 checks every roll before it ships from our Foshan warehouse. But once the product arrives at your facility or home workshop, a second inspection is always a smart move. Transit can cause damage that was not there when the roll left us.
Before installation, unroll your rattan webbing on a flat surface and visually inspect it for broken strands, discoloration, mold spots, or uneven weave patterns. Wipe it gently with a damp cloth to remove dust and debris, then let it air-dry completely before soaking.

Quality inspection takes only a few minutes, but it can save you hours of frustration. A single broken strand in the middle of a panel becomes very visible once the piece is installed. Catching problems early lets you address them before they are permanent.
What to Look For During Inspection
Unroll the webbing completely. Lay it flat. Walk along its length and look for the following issues:
- Broken strands: Small gaps or snapped fibers in the weave. A few are normal in natural rattan. Too many indicate poor quality or shipping damage.
- Discoloration: Dark spots, water stains, or uneven color. Some natural variation is expected, but large dark patches may indicate mold or rot.
- Mold or mildew: Fuzzy white or green spots. This happens when rattan is stored in humid conditions. Mold weakens the fibers and can spread.
- Uneven weave: Sections where the pattern shifts, bunches, or has gaps. This affects the visual appearance of the finished project.
- Crushed edges: Damage from tight packing or stacking during shipping.
Cleaning the Webbing
Use a soft, damp cloth to wipe down both sides of the webbing. This removes dust, sawdust from processing, and any surface debris. Do not use soap, detergent, or chemical cleaners at this stage. They can leave residue that interferes with glue adhesion or finish absorption later.
For stubborn dust in the weave openings, a soft-bristle brush works well. Brush gently in the direction of the weave. Avoid scrubbing hard, as this can loosen the strands.
After wiping, let the webbing air-dry for 15–30 minutes before proceeding to the soaking step. You want it clean but dry before it goes into the water.
Inspecting the Frame Too
Preparation is not only about the webbing. The frame or surface where you plan to install it also needs attention. Remove all old glue, staples, or remnants of previous cane. Sand any rough edges that could snag the new webbing. Wipe the frame with a dry cloth to remove dust. A clean, smooth frame ensures a flush, even installation.
For grooved spline installations, inspect the groove itself. Old spline material or dried glue inside the groove will prevent the new spline from seating properly. Use a flathead screwdriver or chisel to clean out the channel. Check that the groove depth is consistent all the way around the frame.
Dealing with Defective Material
If you find significant damage — large mold patches, multiple broken strands in a concentrated area, or severe discoloration — contact your supplier before proceeding. At our company, we have a clear process for handling quality claims. We ask for photos of the defect with a measurement reference, and we resolve issues quickly because our reputation depends on it. A trustworthy rattan wholesaler will always stand behind their product quality.
Should I apply any specific treatments or finishes to my rattan webbing before mounting it?
From our experience supplying rattan to markets with very different climates — from humid Thailand to dry Saudi Arabia — we know that one finish does not fit all situations. The treatment you choose depends on where the final product will live.
Applying a protective finish before mounting is optional but recommended for longevity. A light coat of clear lacquer, polyurethane, or natural oil protects rattan from moisture, UV damage, and dirt. Apply the finish after soaking and drying, or after installation, depending on the product type.

Many DIY installers and even some furniture factories skip this step. The webbing looks great right out of the roll. But without protection, natural rattan degrades faster. Sunlight yellows it. Moisture warps it. Dust settles into the open weave and becomes hard to clean. A simple finish extends the life of your project by years.
When to Apply a Finish
There are two schools of thought here. Some professionals apply a finish before installation, while the webbing is still flat and easy to coat evenly. Others prefer to apply it after installation, once the webbing is taut and dry on the frame.
Both approaches work. Here is a comparison.
| Timing | الإيجابيات | السلبيات |
|---|---|---|
| Before installation | Even coverage on both sides; easier to handle flat material | Finish may crack slightly during stretching; need to re-soak after if using water-based soaking |
| After installation | No risk of finish cracking during install; webbing is already taut | Hard to coat the back side; may drip on frame |
For most projects, we recommend applying finish after installation. Wait until the webbing has fully dried and tightened — usually 24 to 48 hours. Then apply one to two thin coats of your chosen product.
Types of Protective Finishes
Not every finish suits rattan. Heavy, thick coatings clog the weave and look unnatural. Here are the most common options:
- Clear spray lacquer: Fast-drying, even coverage, and preserves the natural color. Best for indoor furniture like cabinet doors and headboards.
- Polyurethane (water-based): Durable and moisture-resistant. Good for pieces in bathrooms or kitchens where humidity is higher. Apply with a foam brush in thin coats.
- Tung oil or linseed oil: Natural options that soak into the fibers and enhance the warm, honey color of rattan. They do not form a hard surface film, so reapplication every 1–2 years is needed.
- UV-resistant spray: For pieces near windows or in sunrooms. Prevents yellowing and fiber degradation from sunlight exposure.
- Beeswax: A gentle, eco-friendly option. It adds a subtle sheen and repels light moisture. Best for decorative pieces that will not see heavy use.
Pre-Treated and Pre-Finished Options
Some of our clients, especially those purchasing bleached rattan cane webbing, ask whether they still need to apply a finish. Bleached rattan has already been chemically processed to lighten its color. This process can slightly weaken the fibers, so a protective coat is actually more important, not less.
We also supply pre-finished webbing for certain orders. These rolls come with a factory-applied sealant that provides basic UV and moisture resistance. They are a good option for high-volume furniture production where applying finish to each piece individually is not practical.
For eco-conscious buyers — and we see this trend growing rapidly in Europe and Australia — natural oil finishes are the preferred choice. They are non-toxic, biodegradable, and align with the sustainable appeal that draws people to rattan in the first place.
Climate Considerations
If the finished piece will live in a high-humidity environment, consider a moisture-repellent sealant. In dry climates, an oil-based finish prevents the rattan from becoming too brittle over time. The right finish depends on the end use and location. Always test on a small, hidden section before coating the entire piece.
خاتمة
Proper preparation is what separates a professional rattan installation from a disappointing one. Soak, measure, inspect, and finish — do these four steps well, and your rattan cane webbing will look beautiful and last for years.
ملاحظات سفلية
1. Provides a comprehensive overview of rattan, its origin, and uses. ↩︎
2. Explains the general characteristics and properties of natural fibers. ↩︎
3. Replaced HTTP 404 with an authoritative Wikipedia page on rattan. ↩︎
4. Defines lignin and its crucial role in plant structure and rigidity. ↩︎
5. Details the process of installing cane webbing using a spline method. ↩︎
6. Describes the common uses and types of utility knives for various tasks. ↩︎
7. Explains the principles and importance of quality control in manufacturing. ↩︎
8. Provides authoritative information on mold, its causes, and prevention. ↩︎
9. Discusses various types of protective finishes and their benefits for wood. ↩︎
10. Explains how ultraviolet radiation affects and degrades various materials. ↩︎

