After years of shipping rattan webbing rolls from our factories in Foshan and Indonesia, one question keeps popping up from our wholesale clients and their end users alike: what exactly do you need to install it wooden or acrylic wedges 1? Many DIY enthusiasts and furniture factories grab a sheet of beautiful pre-woven cane only to realize they are missing a critical tool or supply, leading to cracked splines, loose webbing, and wasted material.
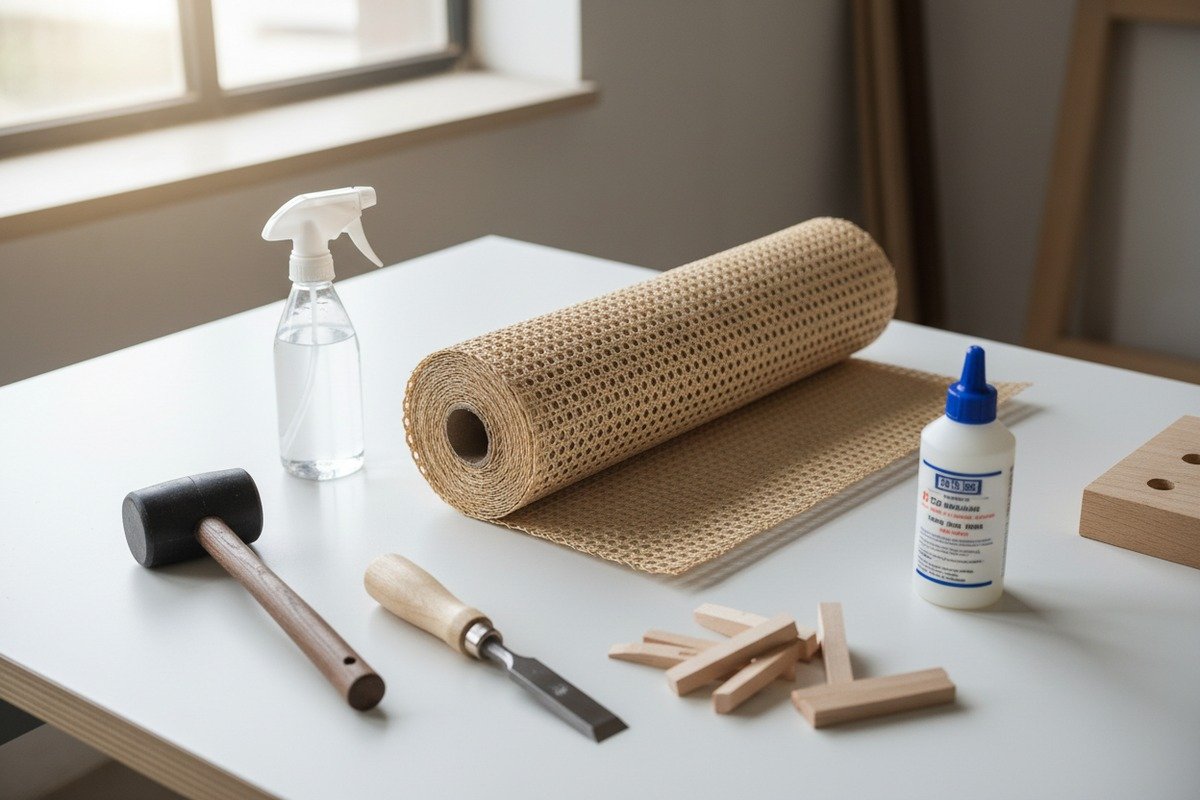
Installing natural rattan cane webbing requires pre-woven cane sheets, reed spline matched to your groove width, wood glue, wooden or plastic wedges, a spline pressing tool, a chisel, a rubber mallet, a utility knife, and a spray bottle or soaking tub for dampening the cane before fitting.
This guide walks you through every tool and supply you need, from the soaking stage to the final trim spline pressing tool 2. Whether you are a furniture factory buyer stocking up for production or a wholesaler advising your retail customers, the details below will help you get every installation right the first time.
What essential tools should I include in my rattan cane installation kit?
When we pack cane webbing kits for our export clients in the US and Australia, the number one complaint we hear is about missing or wrong-sized tools. A beautiful sheet of hexagonal rattan cane can turn into a frustrating mess if you do not have the right kit ready before you start.
Your rattan cane installation kit should include wooden or acrylic wedges, a spline roller or pressing tool, a narrow chisel or spline remover, a rubber mallet, a sharp utility knife, heavy-duty scissors, a spray bottle, and clamps or weights for holding the webbing in place during drying.

The Core Tool List
Let us break this down into what you truly need versus what is optional. Every tool serves a specific job in the installation process. Skip one, and you risk damaging the cane or the frame.
| Tool | Objectif | Material Options |
|---|---|---|
| Wedges (set of 5) | Push cane into groove temporarily | Wood, acrylic, or plastic |
| Spline roller / pressing tool | Seat cane and spline firmly into groove | Acrylic-tipped or hardwood |
| Narrow chisel (1/8") | Remove old spline and clean groove | Steel blade, wood handle |
| Rubber mallet | Tap spline into groove without damage | Rubber head, wood handle |
| Utility knife 3 / razor knife | Cut excess cane and trim spline ends | Retractable steel blade |
| Heavy-duty scissors 4 | Trim cane webbing to rough size | Stainless steel |
| Spray bottle | Keep cane damp during install | Plastic |
| Clamps or weights | Hold webbing taut while drying | Metal or sandbag |
Wood Wedges vs. Acrylic Wedges
This is a debate we see often among our wholesale clients. Traditional wood wedges work fine. They are cheap and easy to replace. But they swell when wet. Since you are working with damp cane, wooden wedges can expand inside the groove and get stuck. Acrylic wedges do not absorb water. They stay the same size. They also let you see through to the groove, which helps with alignment. Our recommendation for humid climates or production environments is acrylic. For occasional home use, wood is perfectly adequate.
Spline Pressing Tools: What to Look For
A good pressing tool has a flat edge on one side and a curved edge on the other. The flat edge seats the cane into straight grooves. The curved edge handles corners and curves. Some tools have a roller wheel built in, which speeds up long runs on cabinet doors or headboards. We have seen furniture factories in the Netherlands and Spain switch entirely to acrylic-ended tools because they do not mark the wet cane the way bare wood does.
Groove Cleaning Tools
Before any new installation, you must clean the old groove. Dental picks, narrow chisels, and even small flathead screwdrivers work here. The goal is to remove every bit of old glue and spline fragment. A dirty groove means the new spline will not seat properly. This step is often skipped by beginners, and it is the single biggest cause of spline popping out after a few months.
Protecting Your Work Surface
A non-slip padded mat or an old blanket under your furniture piece prevents scratches on both the item and your workbench. This sounds minor, but when you are tapping a mallet dozens of times, the piece can shift and slide. A simple padded surface keeps everything stable and scratch-free.
How do I properly soak and prepare my natural rattan webbing for a perfect fit?
Through our production line in Indonesia, we process raw rattan into finished webbing sheets every day. One lesson we have learned the hard way is that improper soaking ruins more cane installations than any other mistake. Too little soaking and the cane cracks. Too much and it becomes mushy and loses its structure.
Soak your natural rattan cane webbing in warm water for 20 to 30 minutes before installation. This makes the fibers pliable enough to press into the groove without cracking. Also soak the reed spline for 10 to 15 minutes. Never exceed 30 minutes, as over-soaking weakens the cane fibers permanently.

Step-by-Step Soaking Process
Start by filling a bathtub, large basin, or plastic tub with warm water. Not hot. Not cold. Warm. Around 80–100°F (27–38°C) is ideal. Lay your pre-cut cane sheet flat in the water. Make sure it is fully submerged. If the sheet floats, place a clean weight on top. A plate or small cutting board works well.
Set a timer for 20 minutes. Check the cane at the 20-minute mark by gently bending a corner. It should flex easily without cracking or snapping. If it still feels stiff, give it another 5 minutes. But do not go past 30 minutes total.
Why Over-Soaking Is Dangerous
Over-soaked cane becomes too soft. The fibers lose their natural tension. When this cane dries after installation, it may not tighten properly. Instead of a smooth, drum-tight surface, you get a saggy, loose panel. We have had wholesale clients return cane sheets claiming they were defective, only to discover the installer soaked them overnight. That is far too long.
Preparing the Spline
Le lamelle de rotin 5 also needs soaking, but less time than the cane sheet. About 10 to 15 minutes is enough. You want the spline flexible enough to bend around corners without snapping, but not so soft that it compresses too easily in the groove. After soaking, wipe the spline with a dry towel to remove surface moisture.
Cutting the Cane to Size Before Soaking
Always cut your cane sheet about 2 inches larger than the frame opening on all sides before you soak it. This extra material gives you enough cane to grip with the wedges. After installation, you will trim the excess. Cutting after soaking is messy and imprecise because the wet fibers are slippery.
| Soaking Parameter | Cane Webbing | Reed Spline |
|---|---|---|
| Water temperature | 80–100°F (warm) | 80–100°F (warm) |
| Soaking duration | 20–30 minutes | 10–15 minutes |
| Maximum soak time | 30 minutes | 20 minutes |
| Post-soak step | Lay flat, do not wring | Wipe dry with towel |
| Risk of over-soaking | Saggy, loose panel | Spline compresses too easily |
Keeping the Cane Damp During Installation
Once you remove the cane from the water, you have a working window. As the cane dries, it stiffens. For a standard chair seat, you typically have 30 to 45 minutes before the cane becomes difficult to work with. Keep a spray bottle nearby and mist the cane lightly if it starts to feel stiff while you are still pressing it into the groove. Do not re-soak a partially installed sheet. That causes uneven tension.
Grain Direction Matters
Before soaking, check the grain direction of your cane sheet. Most pre-woven cane has a front side and a back side. The front side is smoother and more uniform. The back side shows more of the raw fiber. Always install with the front side facing up. Mark this before soaking, because once the cane is wet, telling the difference becomes harder.
Should I use a staple gun or spline and glue to secure my rattan mesh?
This question comes up constantly, especially from new furniture factories looking to speed up production. Our engineering team in Foshan has tested both methods extensively on chair seats, cabinet doors, and headboard panels. The answer depends on your project type, but one method is clearly superior for most applications.
For pre-woven rattan cane webbing installed in a grooved frame, use reed spline and wood glue — not a staple gun. The spline locks the cane into the groove for a clean, professional finish. Staple guns are only appropriate for flat-frame applications where the webbing wraps around the back of the frame without a groove.

Spline and Glue: The Standard Method
The spline and glue method is the industry standard for grooved frames. Here is why it works. The groove in your frame is a narrow channel routed into the wood. You press the cane into this channel using wedges. Then you apply a thin bead of de la colle à bois 7 along the bottom of the groove. Finally, you push the reed spline on top of the cane into the groove. The spline wedges the cane against the groove walls. The glue cures and locks everything permanently.
This method gives a perfectly flush finish. No visible fasteners. No staple heads to rust or catch fabric. The cane surface sits flat and tight across the frame opening.
How to Choose Your Glue
Glue selection matters more than most people realize. There are three common options.
| Glue Type | Idéal pour | Avantages | Inconvénients |
|---|---|---|---|
| PVA (Elmer's white glue) 8 | General DIY projects | Easy to find, dries clear, strong bond | Can yellow over years, not reversible |
| Clear wood glue 9 | Production environments | Stronger than white PVA, moisture resistant | Harder to clean up |
| Hide glue 10 | Antique restoration | Reversible with heat/steam, traditional | Requires heating, shorter working time |
For most wholesale clients and furniture factories, we recommend clear wood glue. It bonds well, resists moisture better than white PVA, and dries nearly invisible. For antique restoration work, hide glue is the correct choice because it allows future repairs without destroying the frame.
When a Staple Gun Makes Sense
Staple guns have their place, but it is not in grooved frames. Some furniture designs use a flat frame with no groove. In these cases, the cane webbing wraps around the back of the frame and is stapled directly to the wood. The stapled edge is then covered with a trim piece, gimp braid, or decorative molding.
This method is faster. It works for upholstered panels where the webbing sits behind fabric. It is common in headboards and decorative wall panels. But the finish is less refined. Staples can pull through the cane if the webbing is under tension. They can also rust in humid environments, staining the cane.
Spline Sizing: Get This Right
Matching the spline to your groove width is critical. If the spline is too thin, it will not hold the cane securely. Too thick, and you risk splitting the groove or cracking the frame. Measure the groove width with calipers before ordering spline.
Common groove widths for chair seats are 3/16" to 1/4". A #8 spline fits a 3/16" groove. A #8.5 spline fits a standard 1/4" groove. When in doubt, order a small sample first. We sell spline by the foot for exactly this reason — so clients can test the fit before committing to a bulk order.
Applying Glue Correctly
Apply a thin, continuous bead of glue along the bottom of the groove after the cane is wedged in but before the spline goes in. Do not flood the groove. Excess glue squeezes out onto the cane surface and creates visible stains that are nearly impossible to remove from natural rattan. A small squeeze bottle with a precision tip gives you the most control.
What supplies will help me trim and finish the edges of my rattan project?
The trimming and finishing stage is where a good installation becomes a great one. We have seen many otherwise solid jobs ruined by sloppy edge work. From our experience exporting cane webbing kits to clients in Europe and the Middle East, the feedback is consistent: customers notice rough edges immediately.
To trim and finish rattan cane webbing edges, you need a sharp razor knife or utility knife, heavy-duty scissors, a rubber mallet, a flat board or plywood scrap for final spline seating, fine-grit sandpaper or a rasp for smoothing groove edges, and a damp cloth for cleaning excess glue.

Trimming Excess Cane
After the spline is seated and the glue has been applied, you will have excess cane sticking up above the groove on all four sides. This is the overhang from your initial 2-inch-oversized cut. To remove it, run a sharp utility knife along the outer edge of the groove. Keep the blade tight against the spline. Use a single, smooth stroke rather than sawing back and forth. Sawing frays the cane and leaves a messy edge.
Replace your blade frequently. Natural rattan is surprisingly tough on knife edges. A dull blade tears instead of cutting. For a production environment processing multiple chairs per day, we recommend having at least 10 spare blades on hand.
Cutting Spline Ends
Where the spline ends meet — usually at a corner — cut both ends at a 45-degree angle. This creates a mitered joint that looks professional and prevents the spline ends from lifting. Use a sharp knife, not scissors, for this cut. Scissors crush the spline fibers rather than cutting them cleanly.
Final Spline Seating
After trimming, go over the entire spline one more time with a mallet and a flat board. Place the board on top of the spline and tap it lightly with the mallet. This ensures the spline is perfectly flush with the frame surface. Without this step, you may have sections where the spline sits slightly proud of the frame, creating an uneven surface that catches on clothing or skin.
Smoothing the Groove Edges
Before installation even begins, it helps to bevel the inner edge of the groove with a rasp or fine-grit sandpaper (180 to 220 grit). Sharp groove edges can cut or fray the cane during installation. A slight bevel — just a pass or two with the rasp — eliminates this risk. This is especially important on hardwood frames where the routed groove can have very sharp corners.
Clean-Up Supplies
| Supply | Objectif | When to Use |
|---|---|---|
| Damp cloth | Wipe excess glue from cane surface | Immediately after spline seating |
| Fine sandpaper (220 grit) | Smooth any rough spots on frame | Before and after installation |
| Mineral spirits (small amount) | Remove stubborn dried glue spots | After glue has cured, 24 hours |
| Furniture wax or oil | Protect and finish the cane surface | After full drying, 24–48 hours |
| Masking tape | Protect frame finish during trimming | During knife trimming step |
Séchage et durcissement
After installation, let the project dry for 24 to 48 hours before use. As the cane dries, it shrinks slightly and tightens across the frame opening. This is what gives a properly installed cane panel its characteristic drum-tight appearance. Do not rush this step. Sitting on a newly caned chair before the glue has cured and the cane has dried can cause the spline to shift.
During drying, you can place light weights or clamps on the frame to keep everything flat. Avoid direct sunlight or heat sources, which can dry the cane too quickly and cause cracking. A room-temperature environment with moderate humidity is ideal.
Common Finishing Mistakes
The most common finishing error is trimming too aggressively. If you cut into the cane webbing below the spline, you weaken the panel. Another frequent mistake is not cleaning up glue immediately. Wood glue dries clear but leaves a shiny film on natural cane that looks out of place. A damp cloth used within the first few minutes takes care of this easily.
Conclusion
Having the right tools and supplies before you start makes rattan cane webbing installation straightforward and rewarding. From proper soaking to spline sizing and clean edge trimming, every step matters for a professional result.
Notes de bas de page
1. Specialized supplier detailing tools, including wedges, for cane installation. ↩︎
2. Describes the function and design of a tool specifically for pressing spline into cane webbing. ↩︎
3. Provides safety guidelines and proper usage for utility knives in various applications. ↩︎
4. Explains the general purpose and types of scissors, including heavy-duty shears. ↩︎
5. Explains the role of reed spline in the traditional craft of chair caning. ↩︎
6. Provides a general overview of rattan, from which cane webbing is derived. ↩︎
7. Wikipedia provides a comprehensive and authoritative overview of various types of wood glue. ↩︎
8. Defines polyvinyl acetate (PVA) and its common uses as a wood adhesive. ↩︎
9. This is an official product page for a well-known brand of wood glue that specifically dries clear. ↩︎
10. The Wikipedia page for Animal glue includes a dedicated and authoritative section on Hide glue. ↩︎

