Отслаивающаяся ротанговая сетка на свежеотреставрированном стуле — это разочаровывающее зрелище, которое мы видим слишком часто. За годы работы наших предприятий по переработке ротанга и отправки материалов производителям мебели по всему миру мы протестировали десятки вариантов клея на натурального ротангового плетения 1 — и результаты не всегда такие, как вы ожидаете.
Лучшие клеи для натурального ротангового плетения — это клей ПВА для дерева (белый или желтый), костный клей для традиционных применений с использованием шпона и клеи для рукоделия с низким содержанием ЛОС для мелкого ремонта. Клей ПВА хорошо склеивает пористый ротанг и деревянные поверхности, особенно в сочетании со скобами или шпоном для механического усиления.
Это руководство охватывает точные типы клеев, этапы нанесения, советы по подготовке и распространенные ошибки. Независимо от того, являетесь ли вы менеджером мебельной фабрики, оптовым продавцом материалов или реставратором-любителем, информация ниже поможет вам добиться прочного соединения каждый раз.
Какие конкретные клеи следует использовать для склеивания натурального ротангового плетения с деревянными рамами?
Выбор неправильного клея может испортить красивый ротанговый проект за считанные дни. На наших производственных линиях в Фошане, где мы обрабатываем тысячи метров ротанговой сетки каждый месяц, мы узнали, какие клеи действительно держатся.
Используйте клей для дерева ПВА в качестве основного клея для склеивания натурального ротангового плетения с деревянными рамами. Для традиционных установок с пазами лучше всего подходит животный клей с шплинтом. Для быстрого точечного ремонта идеально подходит гибкий прозрачный клей для рукоделия. Всегда сочетайте клей с механическими креплениями для максимальной долговечности.

Понимание клеев ПВА для дерева для ротанга
ПВА (поливинилацетат 2) клей для дерева — это стандартный выбор для большинства проектов с ротанговой сеткой. Он доступен по цене, его легко найти, и он прочно склеивает пористые поверхности. Как натуральный ротанг, так и необработанное дерево пористы. Это означает, что клей ПВА может впитываться в волокна и создавать прочное механическое соединение на микроскопическом уровне.
Существует два основных типа ПВА клей для дерева 3. Белый ПВА высыхает прозрачным и хорошо подходит для мебели, используемой в помещении. Желтый ПВА (также называемый столярным клеем) немного прочнее и более устойчив к влаге. Для большинства проектов с ротанговой сеткой подходит любой тип. Но если ваше изделие будет находиться во влажной комнате или рядом с кухней, желтый ПВА — более безопасный выбор.
Костный клей для традиционных сидений из ротанга
Скрыть клей 4 используется в производстве мебели веками. Он медленно сохнет. Это дает вам время отрегулировать ротанговую сетку и вдавить ее в пазы. Он также обратим — вы можете размягчить его теплом или влагой, если вам нужно будет переделать работу позже. Это делает костный клей идеальным для реставрации антиквариата, где вам может понадобиться заменить ротанг снова в будущем.
Краткое сравнение типов клеев
| Тип клея | Лучший сценарий использования | Время сушки | Водостойкость | Обратимый |
|---|---|---|---|---|
| Белый клей ПВА | Мебель для помещений, панели шкафов | 1–2 часа | Низкий | Нет |
| Желтый клей ПВА | Стулья, мебель для интенсивного использования | 1–2 часа | Умеренная | Нет |
| Клей для костей | Реставрация антиквариата, сиденья с плетением | 4–8 часов | Низкий | Да |
| Прозрачный клей для рукоделия | Мелкий ремонт, заплатки | 15–30 минут | Варьируется | Нет |
| Эпоксидная смола | Уличные или влажные помещения | 5–60 минут | Высокий | Нет |
Что насчет контактного клея и суперклея?
Контактный клей 5 слишком жесткий для ротанга. Плетеная сетка из ротанга естественно гнется. Жесткий клей треснет под нагрузкой. Суперклей (цианоакрилат) 6 быстро склеивает, но создает хрупкое соединение. Он также имеет тенденцию оставлять белый налет на поверхности тростника, что ужасно выглядит на теплом загорелом цвете натурального ротанга.
Мы всегда говорим нашим оптовым клиентам придерживаться ПВА или костного клея. Они проверены, недороги и широко доступны на всех рынках, куда мы экспортируем — от США до Австралии и Нидерландов.
Соображения по брендам
Нет единственного "лучшего бренда". Titebond Original и Titebond II популярны в Северной Америке. В Европе такие бренды, как Ponal и UHU, предлагают аналогичные формулы ПВА. Главное — выбрать клей, предназначенный для пористых деревянных поверхностей. Обычный ПВА из хозяйственного магазина подойдет для большинства проектов. Вам не нужен специальный продукт.
Как предотвратить протекание клея, которое может испортить внешний вид моего плетеного ротанга?
Вытекание клея — одна из самых частых жалоб, которые мы слышим от наших клиентов на мебельных фабриках. Когда мы отправляем ротанговую сетку покупателям в Испанию, Турцию и на Филиппины, мы всегда прилагаем инструкции по обращению — и предотвращение просачивания клея находится на первом месте.
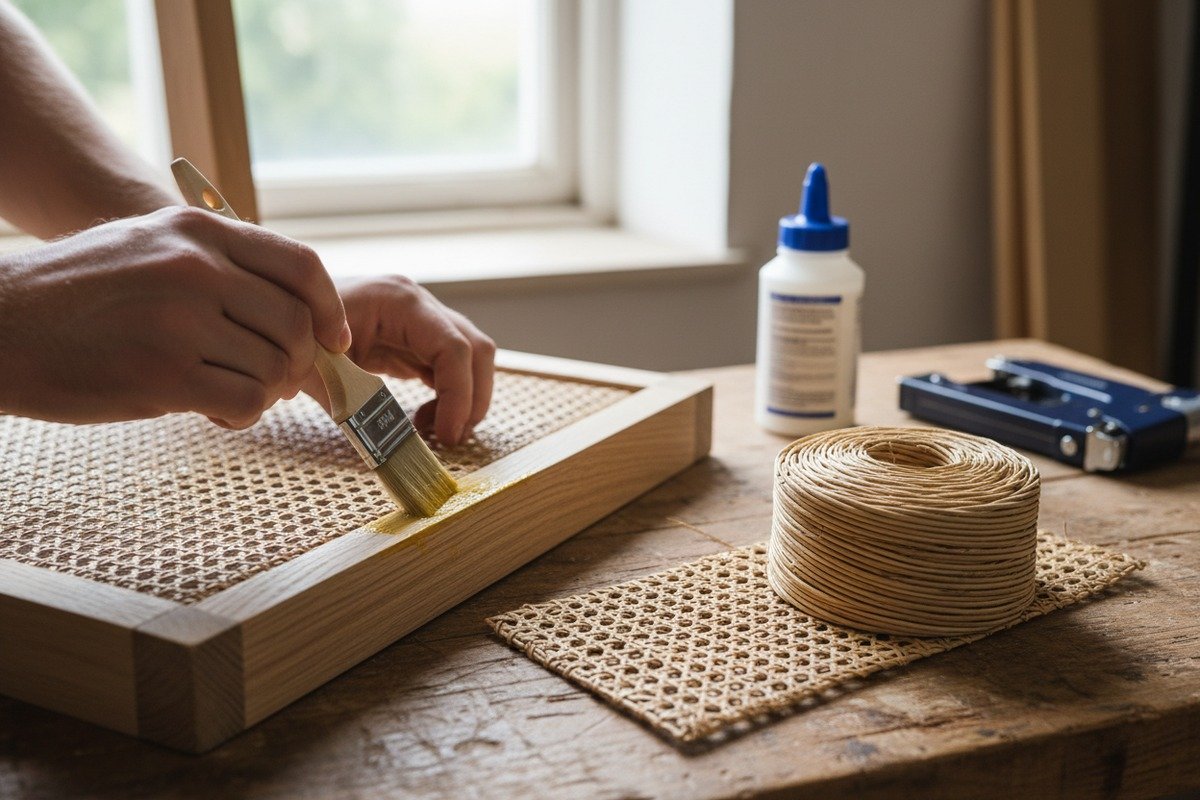
Предотвратите вытекание клея, нанося тонкий, равномерный слой клея только на поверхность деревянной рамы — никогда непосредственно на плетение из ротанга. Для точности используйте небольшой поролоновый валик или кисть. Немедленно удалите излишки клея влажной тканью до высыхания. Работайте небольшими участками и аккуратно прижимайте тесьму, чтобы клей не просачивался сквозь открытое плетение.

Почему происходит просачивание клея
Натуральная ротанговая сетка имеет узор с открытым плетением. Самый популярный стиль — шестиугольный или "открытый ротанг" — имеет видимые отверстия между каждой нитью. Когда вы прижимаете сетку к поверхности с избытком клея, клей проталкивается через эти отверстия. После высыхания он образует твердые, блестящие пятна, которые выделяются на матовой поверхности ротанга.
Эта проблема усугубляется при использовании тонких, жидких клеев. Густые формулы ПВА легче контролировать. Если ваш клей слишком жидкий, дайте ему постоять с открытой крышкой несколько минут, чтобы он немного загустел, прежде чем наносить.
Пошаговое предотвращение просачивания
- Наносите клей только на деревянную раму, а не на ротанг.
- Используйте поролоновую кисть или небольшой валик для нанесения тонкого, ровного слоя.
- Подождите 30 секунд, чтобы клей стал слегка липким.
- Положите ротанговую сетку на проклеенную область и аккуратно прижмите.
- Немедленно протрите любое вытекшее количество чистой, слегка влажной тканью.
- Не нажимайте сильно на сетку — пусть ее удерживает липкость клея.
- Закрепите края степлером или шплинтом, пока клей не высохнет.
Инструменты для уборки, которые следует держать под рукой
| Инструмент | Назначение | Когда использовать |
|---|---|---|
| Влажная хлопчатобумажная ткань | Протрите влажный клей, выступивший наружу | Сразу после прижимания тесьмы |
| Деревянная зубочистка | Удалите клей из отверстий в плетении | В течение 5 минут после нанесения |
| Мелкозернистая наждачная бумага (220 грит) | Отшлифуйте засохшие пятна клея на деревянной раме | После полного высыхания (24 часа) |
| Раствор белого уксуса | Растворить полусухой остаток ПВА | В течение 1 часа после нанесения |
| Painter's tape | Закройте участки, где клей не нужен | Перед нанесением клея |
Правило "Меньше значит больше"
Распространенная ошибка — думать, что больше клея означает более прочное соединение. На ротанге верно обратное. Слишком много клея создает слабый, скользкий слой между деревом и тростником. Он также сохнет гораздо дольше. И, конечно же, он просачивается сквозь плетение.
Нанесите ровно столько клея, чтобы увидеть тонкую влажную пленку на дереве. Если вы видите лужицы или капли, вы использовали слишком много. Соскребите излишки шпателем, прежде чем укладывать тесьму.
Что делать, если клей уже высох на ротанге?
Если клей ПВА высох на видимой поверхности вашей плетенки из ротанга, смочите ткань теплой водой и подержите ее над пятном в течение двух-трех минут. ПВА размягчается от влаги. Аккуратно удалите остатки, поддев или потерев их. Для мездрового клея теплая вода действует еще быстрее. Избегайте использования химических растворителей — они могут смыть естественный цвет ротанга и ослабить волокна.
Обеспечит ли стандартный столярный клей достаточно прочное соединение для моей прочной ротанговой мебели?
Этот вопрос часто возникает при работе с мебельными фабриками, производящими обеденные стулья и барные стулья. Эти предметы подвергаются настоящим испытаниям — люди откидываются назад, смещают вес, тащат стулья по полу. Наша производственная команда провела стресс-тесты различных методов склеивания только клеем и гибридных методов.
Обычного клея ПВА для дерева недостаточно для прочной плетеной мебели, такой как обеденные стулья или барные стулья. Для применений с высокой нагрузкой сочетайте клей ПВА с механическими крепежами, такими как скобы, гвоздики или система шпунт-паз. Этот гибридный подход обеспечивает как химическую адгезию, так и физическое закрепление для долговечности.

Понимание ограничений клеевых соединений
Клей ПВА для дерева обладает высокой прочностью на сдвиг 7 на пористых поверхностях. Это означает, что он сопротивляется силам, которые пытаются сдвинуть две поверхности друг от друга. Но сиденья из ротанговой мебели подвергаются не только силам сдвига. Они также подвергаются отрывающим силам 8 — тому типу нагрузки, который пытается оторвать плетенку от рамы по краям.
Клей ПВА слабее противостоит отрывающим силам. Со временем, особенно под весом тела, давящим на центр сиденья из ротанга, края могут начать отслаиваться. Изменения температуры и влажности усугубляют это. Ротанг немного расширяется и сжимается в зависимости от уровня влажности. Если клей не может сгибаться вместе с ним, соединение трескается.
Гибридный метод: клей плюс механическое крепление
Наиболее надежный подход для прочных изделий использует как клей, так и механические крепления 9. Вот как это делают профессиональные производители мебели:
- Нанесите тонкий слой клея ПВА на край деревянной рамы.
- Вдавите предварительно замоченную плетеную сетку на место.
- Закрепите сетку скобами каждые два-три дюйма по краям.
- Для сидений с пазами вдавите сетку в паз и вбейте шплинт с клеем.
- Дайте полностью высохнуть в течение 12-24 часов перед использованием.
Скобы или шплинт механически удерживают сетку. Клей заполняет мельчайшие зазоры и предотвращает ослабление в долгосрочной перспективе. Вместе они создают соединение, которое выдерживает годы ежедневного использования.
Сравнение методов склеивания для различных типов мебели
| Тип мебели | Рекомендуемый метод | Тип клея | Механическое крепление | Ожидаемый срок службы |
|---|---|---|---|---|
| Декоративная панель шкафа | Только клей | Белый ПВА | Не требуется | 10+ лет |
| Акцентный стул для легкого использования | Клей + скобы | Желтый ПВА | Скобы каждые 3 дюйма" | 5–8 лет |
| Сиденье обеденного стула | Клей + шпонка | Желтый ПВА или костный клей | Шпонка (#8, паз 3/16 дюйма) | 8–15 лет |
| Сиденье барного стула | Клей + скобы + шпонка | Желтый ПВА | Скобы + шпонка | 10–15 years |
| Садовый стул для патио | Эпоксидная смола + скобы | Морская эпоксидная смола | Нержавеющие скобы | 5–7 лет |
Факторы влажности и температуры
По нашему опыту экспорта в страны с очень разным климатом — от сухой Саудовской Аравии до влажного Таиланда — мы видим, что отказы клеевого соединения чаще связаны с окружающей средой, чем с самим клеем. Клей ПВА для дерева лучше всего работает в стабильных условиях в помещении. Если влажность регулярно колеблется выше 70% или ниже 30%, соединение со временем ослабевает.
Для мебели, предназначенной для влажной среды, рассмотрите использование водостойкого клея ПВА типа II или типа III 10 формулы. Titebond II и Titebond III являются распространенными примерами. Они стоят немного дороже, но гораздо лучше противостоят влаге, чем стандартный белый ПВА.
Когда следует рассмотреть альтернативы
Если вы строите уличную мебель из ротанга или изделия для морского использования (например, вентиляционные панели каюты лодки), клей ПВА не подходит. Эпоксидная смола для морского применения или полиуретановый клей лучше справляются с воздействием воды. Однако эти клеи труднее очищать, и они не являются обратимыми. Используйте их только тогда, когда влагостойкость является вашим главным приоритетом.
Для большинства предметов интерьера — даже для прочных стульев и табуретов — гибридный метод ПВА плюс скобы работает отлично. Мы видели, как этот подход выдерживал более десяти лет на обеденных гарнитурах, произведенных нашими фабричными партнерами.
Какие шаги мне следует предпринять, чтобы подготовить плетеную трость перед нанесением клея?
Подготовка — это то, где большинство DIY-проектов идут не так. Когда мы поставляем тростниковую сетку нашим оптовым клиентам, мы всегда подчеркиваем, что необработанный ротанг прямо с рулона не готов к склеиванию. Пропуск этапов подготовки приводит к слабым соединениям, треснувшим волокнам и неровным поверхностям.
Перед нанесением клея замочите натуральную ротанговую циновку в теплой воде на 15–30 минут, пока она не станет гибкой. Затем обрежьте ее по размеру, оставив по два дюйма запаса с каждой стороны. Тщательно очистите деревянную раму, удалив старый клей, пыль и покрытие. Дайте раме полностью высохнуть перед нанесением клея.

Почему замачивание имеет значение
Натуральный ротанговый тростник жесткий в сухом состоянии. Если вы попытаетесь прижать сухую тростниковую сетку к изогнутой или утопленной раме, она треснет и сломается. Замачивание в теплой воде (не горячей — горячая вода может обесцветить более светлые сорта ротанга) на 15-30 минут делает волокна гибкими и податливыми.
Есть и другое преимущество. Влажный ротанг сжимается при высыхании. Когда вы устанавливаете замоченную сетку и даете ей высохнуть на месте, она натягивается на раму, как барабанная кожа. Это естественное натяжение придает сиденьям из тростника их упругое, пружинящее ощущение. Если вы пропустите замачивание, сетка останется свободной и провиснет.
Как долго замачивать разные типы плетения
Не вся тростниковая сетка из ротанга требует одинакового времени замачивания. Более плотные плетения медленнее впитывают воду. Вот общее руководство, основанное на том, что мы рекомендуем нашим фабричным партнерам:
| Тип плетения | Время замачивания (теплая вода) | Примечания |
|---|---|---|
| Мелкое гексагональное (1/2") | 15–20 минут | Наиболее распространенное; быстро впитывает воду |
| Среднее открытое плетение | 15–20 минут | Похоже на мелкое гексагональное |
| Плотное алмазное плетение | 20–30 минут | Плотное плетение впитывает медленнее |
| Плотное плетение "корзинка" | 25–30 минут | Требуется дополнительное время для гибкости |
| Отбеленный ротанг | 10–15 минут | Отбеливание ослабляет волокна; не замачивайте слишком долго |
Чрезмерное замачивание — реальный риск. Если оставить ротанг в воде более чем на 45 минут, волокна могут слишком сильно набухнуть и ослабнуть. Плетение может деформироваться. Стремитесь к состоянию "гибкий, но не вялый"."
Подготовка деревянной рамы
Ротанг — это только половина дела. Деревянная рама также нуждается в подготовке. Вот краткий контрольный список:
- Удалите старый клей. Соскребите засохший клей шпателем или стамеской. Старый клей создает барьер, который мешает новому клею схватиться.
- Отшлифуйте поверхность. Используйте наждачную бумагу зернистостью от 120 до 150, чтобы сделать поверхность склеивания шероховатой. Это даст клею ПВА больше текстуры для сцепления.
- Удалите пыль. Протрите липкой тканью или влажной тряпкой. Дайте дереву полностью высохнуть.
- Проверьте покрытие. Лак, нитролак или краска на поверхности склеивания блокируют впитывание клея. Удалите или отшлифуйте эти покрытия с участков, где вы будете наносить клей.
Резка и подгонка тесьмы
Всегда заказывайте тростниковую тесьму большего размера, чем готовое отверстие. Стандартное правило — добавлять два дюйма с каждой стороны. Например, если отверстие сиденья вашего стула составляет 14 на 14 дюймов, вам понадобится лист тростниковой тесьмы размером 18 на 18 дюймов.
Этот дополнительный материал дает вам пространство для захвата, натяжения и регулировки тесьмы во время установки. После того как клей и крепеж будут на месте и полностью высохнут, обрежьте излишки острым канцелярским ножом. Тупое лезвие порвет ротанг вместо того, чтобы ровно разрезать.
Примерка перед склеиванием
После замачивания и обрезки проведите сухую примерку. Положите влажную тесьму на каркас без клея. Проверьте следующее:
- Соответствует ли рисунок плетения краям каркаса?
- Достаточно ли выступает тесьма со всех сторон?
- Есть ли на тесьме узлы, оборванные нити или слабые места?
Исправьте несоответствия и проблемы с обрезкой сейчас. После нанесения клея повторное позиционирование становится затруднительным — особенно с ПВА, который быстро становится липким.
Сушка и уход после установки
После склеивания и крепления тесьмы дайте ей полностью высохнуть, прежде чем использовать мебель. Обычно это занимает от 12 до 24 часов в зависимости от влажности и температуры. Не торопитесь на этом этапе. Сидение на влажном, только что установленном сиденье из ротанга может привести к необратимому растяжению тесьмы.
После высыхания вы можете ухаживать за ротангом, слегка увлажняя нижнюю сторону минеральным маслом или разбавленным мыльным раствором Murphy's каждые шесть месяцев. Это предотвращает хрупкость, особенно в сухом климате. Протрите и дайте высохнуть в течение двух-четырех часов. Избегайте прямых солнечных лучей, чтобы предотвратить выцветание и растрескивание в течение многих лет.
Заключение
Выбор правильного клея для тесьмы из натурального ротанга сводится к подбору клея для конкретной задачи. Клей для дерева на основе ПВА в сочетании с механическими крепежами остается золотым стандартом для долговечных, профессиональных результатов.
Сноски
1. Определяет и описывает материал, его происхождение и процесс плетения. ↩︎
2. Подробно описывает химический состав, свойства и применение поливинилацетата. ↩︎
3. Объясняет, что такое клей ПВА, его состав и распространенные области применения в деревообработке. ↩︎
4. Заменена авторитетной и всеобъемлющей статьей из Википедии о животном клее, включающей костный клей. ↩︎
5. Объясняет, что такое контактный клей, как он работает и его типичные области применения. ↩︎
6. Описывает цианоакрилатные клеи, их быстрое действие и характеристики склеивания. ↩︎
7. Заменена авторитетной и всеобъемлющей статьей из Википедии о прочности на сдвиг. ↩︎
8. Объясняет адгезию при отслаивании и ее важность при оценке долговечности клеевого соединения. ↩︎
9. Определяет механические крепежи и их роль в соединении объектов без химического склеивания. ↩︎
10. Классифицирует клеи ПВА по стандартам водостойкости (D1-D4). ↩︎

