Работа с ротанговая сетка 1 день за днем на наших трех фабриках преподали нам один ясный урок: правильные инструменты либо создают, либо разрушают каждую установку. Независимо от того, восстанавливаете ли вы винтажное кресло середины века или производите мебель с тростниковыми вставками в больших масштабах, использование неправильного инструмента приводит к разрыву тесьмы, трещинам в рамах и потерянным часам штангенциркуль 2. Это разочарование полностью избежимо.
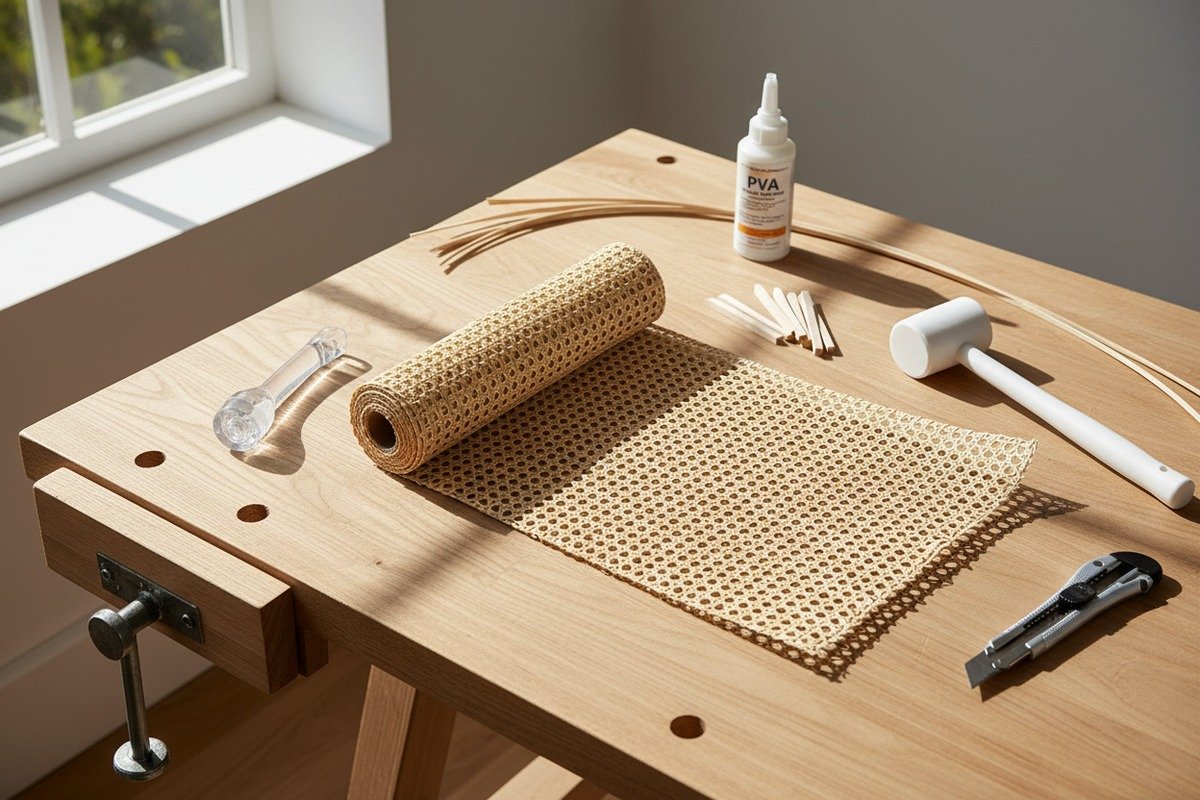
Для установки ротанговой сетки требуется набор специализированных инструментов: ролик для шнура или инструмент для вставки ротанга, деревянные или акриловые клинья, легкий молоток, острый канцелярский нож, столярный клей, лоток для замачивания, инструменты для очистки пазов и шнур соответствующего размера, подобранный под ширину вашего паза.
Каждый из этих инструментов выполняет определенную функцию в процессе установки. В разделах ниже мы подробно рассмотрим каждую категорию инструментов, поделимся знаниями, которые мы накопили за годы поставок ротанговых материалов производителям мебели более чем в дюжине стран, и поможем вам решить, что именно вам нужно в вашем наборе инструментов прямо сейчас.
Какие основные инструменты мне нужны, чтобы начать установку ротанговой сетки в моей мастерской?
Начать работу с установкой ротанговой тесьмы может показаться сложным, когда вы видите длинные списки инструментов в Интернете. За годы помощи нашим оптовым клиентам в их первых проектах мы сузили список до того, что действительно важно.
Чтобы начать установку ротанговой сетки, вам понадобятся шесть основных инструментов: инструмент для вставки ротанга или ролик для шнура, деревянные клинья, резиновый молоток, острый канцелярский нож, клей для дерева ПВА и емкость для замачивания. Эти основы помогут вам резать, подгонять, вдавливать и закреплять сетку в пазах рамы.

Давайте рассмотрим каждый инструмент и объясним, почему он заслуживает места на вашем верстаке.
Инструмент для вставки тростника (валик для шнура)
Это ваш самый важный инструмент. валик для шнура 3 плотно и равномерно вдавливает влажную тростниковую тесьму в пазы рамы мебели. Без него вам будет трудно закрепить тесьму достаточно глубоко, чтобы шнур зафиксировал ее на месте.
Существует два основных типа. Традиционные валики из твердой древесины работают хорошо, но могут разбухать во влажном состоянии. Новые инструменты для вставки с акриловым наконечником устойчивы к разбуханию, остаются видимыми на фоне тростника и более плавно скользят по деликатной тесьме. Отзывы пользователей последовательно хвалят акриловые инструменты за их неразбухающие свойства. Качественный инструмент для вставки тростника обычно стоит около 16,95 фунтов стерлингов у специализированных поставщиков.
Клинья: Ваши временные руки
Деревянные клинья удерживают тесьму в пазу, пока вы работаете по всей раме. Большинство комплектов включают пять клиньев, чего обычно достаточно для стандартного сиденья стула. Вы вдавливаете тростник в паз клином, затем переходите к следующему участку. Клинья остаются на месте, пока вы не будете готовы установить шнур.
Молоток, нож и клей
Легкий резиновый молоток позволяет постукивать шнуром в паз, не повреждая деревянную раму. Острый канцелярский нож или прочные ножницы помогут обрезать излишки тесьмы и нарезать шнур по длине. ПВА клей для дерева 4 надежно фиксирует шплинт внутри паза.
Сравнение стартовых наборов инструментов
| Инструмент | Назначение | Примерная стоимость | Включен ли набор для самостоятельного изготовления? |
|---|---|---|---|
| Инструмент для вставки тростника (акриловый) | Вдавливание сетки в паз | $16.95 | Редко |
| Деревянные клинья (упаковка из 5 шт.) | Временно удерживает тесьму | $3–$5 | Да |
| Резиновый молоток | Вбейте шплинт в канавку | $8–$12 | Нет |
| Канцелярский нож | Подрежьте тесьму и шплинт | $5–$8 | Иногда |
| ПВА клей для дерева | Приклейте шплинт в канавку | $4–$7 | Да (маленькая бутылка) |
| Емкость для замачивания | Замочите тесьму для придания гибкости | $10–$20 | Нет |
Наборы для самостоятельного изготовления против покупки инструментов по отдельности
Готовые наборы популярны среди домашних реставраторов. Обычно они включают тесьму, шплинт, клей, клинья и основные инструкции по цене от $50 до $100, в зависимости от размера. Наборы подходят для разовых проектов, но обычно в них отсутствует инструмент для вставки, гребень для плетения и инструменты для чистки пазов. Если вы планируете выполнить более одного проекта, купите основные инструменты отдельно для лучшей точности и долговечности.
Когда мы отправляем рулоны тростниковой тесьмы нашим оптовым клиентам в США, Австралии и Европе, мы всегда рекомендуем им сначала инвестировать в надлежащий акриловый инструмент для вставки. Он окупается уже на первом стуле.
Какие профессиональные пневматические степлеры мне следует использовать для моего высокообъемного производства мебели?
Когда объем производства превышает несколько десятков единиц в неделю, ручные инструменты замедляют работу. Наш завод в Фошане обрабатывает тысячи квадратных метров ротангового полотна каждый месяц, и мы рано поняли, что пневматические инструменты полностью меняют правила игры.
Для высокообъемного производства ротангового полотна используйте пневматические степлеры с узкой коронкой (коронка 1/4 дюйма) со скобами калибра от 18 до 22. Эти степлеры быстро закрепляют полотно на рамах без пазов, не расщепляя волокна ротанга. Соедините их с воздушным компрессором, рассчитанным на 70–90 PSI, для надежного и безопасного крепления на длинных участках.

Пневматические степлеры 5 не используются для традиционных установок с пазами и шпонками. Они применяются при креплении ротангового полотна к плоским поверхностям, обтяжке панелей или креплении полотна к задним рамам в дверцах шкафов, изголовьях кроватей и декоративных экранах. Вот что вам нужно знать.
Почему пневматические вместо ручных?
Ручные степлеры требуют значительного давления руки. В течение полного рабочего дня усталость приводит к непостоянной глубине забивания скоб. Пневматические степлеры обеспечивают равномерное усилие каждый раз. Они также стреляют быстрее, что важно, когда вы производите сотни панелей за смену. воздушный компрессор 6 выполняет основную работу, а не ваше запястье.
Выбор правильного степлера
Не каждый пневматический степлер подходит для ротанга. Вам нужны модели с узкой коронкой, потому что широкие коронки раздавливают волокна ротанга. Калибр скоб также имеет значение. Любой калибр тяжелее 18-го рискует расщепить тростник. Более легкие скобы калибра 22 хорошо держатся на более мягких материалах, таких как МДФ или фанера.
| Характеристика степлера | Рекомендуемая спецификация | Почему это важно |
|---|---|---|
| Ширина коронки | 1/4" (узкая коронка) | Предотвращает смятие ротанговых нитей |
| Калибр скобы | 18–22 калибр | Избегает расщепления волокон тростника |
| Рабочее давление | 70–90 PSI | Постоянная глубина без пробивания насквозь |
| Длина скобы | 3/8" до 5/8" | Соответствует толщине материала рамы |
| Емкость магазина | 100+ скоб | Сокращает время простоя на перезарядку |
| Тип спускового крючка | Контактный или последовательный | Последовательный для точности, контактный для скорости |
Советы с нашей производственной линии
Мы всегда сначала проверяем глубину скобы на обрезках тесьмы. Если скоба погружается слишком глубоко, она прорезает тростник. Если она находится слишком высоко, тесьма со временем ослабевает. Регулировка регулятора компрессора с шагом в 5 PSI помогает добиться идеальной глубины.
Нашим клиентам, управляющим мебельными фабриками в Таиланде, Индии и на Филиппинах, мы рекомендуем иметь на линии запасной степлер. Простой оборудования стоит дороже самого инструмента.
Когда не следует использовать степлер
При установке с использованием пазов и шпунтов на стульях и традиционной мебели никогда не следует использовать скобы. Метод пазов и шпунтов обеспечивает чистый, бесшовный вид. Скобы видны и подходят только для применений, где точка крепления будет скрыта молдингом, отделкой или краями рамы.
Как выбрать подходящие клинья и шпонки для моей конкретной установки из ротанга?
Ошибки в подборе размеров клиньев и шпунтов — это самая частая жалоба, которую мы слышим от покупателей, совершающих покупку впервые. Слишком тонкий шпунт расшатывается через несколько месяцев. Слишком толстый шпунт раскалывает паз или рвет тесьму. Правильный подбор размера не является опцией.
Выбирайте шпунт, точно измерив ширину паза штангенциркулем. Для паза шириной 1/4 дюйма обычно требуется тростниковый шпунт #8.5. Клинья должны быть немного уже паза, чтобы временно удерживать тростник, не растягивая его. Всегда подбирайте диаметр шпунта к ширине паза и обрезайте концы шпунта под углом 45 градусов для чистых, плотных угловых соединений.

Именно здесь многие установки терпят неудачу или достигают успеха. Давайте углубимся в детали.
Понимание размеров пазов и шпунтов
Каркасы мебели, предназначенные для прессованной ротанговой тесьмы, имеют фрезерованный канал шириной обычно от 3/16 до 5/16 дюйма. Шпунт представляет собой круглый тростник, который запрессовывается в этот канал поверх тесьмы, фиксируя все на месте. Шпунт должен немного сжиматься при вдавливании. Слишком свободный — выпадет. Слишком тугой — расколет дерево или порвет тростник.
Руководство по подбору шпонки
| Ширина паза | Рекомендуемый размер шпонки | Приблизительный диаметр шпонки | Тип рамы |
|---|---|---|---|
| 3/16" | #7 шпунта из тростника 7 | 4.5 мм | Деликатные антикварные стулья |
| 1/4" | #8.5 шпонка для тростника | 5.5 мм | Стандартные современные стулья |
| 5/16" | #10 шпонка для тростника | 6.5 мм | Рамы повышенной прочности, скамейки |
Когда мы поставляем плетеную тростниковую сетку оптовым поставщикам мебельных материалов, мы всегда просим их подтвердить ширину паза, прежде чем рекомендовать размер шпонки. Несоответствие даже на 1 мм вызывает проблемы.
Материал и форма клина
Большинство клиньев изготавливаются из твердых пород дерева, обычно из дуба или бука. Они должны иметь плавный конус, чтобы они вдавливали сетку в паз, не разрезая и не растягивая ее. Некоторые установщики используют самодельные клинья, вырезанные из обрезков дерева, но мы видели, как они вызывали неравномерное натяжение. Специально изготовленные клинья имеют равномерный конус и закругленные края, которые защищают тростник.
Существуют также пластиковые клинья. Они не впитывают воду, что является преимуществом при работе с влажным ротангом. Однако они могут быть скользкими. Многие профессионалы предпочитают дерево, потому что оно слегка цепляется за влажную тесьму, удерживая ее более надежно в пазу.
Обрезка шнура по углам
Шнур следует обрезать под углом 45 градусов там, где он встречается в углах. Это создает косой стык 8 который выглядит аккуратно и плотно держится. Острый канцелярский нож подойдет, но прецизионные ножницы для обрезки шнура, предназначенные для плотных волокнистых материалов, обеспечивают более прямые и чистые срезы. Когда вы обрезаете шнур тупым лезвием, ротанг сминается вместо того, чтобы ровно разрезаться, оставляя шероховатый конец, который не садится должным образом.
Распространенные ошибки при работе со шнуром
Чрезмерное нанесение клея в паз перед установкой шнура выдавливает излишки клея на видимую поверхность ротанга. Нанесите тонкую ровную линию клея ПВА внутрь паза, затем немедленно вставьте шнур. Также никогда не вставляйте сухой шнур в паз силой. Замачивайте шнур на 20–30 минут вместе с тесьмой. Сухой шнур жесткий и трескается под давлением.
Какое оборудование мне нужно, чтобы правильно замочить и подготовить ротанговую сетку перед началом работы?
Замачивание кажется простым, но именно на этом этапе большинство новичков совершают дорогостоящие ошибки. Мы постоянно видим это при обучении новых оптовых клиентов, которые только начинают работать с нашими натуральной ротанговой сетки 9 рулонами. Недостаточное замачивание оставляет ротанг жестким и склонным к растрескиванию. Чрезмерное замачивание делает его кашеобразным и слабым.
Чтобы правильно замочить ротанговую сетку, вам понадобится плоский лоток для замачивания или ванна достаточного размера, чтобы полностью погрузить лист, теплая вода (не горячая), таймер, установленный на 20–30 минут, и чистые полотенца для промакивания излишней влаги. Для шнура используйте отдельную емкость или ПВХ-трубу, чтобы замачивать его одновременно с сеткой.

Правильная подготовка выходит за рамки простого замачивания. Она включает очистку паза, удаление старых материалов и организацию рабочего места. Вот полный разбор.
Выбор емкости для замачивания
Емкость должна быть достаточно большой, чтобы тесьма помещалась ровно, без складывания. Складывание создает складки, которые будут видны на готовом изделии. Для стандартных сидений стульев размером до 24 x 24 дюймов подойдет большой пластиковый контейнер для хранения или ванна. Для производственных условий мы рекомендуем специальные лотки для замачивания из нержавеющей стали или прочного пластика.
Некоторые профессионалы используют длинные ПВХ-трубы для замачивания свернутой тесьмы. Это сохраняет форму рулона и обеспечивает равномерное насыщение. Это особенно полезно для тесьмы, которая будет наноситься на изогнутые поверхности.
Температура воды и время
Используйте теплую воду, около 21–27°C. Горячая вода может ослабить натуральные волокна. Холодной воде требуется больше времени для проникновения в ротанг. Целевое время замачивания составляет 20–30 минут. Установите таймер. Мы не можем достаточно подчеркнуть это.
Чрезмерное замачивание более 30 минут приводит к тому, что ротанг становится чрезмерно гибким и теряет структурную целостность. Он может неравномерно растягиваться во время установки, а затем слишком сильно сжиматься при высыхании, отходя от шнура. Недостаточное замачивание означает, что ротанг остается жестким и трескается, когда вы вдавливаете его в канавку.
Инструменты для подготовки, помимо замачивания
Прежде чем вы даже коснетесь воды, рама должна быть готова.
Инструменты для очистки канавок и проволочные щетки: Старые установки оставляют засохший клей и фрагменты шнура в канавке. Крючкообразные инструменты или узкие проволочные щетки очищают этот мусор. Чистая канавка обеспечивает оптимальное сцепление нового клея и плотное прилегание шнура.
Парогенераторы для удаления старого шнура: Если старый шнур был сильно приклеен, ручной парогенератор размягчает клей через небольшие просверленные отверстия. Это профессиональный подход. Попытка выбить приклеенный шнур без пара рискует сколоть или треснуть раму. Специальное зубило для шнура, стоимостью около 21,95 доллара США, используется вместе с парогенератором для чистой удаления.
Промакивание и подготовка: После замачивания разложите тесьму на чистых полотенцах. Аккуратно промокните, чтобы удалить поверхностную воду. Ротанг должен быть податливым, но не мокрым. Работайте быстро, как только тесьма будет извлечена из воды. Ротанг начинает затвердевать по мере высыхания.
Краткое описание оборудования для замачивания
| Оборудование | Назначение | Примечания |
|---|---|---|
| Плоский лоток для замачивания / ванна | Погрузите тесьму плашмя | Избегайте складывания, чтобы предотвратить образование складок |
| ПВХ трубка (опционально) | Равномерно замочите свернутую тесьму | Идеально подходит для изогнутых применений |
| Теплая вода (21–27°C) | Размягчите ротанговые волокна | Избегайте горячей воды, чтобы предотвратить повреждение волокон |
| Таймер | Отслеживайте замачивание в течение 20–30 минут | Чрезмерное замачивание ослабляет тростник |
| Чистые полотенца | Промокните излишки влаги | Работайте быстро после промокания |
| Инструменты для чистки канавок | Удалите старый клей и мусор | Важно для проектов по повторному плетению тростника |
| Ручной отпариватель | Размягчить старую приклеенную шпонку | Сначала просверлите небольшие отверстия для проникновения пара |
| Долото для шпонки ($21.95) | Вынуть старую шпонку | Использовать с отпаривателем для лучших результатов |
Зажимная рама для больших проектов
Для более крупных деталей, таких как изголовья кроватей, перегородки или панели шкафов, система зажимной рамы 10 удерживает мебель устойчиво, пока вы работаете. Зажим также помогает поддерживать равномерное натяжение сетки. Без него рама может смещаться, когда вы вдавливаете ротанг с одной стороны, вызывая неравномерное натяжение с противоположной стороны.
Мы видели, как наши заводские партнеры в Индонезии использовали простые струбцины на плоских столах. Это не изысканно, но работает. Ключ — стабильность. Любое движение во время установки проявляется как неравномерное натяжение в готовом изделии.
Заключение
Наличие правильных специализированных инструментов превращает установку ротанговой сетки из разочаровывающей борьбы в плавный, повторяемый процесс. Начните с основ, подберите шпонку к пазу, правильно замочите и пополняйте свой набор инструментов по мере роста ваших проектов.
Сноски
1. Предоставляет общий обзор и определение ротанга. ↩︎
2. Заменено авторитетной статьей из Википедии, определяющей штангенциркуль. ↩︎
3. Объясняет функцию и историю инструмента для прокатки шпунта. ↩︎
4. Подробно описывает, почему клей ПВА предпочтителен для столярных работ. ↩︎
5. Руководство по выбору подходящего пневматического степлера для различных проектов. ↩︎
6. Заменено авторитетной статьей из Википедии, объясняющей воздушные компрессоры. ↩︎
7. Описывает материал шпунта из тростника и его использование в плетении. ↩︎
8. Заменено авторитетной статьей из Википедии, объясняющей косой стык. ↩︎
9. Обсуждает характеристики и применение натуральной ротанговой тесьмы. ↩︎
10. Предлагает подробное руководство по различным типам столярных струбцин. ↩︎

