Years of producing ротанговая сетка 1 across our three factories have shown us one thing clearly: people love old chairs but fear fixing them. That worn-out seat on your grandmother’s dining chair feels like a project too big to tackle pre-woven pressed cane sheets 2. You see the sagging cane, the cracked strands, and you wonder—should I even try? The truth is, most people overestimate the difficulty.
Replacing rattan cane webbing on old chairs is a moderately easy DIY project. With pre-woven pressed cane sheets, basic tools, and 2–4 hours of work, most beginners can achieve professional-looking results. The key challenges are proper soaking, precise groove cleaning, and correct alignment during installation.
This guide walks you through every step, from choosing the right materials to avoiding the mistakes that ruin most first attempts. Whether you have one heirloom chair or a full dining set, you will find clear answers below.
Can I successfully replace the cane webbing on my vintage chairs without professional help?
Every week, we ship rolls of pre-woven cane webbing to small workshop owners and home DIYers across 15+ countries. The feedback we hear most often surprises people: "That was way easier than I expected."
Yes, you can successfully replace cane webbing on vintage chairs without professional help. Pressed cane webbing uses a groove-and-spline system that eliminates the need for hand-weaving skills. With proper preparation, soaking, and patience, most first-timers complete the job in one afternoon with lasting results.

Understanding the Two Types of Cane Seats
Before you start, you need to identify your chair type. This is the most critical first step. There are two main styles of cane seating, and they require completely different approaches.
Hand-woven cane uses individual strands threaded through holes drilled around the seat frame. This is a skilled craft. It takes many hours and genuine weaving knowledge. Most people should not attempt this without training.
Pressed cane webbing uses a pre-woven sheet that sits in a routed groove around the seat perimeter. A reed spline 3 holds it in place. This is the type most vintage chairs from the mid-20th century use. And this is the type you can absolutely handle yourself.
| Характеристика | Hand-Woven Cane 4 | Pressed Cane Webbing |
|---|---|---|
| Skill level required | Advanced | Beginner to intermediate |
| Time per chair | 8–20 hours | 2–4 hours |
| Tools needed | Pegs, awl, weaving expertise | Chisel, mallet, wedges |
| Material format | Individual strands | Pre-woven sheet |
| DIY success rate | Low for beginners | High for beginners |
Why DIY Works for Most People
The pressed cane method is forgiving. You cut a sheet to size, soak it, press it into the groove, and lock it with spline and glue. There is no complex pattern work. The webbing comes already woven in the pattern you choose—hexagonal open mesh 5, square basketweave, or diamond motif.
From our experience supplying furniture material wholesalers across the US and Europe, we see that roughly 80–90% of DIY attempts succeed when the person follows the steps in order. The remaining failures almost always trace back to one of three causes: skipping the structural inspection, using the wrong spline size, or over-soaking the cane.
When to Call a Professional
There are times when professional help makes sense. If your chair is a high-value antique with hand-woven cane, a restoration specialist will preserve its authenticity and value. If the chair frame has severe structural damage—split wood, broken joints, or warped rails—fix those issues first or hire someone who can. A beautiful new cane seat means nothing on a chair that wobbles.
What specific tools and materials do I need to prepare for my rattan restoration project?
When we pack sample kits for new wholesale clients, we always include a checklist of what their end customers will need. Getting the right supplies before you start is half the battle. Nothing kills momentum like stopping mid-project for a missing tool.
You need pre-woven rattan cane webbing, reed spline matched to your groove width, PVA or clear-drying glue, a chisel or awl, a rubber mallet, a utility knife, wedges or a cane webbing tool, sandpaper, scissors, and a basin of warm water for soaking materials before installation.

Essential Materials List
Your material choices directly affect the quality and lifespan of the repair. Here is what you need and why each item matters.
Pre-woven cane webbing comes in different patterns and grades. For most vintage chairs, the classic hexagonal open-mesh pattern (sometimes called "radio weave") is the standard choice. You need a piece large enough to cover the seat opening plus 2–4 inches of overhang on each side.
Reed spline is the thin, flexible strip that locks the cane into the groove. It comes in coils, and you typically need about 6 feet per chair. The critical detail here is width. Measure your groove with calipers or a ruler. The most common groove width is 1/4 inch, but older chairs may vary. The spline must fit snugly—too thin and it will not hold, too thick and you risk cracking the groove walls.
Glue should be PVA wood glue 7 or a clear-drying adhesive. Avoid white acrylic craft glue. It dries too fast and makes adjustments impossible. Some professionals use carpenter's yellow glue for a stronger bond.
Essential Tools List
| Tool | Purpose | Alternative |
|---|---|---|
| Cane webbing tool | Press cane into groove evenly | Wooden wedges |
| Chisel (narrow) | Remove old spline and clean groove | Flathead screwdriver |
| Rubber mallet 8 | Tap spline into groove without damage | Hammer with cloth buffer |
| Utility knife | Score old spline, trim excess cane | Sharp craft knife |
| Sandpaper (150-grit) | Smooth groove edges after cleaning | Fine sanding block |
| Scissors or nippers | Cut cane webbing to rough size | Heavy-duty shears |
| Basin or tub | Soak cane and spline in warm water | Bathtub or large bucket |
| Measuring tape | Measure seat opening and groove | Ruler |
| Awl | Clean debris from groove corners | Nail or pick |
Choosing Between Natural and Synthetic Rattan
This is a decision many buyers face. At our production facility, we manufacture both натуральный ротанг 9 cane webbing and synthetic alternatives. Each has clear advantages.
Natural rattan gives you the authentic look—warm beige tones, organic texture variations, and that classic artisanal feel. It is the right choice for vintage restoration when you want to preserve the chair's original character. It does require more careful handling. You must soak it properly, and it is sensitive to prolonged moisture exposure in use.
Synthetic rattan matting mimics the woven look of natural cane but uses durable plastic. It resists moisture, UV exposure 10, and heavy wear. It works well for outdoor furniture or high-traffic areas. However, purists and antique collectors generally prefer natural materials for restoration work.
Bleached rattan cane webbing offers a lighter, more uniform color than standard natural cane. It suits Scandinavian-style furniture and modern interiors where a clean, bright look is desired.
Where to Source Quality Materials
Look for suppliers who specialize in rattan materials rather than general craft stores. Specialty suppliers carry the full range of spline sizes, webbing patterns, and grades. Many furniture material wholesalers now offer online kits that include pre-cut webbing, spline, glue, and basic tools—a convenient option for first-timers.
How much time and effort will it take me to complete a full chair webbing replacement?
Our production team in Foshan processes thousands of square meters of cane webbing every month, but even we respect the patience this craft demands at the individual chair level. Speed is not the goal. Precision is.
A full chair webbing replacement takes 2–4 hours of active work plus 24 hours of drying time. The most labor-intensive phase is removing the old spline and cleaning the groove, which can take 30–60 minutes alone. Installation and trimming require careful alignment but move quickly once you establish a rhythm.

Phase-by-Phase Time Breakdown
Let me walk you through what each phase looks like in real time. This breakdown assumes a single dining chair with a standard pressed cane seat.
| Phase | Задача | Estimated Time |
|---|---|---|
| 1. Inspection | Check chair structure, tighten joints | 10–15 minutes |
| 2. Removal | Score and remove old spline, scrape glue, clean groove | 30–60 минут |
| 3. Soaking | Soak cane webbing (20–30 min) and spline (15–30 min) | 20–30 minutes |
| 4. Installation | Center webbing, press into groove with wedges, adjust | 30–45 minutes |
| 5. Trimming | Trim excess cane flush with groove edge | 10–15 minutes |
| 6. Gluing & spline | Apply glue, cut and tap spline into groove | 20–30 minutes |
| 7. Drying | Allow 24 hours for full drying and cane tightening | 24 hours (passive) |
| 8. Finishing | Trim loose strands, clean glue, optional staining | 10–15 minutes |
| Total active work | 2–3.5 hours |
The Hardest Part: Removing the Old Spline
This phase tests your patience more than your skill. On vintage chairs, decades of old glue have bonded the spline deep into the groove. Here is the process:
First, score along both edges of the old spline with a utility knife. This breaks the glue seal. Then, use a narrow chisel and mallet to carefully lift and pry out the spline in sections. Go slowly. If you rush, you risk chipping the groove edges or gouging the wood.
After the spline is out, scrape all remaining glue from the groove walls and bottom. An awl works well for corners and tight spots. Lightly sand the groove with fine sandpaper, but do not widen it. The groove dimensions must stay the same for the new spline to fit properly.
On some vintage chairs, especially mid-century pieces like Cesca-style chairs, the old glue can be extremely stubborn. A heat gun on low or a damp cloth laid over the glue for a few minutes can soften it. Avoid chemical solvents near the wood finish.
Soaking: The Step People Get Wrong
Soaking times vary across different guides, and this creates real confusion. Some say 20 minutes. Others say up to 3 hours. Here is what we have found works best based on feedback from our clients:
Soak your cane webbing in warm (not hot) water for 20–30 minutes. It should be flexible and easy to bend without cracking. If you soak too long, the fibers become mushy, weak, and prone to warping once dried. If you soak too little, the cane will crack when you try to press it into the groove.
Soak the reed spline for 15–30 minutes. It needs to be pliable enough to curve around corners without snapping.
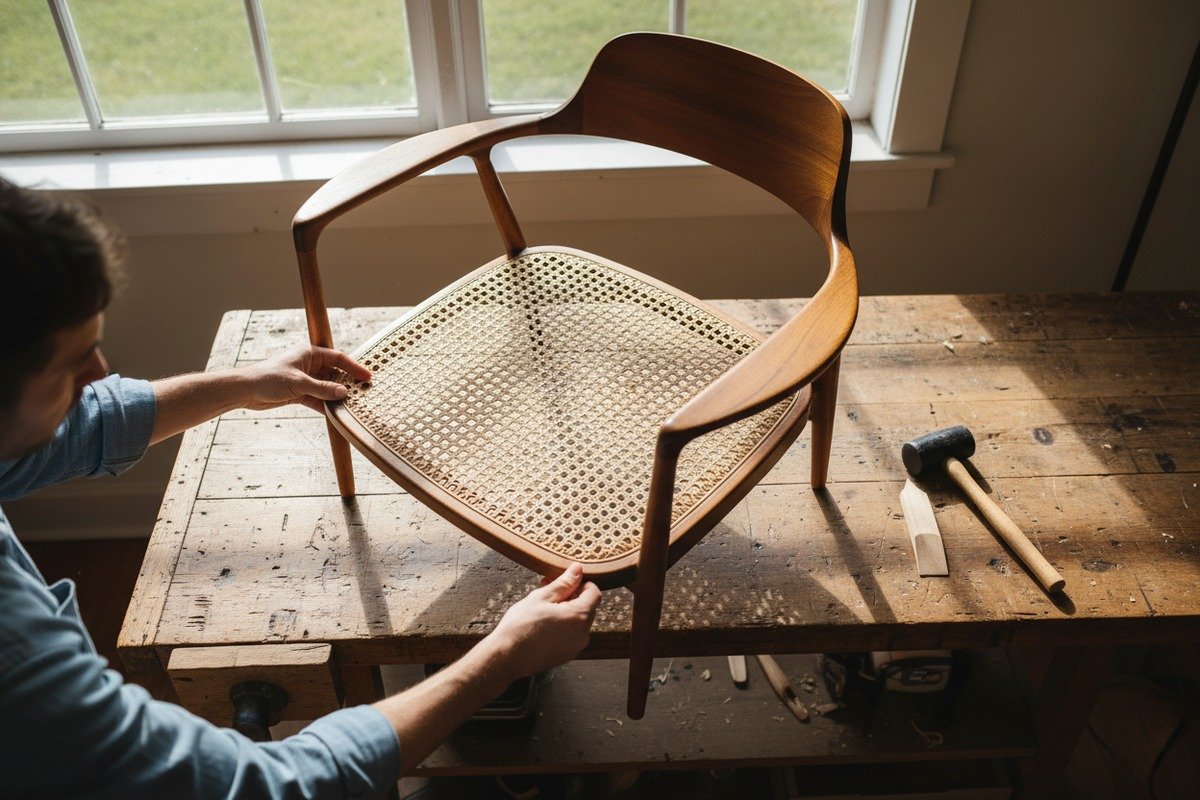
Installation Tips for a Tight Fit
Start by centering the webbing over the seat opening, smooth side up. The smooth side is the visible surface. Press the cane into the front groove first using your cane webbing tool or wooden wedges. Work from the center outward. Then do the back, then the sides.
Do not stretch the cane tight. It will shrink and tighten as it dries over the next 24 hours. If you pull it too tight during installation, it may tear or pull the spline out of the groove as it contracts.
Once the cane is seated in the groove all around, trim the excess cane about 1/8 inch outside the groove edge. Apply a thin, even bead of glue into the groove on top of the cane. Then press the spline in, tapping gently with the mallet. For square or rectangular seats, cut the spline at 45-degree angles at the corners. For round seats, use one continuous piece.
How do I choose the right grade of rattan webbing to ensure my repaired chair lasts for years?
Through years of quality-grading rattan at our processing facility in Indonesia, we have learned that not all cane webbing is created equal. The grade you choose determines how your chair looks, feels, and holds up over five, ten, or even twenty years of daily use.
Choose Grade A or premium-grade rattan webbing for chairs that will see regular use. Higher grades feature uniform strand thickness, fewer natural blemishes, consistent weave density, and greater tensile strength. Match the webbing pattern to your chair's original style and select the correct mesh size for both aesthetics and structural support.

What Makes a "Grade A" Rattan Webbing?
Grading in the rattan industry is not standardized globally, but reputable suppliers use consistent criteria. Here is what separates good webbing from great webbing:
Strand uniformity is the first indicator. In high-grade webbing, every strand is close to the same width and thickness. This creates an even, attractive pattern with no thin spots that might break under stress.
Color consistency matters both for appearance and for structural reasons. Wide color variation often means mixed batches of rattan from different harvests or processing runs. Uniform color indicates controlled processing—proper drying, sorting, and sometimes bleaching.
Weave tightness affects strength directly. A tightly woven sheet distributes weight more evenly across the seat. Loose weaves sag faster and are more prone to stretching out.
Flexibility after soaking tells you about fiber health. Good rattan bends smoothly without splintering. Poor-grade material cracks or flakes even after proper soaking.
Common Webbing Patterns and Their Best Uses
| Pattern | Description | Best For | Долговечность |
|---|---|---|---|
| Hexagonal open mesh (radio weave) | Classic six-sided openings | Traditional and vintage chairs | Good—breathable, moderate strength |
| Square basketweave | Dense, tight grid pattern | Heavy-use dining chairs | Excellent—strong, supportive |
| Diamond motif | Complex geometric pattern | Decorative and accent chairs | Good—visually striking, moderate use |
| Chevron wave | V-shaped repeating design | Modern and contemporary furniture | Good—unique aesthetic, moderate strength |
| Close-woven (fine mesh) | Very tight, almost solid weave | Formal seating, headboards | Excellent—maximum support |
Matching Webbing to Your Chair's Era
For authentic vintage restoration, pattern choice matters. Most mid-century modern chairs originally used the hexagonal open mesh. Victorian and Edwardian pieces often had finer, tighter weaves. If you are restoring a chair for resale or display, matching the original pattern adds value.
If you care more about durability than historical accuracy, the square basketweave is hard to beat. It handles weight well and resists stretching over time. Many of our wholesale clients who supply furniture factories recommend basketweave for commercial dining chairs and hospitality furniture.
Longevity Tips After Installation
A properly installed cane seat can last 10–15 years or more with basic care. Here are the habits that extend its life:
Keep the chair away from direct, prolonged sunlight. UV exposure dries out natural rattan and makes it brittle over time. If the chair sits near a window, consider rotating it periodically.
Avoid sitting on a cane seat with wet clothing. Repeated moisture exposure weakens the fibers and can promote mold in humid climates.
Dust the cane regularly with a soft brush or vacuum with a brush attachment. Dirt and grit that settle into the weave act as abrasives and accelerate wear.
Once or twice a year, lightly mist the underside of the cane seat with water using a spray bottle. This prevents the rattan from becoming too dry and cracking. Do not soak it—just a light mist.
Cost Comparison: DIY vs. Professional
One of the strongest arguments for doing this yourself is the cost savings. Professional cane seat replacement typically costs $100–$300 per chair depending on location, chair complexity, and the shop's reputation. A DIY approach costs a fraction of that.
Materials for a single chair—webbing, spline, and glue—run about $20–$50. If you already own basic tools like a chisel and mallet, your total out-of-pocket cost stays very low. Even buying a complete tool kit adds only $30–$50, and those tools work for every future chair.
For someone with a set of six dining chairs, the math is compelling. Professional restoration might cost $600–$1,800. DIY materials for all six chairs might total $120–$200. That is a significant difference, especially when the skill level required is genuinely accessible.
Заключение
Replacing rattan cane webbing is a rewarding DIY project within reach of most people. With the right materials, proper preparation, and a few hours of patience, you can bring old chairs back to life beautifully and affordably.
Сноски
1. Informational article about cane webbing. ↩︎
2. Describes pre-woven cane sheets, their mesh, and application in chair caning and restoration. ↩︎
3. Identifies reed spline as a material used with cane webbing for caning chairs. ↩︎
4. Distinguishes hand caning as a technique using individual strands through drilled holes. ↩︎
5. Highlights the classic hexagonal open-weave pattern for its breathability and timeless vintage aesthetic. ↩︎
6. Defines spline as a wedge-shaped reed used to secure sheet cane into chair grooves. ↩︎
7. Explains PVA glue’s strong bonding with wood, flexibility, and non-toxic properties for woodworking. ↩︎
8. Details the versatility of a rubber mallet for gently tapping wooden joints without damage. ↩︎
9. Article explaining what natural rattan material is and its properties. ↩︎
10. Explains how direct UV rays dry out natural rattan fibers, causing cracks and color fading. ↩︎

