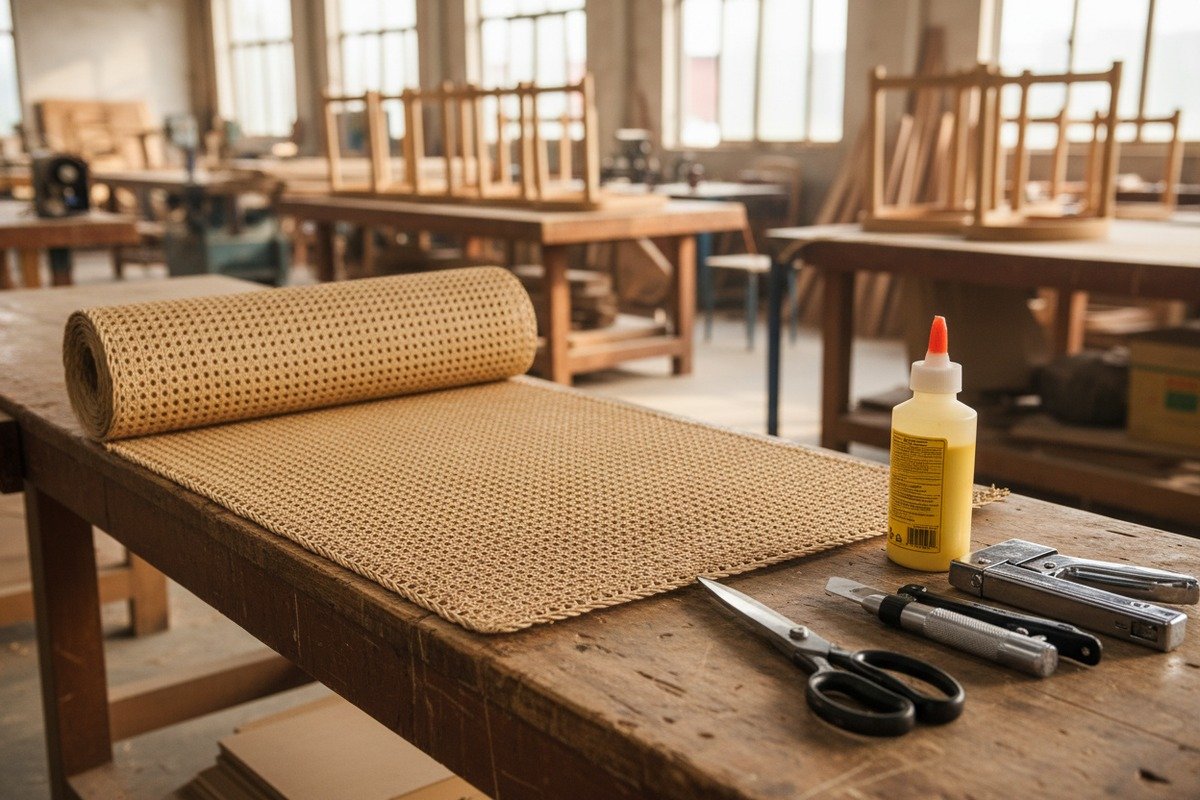
Cada semana, nuestro equipo de producción en Foshan maneja cientos de pedidos de cincha de ratán 1. ¿La queja más común que escuchamos de los compradores primerizos? Bordes deshilachados e inacabados que arruinan una pieza de mobiliario por lo demás hermosa herramientas de corte 2. Cortas la cincha, la grapas y luego te quedas mirando esos bordes ásperos y desordenados preguntándote qué salió mal. La verdad es que la cincha en sí rara vez es el problema. El acabado lo es.
El acabado de los bordes de la rejilla de ratán natural requiere una combinación de herramientas de corte como tijeras afiladas o un cúter, adhesivos como cola de madera, sujetadores como grapadoras o clavos de latón, y materiales de cobertura que incluyen listones de ratán, molduras decorativas de madera o junco redondo para ocultar los bordes crudos y evitar el deshilachado.
Esta guía desglosa todos los materiales que necesitas, desde herramientas básicas hasta suministros de acabado especializados. Ya seas un gerente de fábrica de muebles que pide rollos a granel o un entusiasta del bricolaje que aborda tu primer proyecto de caña, encontrarás respuestas claras a continuación.
¿Qué herramientas y adhesivos específicos necesito para terminar los bordes de mi tejido de ratán?
Caminando por el piso de nuestra fábrica, verás bancos de trabajo alineados con una lista sorprendentemente corta de herramientas. Sin embargo, muchos compradores nos contactan confundidos sobre lo que realmente necesitan. El problema es simple: demasiadas guías en línea mezclan herramientas para caña tejida a mano con herramientas para cincha pretejida. Son procesos diferentes con requisitos diferentes.
Para terminar los bordes del tejido de ratán, necesitarás tijeras afiladas o un cúter para recortar, una grapadora para fijar, cola de madera o adhesivo para manualidades para pegar, un mazo de goma o un cincel plano para presionar las varillas, y papel de lija de grano fino para alisar las fibras ásperas a lo largo de la línea de corte.

Herramientas de corte esenciales
El primer paso en cualquier trabajo de acabado de bordes es un corte limpio. Las cuchillas desafiladas causan los mayores dolores de cabeza. Rasgan las fibras tejidas en lugar de cortarlas. Esto crea un borde irregular que ninguna cantidad de recorte puede ocultar por completo.
Usa tijeras de alta resistencia para tejidos más ligeros como patrones finos de octágono. Para cinchas más gruesas de tejido cerrado (aproximadamente 1/16" de grosor), un cúter afilado con una cuchilla nueva funciona mejor. Corta siempre sobre una superficie plana con una regla metálica como guía. Le decimos a nuestros clientes mayoristas que tengan cuchillas de repuesto a mano. Una cuchilla generalmente se desafila después de unos 3 metros de corte.
Adhesivos que realmente se adhieren
No todos los pegamentos funcionan en ratán. El material es orgánico, poroso y ligeramente aceitoso en la superficie. Esto es lo que hemos probado en nuestro taller:
| Tipo de Adhesivo | Fuerza de unión | Tiempo de secado | Mejor caso de uso |
|---|---|---|---|
| Pegamento para madera PVA 3 | Fuerte | 1–2 horas | Instalaciones de ranura y lengüeta |
| Adhesivo de contacto 4 | Muy Fuerte | 15–30 minutos | Fijación de moldura de marco plano |
| Pegamento caliente | Moderada | 30 segundos | Reparaciones rápidas de bricolaje, fijaciones temporales |
| Resina epoxi | Muy Fuerte | 4–24 horas | Acabados modernos con bordes sellados |
| Pegamento blanco para manualidades | Débil | 1–2 horas | No recomendado para muebles |
El pegamento para madera PVA es el estándar de la industria. Penetra bien en las fibras de ratán y se seca flexible. El adhesivo de contacto es una alternativa sólida cuando necesita una sujeción instantánea, especialmente para unir ribetes de cuero o cinta de chapa. La pistola de pegamento caliente está bien para proyectos de manualidades pequeños, pero se ablandará en ambientes cálidos. No lo recomendamos para muebles que se encuentran cerca de ventanas o en climas tropicales.
Herramientas de fijación
Más allá del adhesivo, los sujetadores mecánicos añaden seguridad real. Una pistola de grapas de corona estrecha 5 es ideal. Utilice grapas de 6 mm a 10 mm de largo. Cualquier cosa más larga corre el riesgo de atravesar marcos delgados. Los clavos de calibre 18 funcionan bien para unir molduras de madera sobre el borde de la cincha. Un mazo de goma ayuda a insertar las espigas en las ranuras sin agrietarlas.
Suministros de lijado
Papel de lija de grano fino 6 (220 granos o superior) es su toque final. Lije ligeramente los bordes cortados de la cincha después de recortarla. Esto elimina las fibras sueltas y crea una superficie más lisa para la adhesión del pegamento. No lije en exceso. El ratán es delgado y el lijado agresivo puede debilitar el tejido cerca del borde.
¿Debo usar listones de ratán o tiras de madera para ocultar las grapas en mi proyecto de muebles?
Esta es la pregunta que nuestro equipo de exportación recibe con más frecuencia de las fábricas de muebles en los Países Bajos y Australia. Ambos métodos funcionan. Pero elegir el incorrecto para su tipo de marco conduce a la pérdida de tiempo y materiales. Hemos enviado espigas de ratán 7 y molduras de madera a docenas de países, y la respuesta siempre depende de una cosa: la construcción de su marco.
Use rattan splines if your frame has a pre-routed groove, as splines lock the webbing in place and create an invisible seam. Use wood strips or decorative molding if your frame is flat, since they cover stapled edges cleanly and add a polished, furniture-grade finish.

Comprensión de las espigas de ratán
Una espiga de ratán es una pieza de junco redonda o en forma de cuña. Está diseñada para presionarse en una ranura (también llamada canal o rebaje) que se ha fresado en el marco de madera. Cuando empuja la espiga con pegamento, esta aprieta la rejilla de caña contra las paredes de la ranura. Esto crea un borde muy limpio, casi invisible.
Las espigas son el método tradicional para los asientos de sillas de caña y muchos estilos de muebles europeos clásicos. La ventaja es obvia: sin sujetadores visibles, sin piezas de moldura, solo una línea suave donde la caña se une a la madera.
Sin embargo, las espigas requieren un marco ranurado. Si su marco no tiene una ranura, necesitará una fresadora para crear una. Esto agrega un paso. Para la producción de alto volumen, nuestros socios de fábrica en Foshan pre-ranuran todos sus marcos antes de pedirnos la rejilla.
Comprensión de las molduras de tiras de madera
Las tiras de madera, también llamadas molduras o remates de cuentas, se asientan sobre la superficie del marco. Cubren el borde grapado o pegado de la rejilla. Las fija con clavos de tapicero, pegamento para madera o ambos.
Este método es más indulgente. Funciona en cualquier marco plano. No requiere una ranura. Y permite opciones decorativas: molduras redondeadas, tiras planas, molduras teñidas o incluso acentos pintados.
¿La desventaja? La moldura es visible. Se asienta sobre la superficie del marco. A algunos diseñadores les encanta este aspecto. Otros lo encuentran demasiado voluminoso para proyectos minimalistas.
Comparación lado a lado
| Característica | Espiga de ratán (Ranura) | Moldura de tira de madera 8 (Superficie) |
|---|---|---|
| Requisito del marco | Ranura pre-enrutada necesaria | Marco plano, sin ranura |
| Visibilidad | Casi invisible | Línea de recorte visible |
| Tools Needed | Cincel, mazo, pegamento | Clavadora neumática, pegamento |
| Nivel de dificultad | Intermedio | Principiante |
| Mejor para | Asientos de sillas, muebles tradicionales | Puertas de gabinete, paneles, cabeceros |
| Costo por proyecto | $5–$15 | $10–$30 |
| Durabilidad | Excelente (bloqueado en la ranura) | Bueno (depende del adhesivo) |
Cubiertas de borde alternativas
Más allá de las espigas y las tiras de madera, algunos de nuestros clientes han explorado alternativas creativas. La cinta de chapa de madera autoadhesiva se puede planchar para obtener un borde sin costuras. Las tiras delgadas de cuero aseguradas con tachuelas decorativas ofrecen un acabado lujoso. Las cuerdas de fibra natural como el yute o el ratán delgado se pueden enrollar a mano alrededor de los bordes para un aspecto rústico y artesanal. Cada opción tiene su lugar dependiendo de la estética del diseño.
Para la mayoría de los muebles de producción, recomendamos espigas para marcos ranurados y molduras de madera para todo lo demás. Es el enfoque más seguro y probado.
¿Cómo elijo el tamaño correcto de la espiga de junco para las ranuras de mi tejido de ratán?
Equivocarse con el tamaño de la varilla es uno de los errores más frustrantes en el trabajo de caña. Lo vemos regularmente cuando los compradores nuevos piden varillas sin medir primero sus ranuras. Demasiado delgada, y la varilla se tambalea suelta. Demasiado gruesa, y agrieta el marco o se niega a encajar correctamente. Ambos problemas significan material desperdiciado y producción retrasada.
Elija el tamaño de su junquillo de caña midiendo el ancho de la ranura de su marco con un calibrador. El diámetro del junquillo debe coincidir estrechamente con el ancho de la ranura, generalmente entre 3 mm y 7 mm. Un junquillo ligeramente más grande que la ranura asegura un ajuste ceñido y de fricción cuando se golpea con pegamento y un mazo.

Cómo medir su ranura
Use un par de calibradores digitales 9. Mida el ancho de la ranura en la abertura superior. Luego mida la profundidad. Anote ambos números. La varilla debe encajar en el ancho y no debe ser más larga que la profundidad de la ranura, o sobresaldrá por encima de la superficie del marco.
La mayoría de los marcos de muebles estándar utilizan ranuras de entre 3 mm y 6 mm de ancho, con una profundidad de 8 mm a 12 mm. Los marcos personalizados o antiguos pueden variar. Siempre mida. Nunca adivine.
Tamaños comunes de varillas
| Ancho de la ranura | Tamaño de lengüeta recomendado | Aplicación típica |
|---|---|---|
| 3mm | Junco redondo de 3 mm-3.5 mm | Sillas antiguas delicadas |
| 4mm | Junco redondo de 4 mm-4.5 mm | Sillas de comedor estándar |
| 5mm | Junco redondo de 5 mm-5.5 mm | Paneles de puertas de armario |
| 6mm | Junco redondo de 6 mm-6.5 mm | Marcos de asientos de alta resistencia |
| 7mm | Varilla en cuña de 7 mm | Marcos personalizados de gran tamaño |
La prueba de ajuste
Antes de pegar, haga una prueba en seco. Presione el junquillo en la ranura con la mano. Debería entrar con una ligera resistencia. Si entra libremente, es demasiado pequeño. Si no puede introducirlo en absoluto, es demasiado grande. El ajuste ideal requiere un mazo de goma para asentarlo completamente.
Al trabajar con nuestra planta de procesamiento de ratán en Indonesia, clasificamos nuestros junquillos por consistencia. Los junquillos de Grado A tienen un diámetro uniforme con una variación mínima. Esto es importante porque incluso una inconsistencia de 0,5 mm a lo largo de un junquillo de 2 metros puede causar problemas de ajuste.
Opciones de material para junquillos
El junquillo redondo es el material más común. Es flexible, asequible y está fácilmente disponible en tamaños estándar. Algunos artesanos prefieren un junquillo en forma de cuña o plano para ranuras más anchas. Los junquillos en cuña crean un ajuste más apretado porque se comprimen al ser golpeados.
También existen junquillos sintéticos. Están hechos de PVC o nylon. Resisten la humedad mejor que el junquillo natural. Pero carecen del aspecto y la sensación orgánica que proporciona el ratán natural. Para los clientes que valoran la sostenibilidad y la autenticidad, los junquillos de junquillo natural siguen siendo la mejor opción.
Consejos de instalación
Remoje el junquillo en agua tibia durante 10 a 15 minutos antes de la instalación. Esto lo hace flexible y reduce la posibilidad de agrietamiento. Aplique una fina capa de cola de madera en la ranura. Coloque la tela sobre la ranura con aproximadamente 1 pulgada de solapamiento. Presione el junquillo con un cincel plano, golpeando suavemente con un mazo. Trabaje en secciones pequeñas. En las esquinas, corte el junquillo en un ángulo de 45 grados para una unión a inglete limpia. Deje que todo se seque durante 24 horas antes de recortar el exceso de tela con un cúter.
¿Qué materiales de acabado evitarán que los bordes de mi ratán natural se deshilachen con el tiempo?
Los bordes deshilachados son la queja de calidad número uno que recibimos de los clientes mayoristas que omiten el paso de acabado. Después de pasar semanas buscando tela de ratán de Grado A e instalándola cuidadosamente, ven cómo los bordes se deshilachan lentamente durante el envío o a las pocas semanas del ensamblaje final. Las fibras son naturales. Quieren deshilacharse. Tu trabajo es detenerlas.
Para evitar que los bordes de ratán natural se deshilachen, aplique una capa transparente de poliuretano o barniz a lo largo de los bordes cortados, asegúrelos debajo de molduras de madera o ranuras, y selle opcionalmente las fibras expuestas con pegamento PVA diluido. Estas capas protectoras fijan las fibras tejidas en su lugar y las protegen de la humedad, el manejo y la exposición a los rayos UV.

Capas transparentes y selladores
Una fina capa de poliuretano transparente 10 a lo largo del borde cortado es la medida más sencilla para evitar que se deshilache. Use un pincel pequeño. Aplíquelo solo en el borde, no en toda la cara de la cincha. Esto mantiene intacto el aspecto natural mientras une las fibras sueltas. El poliuretano a base de agua se seca más rápido y tiene menos olor que las versiones a base de aceite. Ambos funcionan bien.
El barniz y la laca también son opciones. El barniz da un tono ligeramente ámbar que complementa el oscurecimiento natural del ratán con el tiempo. La laca se seca más dura pero puede sentirse plástica en un material natural. Para nuestros clientes en Oriente Medio y regiones tropicales, a menudo recomendamos poliuretano de grado marino para una mayor resistencia a la humedad.
El truco del pegamento diluido
Esta es una técnica que nuestros trabajadores de fábrica utilizan a diario. Mezcle pegamento de madera PVA con agua en una proporción de 1:1. Píntelo sobre los bordes cortados en bruto. A medida que se seca, penetra en las fibras y crea un sello flexible e invisible. No cambiará el color ni la textura del ratán. Este método es especialmente útil para cinchas que quedarán ocultas detrás de los adornos, ya que añade una capa adicional de protección debajo de la cubierta decorativa.
Protección UV
El ratán natural se oscurece cuando se expone a la luz solar. Esto es normal y a menudo deseable. Pero la exposición a los rayos UV también seca las fibras, haciéndolas quebradizas y propensas a agrietarse en los bordes. Un revestimiento transparente resistente a los rayos UV ayuda. Algunos de nuestros clientes europeos especifican acabados que bloquean los rayos UV en todos los componentes de los muebles de ratán para exteriores.
Cubiertas físicas para los bordes
Más allá de los tratamientos químicos, las barreras físicas son la solución a largo plazo más fiable. Los adornos de madera, las ranuras, las tiras de cuero, la cinta de chapa y el cordón tejido cumplen este propósito. Evitan físicamente que las fibras del borde se enganchen en la ropa, los dedos u objetos que pasan. Para muebles de alto tráfico como sillas de comedor, siempre recomendamos tanto un sellador como una cubierta física.
Mantenimiento a lo largo del tiempo
Incluso con un acabado adecuado, el ratán natural se beneficia de un cuidado ocasional. Una capa ligera de sellador transparente cada 2 o 3 años mantiene los bordes protegidos. Evite los productos a base de petróleo. Pueden oscurecer y ablandar el ratán. La cera de abejas es una alternativa natural que algunos fabricantes de muebles artesanales prefieren. Añade un brillo sutil y un aroma agradable.
Qué evitar
No tiña la cincha en sí. La mancha penetra de manera desigual en el patrón tejido y crea una apariencia moteada. Si desea un aspecto más oscuro, tiña solo el adorno de madera o el marco. El ratán se oscurecerá naturalmente con el paso de las semanas. Evite también remojar los bordes acabados en agua. Una vez que la cincha esté instalada y seca, volver a mojarla puede causar deformaciones y aflojar las uniones del pegamento.
Conclusión
El acabado de los bordes de la cincha de ratán natural depende de las herramientas adecuadas, los materiales de cobertura adecuados, las ranuras de tamaño adecuado y los selladores protectores. Invierta en estos elementos básicos y sus proyectos de muebles se verán profesionales y durarán años.
Notas al pie
1. Explica el proceso de fabricación y control de calidad de la cincha de ratán. ↩︎
2. Proporciona una lista de herramientas esenciales para la reparación y el recorte de muebles de caña. ↩︎
3. Explica por qué los adhesivos de PVA son el estándar de oro para la carpintería, detallando sus propiedades. ↩︎
4. Encontró una página autorizada de Wikipedia que explica el pegamento de contacto, también conocido como cemento de contacto. ↩︎
5. Explora las características, aplicaciones y beneficios de las grapadoras de corona estrecha en la carpintería y los muebles. ↩︎
6. Proporciona una guía detallada de los granos de papel de lija, incluidos los usos de los granos finos en el acabado. ↩︎
7. Describe las espigas de caña, su material y cómo se utilizan para asegurar el tejido de caña. ↩︎
8. Explora los tipos de molduras decorativas de madera y su aplicación en el diseño de hogares y muebles. ↩︎
9. Encontró una página autorizada de Wikipedia con una sección dedicada a los calibradores digitales. ↩︎
10. Explica qué es el poliuretano, sus tipos y sus beneficios como acabado protector de la madera. ↩︎

