كل أسبوع، يشحن فريق الإنتاج لدينا في فوشان rattan cane webbing 1 إلى صانعي الأثاث في أكثر من 30 دولة - وأكثر شكوى نسمعها من المشترين لأول مرة؟ شبكات متشققة أو منفصلة أو مترهلة بعد التركيب. الحقيقة المحبطة هي أن معظم حالات الفشل تعود إلى سوء الإعداد، وليس سوء المواد. تخطي خطوة إعداد واحدة فقط يمكن أن يدمر مقعد كرسي كامل أو لوح خزانة، مما يهدر الوقت والمال.
لتحضير شبكة قصب الروطان قبل التركيب، تحتاج إلى نقعه في ماء دافئ لمدة 30 إلى 60 دقيقة حتى يصبح مرنًا، وقصه مع ترك 1 إلى 2 بوصة من المواد الإضافية على جميع الجوانب، وتنظيف سطح الإطار وتجهيزه، وتجربة تركيب الشبكة لمحاذاة نمط النسيج قبل تثبيتها.
هذا الدليل يأخذك عبر كل خطوة من خطوات الإعداد بالتفصيل. سواء كنت تدير مصنع أثاث، أو تبيع مواد الروطان بالجملة، أو تقوم بترميم الكراسي القديمة كعمل جانبي، فإن الحصول على الإعداد الصحيح هو ما يفصل النتيجة الاحترافية عن النتيجة الهاوية. دعنا نقسمها قسمًا تلو الآخر.
كم من الوقت يجب أن أنقع قصب الروطان الخاص بي لجعله مرنًا؟
لقد اختبرنا أوقات النقع عبر آلاف الدفعات في منشأة معالجة الروطان لدينا في إندونيسيا، والفرق بين قصب الروطان المنقوع بشكل صحيح وغير المنقوع بشكل كافٍ هو فرق كبير. قصب الروطان الجاف صلب وهش. حاول ثنيه دون نقعه وستسمع صوت فرقعة. هذا الصوت المتشقق يعني أليافًا مكسورة، ومواد مهدرة، وبداية محبطة لأي مشروع.
Soak natural rattan cane webbing in warm water for 30 to 60 minutes to achieve optimal pliability. Use water between 20°C and 40°C. Avoid soaking longer than 4 hours, as over-soaking weakens the fibers, causes darkening, and increases the risk of mold growth.

لماذا الماء الدافئ هو الأفضل
يفتح الماء الدافئ الألياف الطبيعية لقصب الروطان بشكل أسرع من الماء البارد. إنه يلين بنية اللجنين والسليلوز 2 دون صدمة المادة. الماء الساخن، من ناحية أخرى، يمكن أن يتلف القصب. إنه يزيل الزيوت الطبيعية ويجعل الخيوط هشة بمجرد جفافها. فكر في الأمر مثل طهي المعكرونة - الماء الدافئ يفك الأشياء، لكن الماء المغلي يكسرها.
يوصي فريق مراقبة الجودة لدينا بدرجات حرارة الماء بين 25 درجة مئوية و 35 درجة مئوية لمعظم شبكات الروطان القياسية. إذا كنت تعمل في ورشة عمل باردة خلال فصل الشتاء، فاستخدم درجة حرارة 40 درجة مئوية للتعويض عن فقدان الحرارة.
وقت النقع حسب نوع المادة
ليست كل شبكات الروطان تُنقع بنفس الطريقة. نمط النسيج 3, ، سمك الخيط، وما إذا كان طبيعيًا أو مبيضًا يؤثر جميعها على التوقيت. إليك مرجع سريع:
| نوع المادة | وقت النقع الموصى به | الحد الأقصى لوقت النقع | ملاحظات |
|---|---|---|---|
| شبكات قصب الروطان الطبيعي (نسيج مفتوح) | 30 دقيقة | ساعتان | الأكثر شيوعًا؛ يلين بسرعة |
| شبكات قصب الروطان الطبيعي (نسيج كثيف) | 45-60 دقيقة | 3 ساعات | النسيج الأضيق يحتاج إلى مزيد من الوقت |
| شبكة قصب الروطان المبيضة 4 | 20-30 دقيقة | 1.5 ساعة | تمت المعالجة بالفعل؛ يصبح أكثر ليونة بشكل أسرع |
| قصب ورقي لتركيب الأخدود | 45-90 دقيقة | 4 ساعات | المواد السميكة تحتاج وقتاً أطول |
| حشوة القصب | 5–15 دقيقة | 30 دقيقة | النقع الزائد يجعله طريًا جدًا |
مشكلة النقع الزائد
أحد أكبر الأخطاء التي نراها بين المشترين هو ترك الخيزران في الماء طوال الليل. يفترضون أن "المزيد من النقع يساوي المزيد من المرونة". هذا خطأ. بعد حوالي ساعتين، يبدأ الخيزران الطبيعي في امتصاص الكثير من الماء. تتورم الألياف خارج نطاقها المرن. عندما تجف، تتقلص بشكل غير متساوٍ. هذا يخلق سطحًا يبدو ملتوياً، ويشعر بالضعف، وقد يتطور العفن في غضون أسابيع.
كان لدينا ذات مرة عميل مصنع أثاث في أستراليا نقع قصبهم لمدة 6 ساعات لأن ورشة عملهم كانت جافة جدًا. كانت النتيجة شبكة داكنة ولينة تمزقت أثناء التدبيس. بعد التحول إلى نقع لمدة 45 دقيقة مع لف بمنشفة مبللة أثناء التركيب، انخفض معدل الرفض لديهم إلى ما يقرب من الصفر.
تعديلات المناخ
رطوبة منطقتك مهمة. في المناخات الجافة مثل أجزاء من الشرق الأوسط أو أستراليا الداخلية، يفقد الخيزران الرطوبة بسرعة بعد إزالته من الماء. يوفر النقع الأطول قليلاً لمدة 45 إلى 60 دقيقة المزيد من وقت العمل. في المناطق الرطبة مثل جنوب شرق آسيا، يكفي عادةً نقع لمدة 30 دقيقة. تبطئ الرطوبة المحيطة في الهواء عملية التجفيف وتحافظ على مرونة القصب لفترة أطول.
خدعة مفيدة: بعد النقع، جفف الشبكة بمنشفة نظيفة ولفها بشكل غير محكم في قطعة قماش مبللة أثناء عملك. هذا يحافظ عليها مرنة دون الإفراط في الترطيب.
اختبر قبل الالتزام
قبل نقع القطعة الرئيسية، قم بقص قطعة صغيرة من الشبكة - حوالي 15 سم مربع - وانقعها أولاً. قم بثنيها بلطف بعد 20 دقيقة. إذا انثنت دون تشقق، فإن دفعتك جاهزة. إذا كانت لا تزال تبدو صلبة، امنحها 10 دقائق أخرى. هذا الاختبار البسيط يوفر المواد والإحباط.
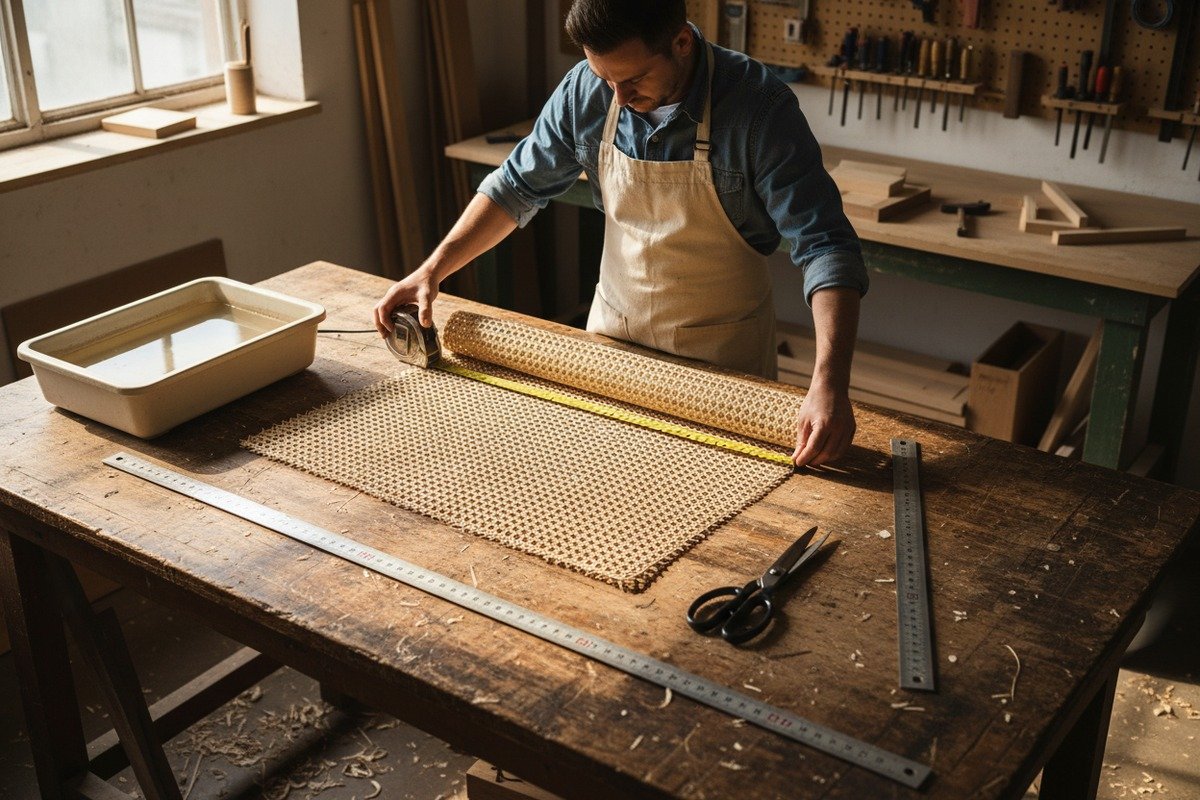
كيف أقيس وأقطع شبكة الروطان الخاصة بي لتقليل هدر المواد؟
عندما نقوم بإعداد طلبات بالجملة لتجار الأثاث في إسبانيا وهولندا، فإن كل سنتيمتر من المواد مهم. شبكة قصب الخيزران منتج طبيعي بتكلفة حقيقية وراءه - يتم حصاده وتجفيفه ونسجه وشحنه. قطعه بإهمال يعني إهدار المال. ومع ذلك، لا يزال العديد من المثبتين يقدرون قطعهم بالعين وينتهي بهم الأمر بنقص في جانب واحد أو بكميات من الخردة غير القابلة للاستخدام.
قم بقياس منطقة التركيب بدقة أولاً، ثم أضف 1 إلى 2 بوصة من المواد الإضافية على كل جانب قبل القطع. استخدم مشرطًا حادًا أو مقص قماش للقطع على طول خطوط النسيج. تسمح هذه الزيادة بالتمدد وتعديلات المحاذاة والتشذيب النظيف بعد تثبيت الشبكة.

عملية القياس خطوة بخطوة
ابدأ بقياس فتحة الإطار أو سطح اللوحة حيث ستوضع الشبكة. قم بقياس العرض والارتفاع في نقاط متعددة. نادراً ما تكون إطارات الأثاث القديم مربعة تمامًا، لذا خذ القياسات في الأعلى والوسط والأسفل. استخدم أكبر قياس كأساس لك.
ثم أضف التداخل الخاص بك. لـ التركيبات الملائمة للأخدود 6, ، أضف 1 بوصة على كل جانب. لطرق الدبابيس أو الغراء على الإطارات المسطحة، أضف 1.5 إلى 2 بوصة. هذه المادة الإضافية لا تضيع - يتم تقليمها بعد التركيب.
نصائح للقطع بحواف نظيفة
اقطع دائمًا على طول خط النسيج، وليس عبره بزاوية عشوائية. هذا يحافظ على خيوط الحافة سليمة ويمنع التفكك. حاد سكين متعدد الاستخدامات 7 يعمل بشكل أفضل على سطح قطع مسطح. الشفرات غير الحادة تسحق وتتلف الخيزران بدلاً من قطعه بشكل نظيف.
بالنسبة لللفات الكبيرة، قم بفك الشبكة على أرضية نظيفة ومسطحة. قم بتثبيت الزوايا بالكتب أو المشابك. حدد خطوط القطع بقلم رصاص أو طباشير. ثم اقطع بحركة واحدة سلسة.
تخطيط المواد لقطع متعددة
إذا كنت تعمل على عدة كراسي أو ألواح من لفة واحدة، خطط لجميع قطعك قبل البدء. ضع الأبعاد وحدد كيفية تداخلها لاستخدام أكبر قدر من المواد. إليك دليل تخطيط بسيط:
| نوع المشروع | حجم اللوحة النموذجي | التداخل المطلوب | المادة لكل وحدة |
|---|---|---|---|
| مقعد كرسي طعام | 40 × 40 سم | +5 سم لكل جانب | 50 × 50 سم |
| لوح باب الخزانة | 30 × 60 سم | +4 سم لكل جانب | 38 × 68 سم |
| لوح اللوح الأمامي | 90 × 60 سم | +5 سم لكل جانب | 100 × 70 سم |
| شاشة تقسيم الغرفة | 50 × 150 سم | +5 سم لكل جانب | 60 × 160 سم |
مراعاة الانكماش
تذكر أن نسيج قصب الروطان ينكمش بنسبة 10% إلى 20% أثناء جفافه بعد التركيب الرطب. هذا الانكماش هو ما يخلق السطح المشدود الذي يشبه الطبل الذي تريده. ولكنه يعني أيضًا أنك بحاجة إلى تلك الزيادة الإضافية. إذا قمت بالقص بشكل ضيق جدًا، فسوف ينسحب النسيج بعيدًا عن الحواف أثناء جفافه. كن دائمًا في جانب المواد الإضافية. يمكنك تقليمها لاحقًا، ولكن لا يمكنك إعادتها.
عندما ننصح عملائنا من الشركات (خاصة مصانع الأثاث التي تطلب لفات بكميات كبيرة)، نقترح دائمًا طلب 10% إلى 15% من المواد الإضافية أكثر من الإجمالي المحسوب. هذا يراعي هدر القطع، وأخطاء المحاذاة، وأي قسم معيب عرضي في أي منتج طبيعي.
جرب التركيب قبل الالتزام
بعد القطع، ضع النسيج فوق الإطار دون تثبيته. تحقق من محاذاة النسيج. يجب أن تكون خطوط النمط موازية لحواف الإطار. النسيج المائل يكون مرئيًا على الفور ويبدو غير احترافي. اضبط وأعد القطع إذا لزم الأمر قبل البدء في التركيب الفعلي.
ما هي الأدوات التي أحتاج إلى تجهيزها لتركيب احترافي للخيزران؟
على مر السنين، ساعد فريقنا مئات من صانعي الأثاث في إعداد أول سير عمل لتركيب الروطان الخاص بهم. نمط واحد نلاحظه مرارًا وتكرارًا: يركز المبتدئون على النسيج نفسه وينسون الأدوات. ثم في منتصف المشروع، يرتجلون بمقص المطبخ وسكين زبدة. النتيجة تبدو كذلك. وجود الأدوات المناسبة مرتبة أمامك قبل البدء هو نصف المعركة.
لتركيب شبكة قصب الروطان الاحترافية، تحتاج إلى سكين متعدد الاستخدامات حاد، وشريط قياس، ومقص، ومجموعة أوتاد أو بكرة شريط، ومطرقة مطاطية، وغراء خشب أو لاصق تلامس، ومشابك، وزجاجة رذاذ، ومناشف نظيفة، وكاشطة لتجهيز الإطار، وورق صنفرة ناعم لتشطيب الحواف.

قائمة أدوات أساسية
إليك قائمة أدوات كاملة منظمة حسب الوظيفة. لا تحتاج إلى كل عنصر من هذه العناصر لكل مشروع، ولكن توفرها يوفر الوقت والإحباط.
| أداة | الغرض | مطلوب لـ |
|---|---|---|
| شريط قياس | قياسات دقيقة للإطار والنسيج | جميع المشاريع |
| سكين متعدد الاستخدامات حاد | قطع نظيفة على طول خطوط النسيج | جميع المشاريع |
| مقص قماش | تقليم النسيج الزائد بعد التركيب | جميع المشاريع |
| مجموعة أوتاد (خشبية أو بلاستيكية) | ضغط القصب في الأخاديد | تركيبات تناسب الأخدود |
| بكرة الأخدود | دفع الشريط في الأخدود بالتساوي | تركيبات تناسب الأخدود |
| مطرقة مطاطية | طرق الأوتاد والشريط في مكانها | تركيبات تناسب الأخدود |
| مسدس دبابيس (يدوي أو هوائي) | تثبيت النسيج على الأطر المسطحة | تركيبات بطريقة الدبابيس |
| غراء الخشب / لاصق تلامس 8 | ربط الشريط الشبكي بالألواح أو بالشق في الأخاديد | طريقة الغراء وملاءمة الشق |
| مشابك (زنبركية أو شريطية) | إبقاء الشريط الشبكي مشدودًا أثناء التجفيف | جميع المشاريع |
| زجاجة رذاذ | الحفاظ على رطوبة الشريط الشبكي أثناء التركيبات الطويلة | جميع المشاريع |
| مناشف نظيفة / قطعة قماش مبللة | التجفيف بالتربيت بعد النقع؛ مسح الغراء الزائد | جميع المشاريع |
| مكشطة أو سكين معجون | إزالة القصب القديم أو الغراء أو الحطام من الإطار | مشاريع الترميم |
| ورق صنفرة ناعم (حصى 220) | تنعيم حواف الإطار قبل التركيب | معظم المشاريع |
| قلم رصاص أو طباشير | تحديد خطوط القطع وأدلة المحاذاة | جميع المشاريع |
أدوات تحضير الإطار
قبل أن تلامس أي شبكة الإطار، يجب أن يكون السطح نظيفًا وناعمًا. لمشاريع الترميم، استخدم مكشطة مسطحة لإزالة مادة القصب القديمة، والغراء الجاف، والطلاء من الأخدود أو حافة الإطار. اتبع ذلك بورق صنفرة بحبيبات 220 لإزالة البقع الخشنة التي يمكن أن تعلق أو تقطع الشبكة الجديدة.
للإطارات الجديدة، يزيل المسح السريع بقطعة قماش مبللة نشارة الخشب وبقايا التصنيع. إذا كان الإطار يحتوي على قناة أخدود، قم بتمرير مفك براغي رفيع أو مثقاب خلالها لتنظيف الحطام. الأخدود المسدود لن يقبل السبلين بشكل صحيح.
اختيار اللاصق المناسب
ليست كل أنواع الغراء تعمل بشكل جيد مع الروطان. توصيتنا بناءً على سنوات من اختبار المنتجات:
- غراء الخشب (PVA): الأفضل للتركيبات ذات الأخدود حيث يثبت السبلين القصب في مكانه. يجف بشكل شفاف ويربط الخشب بالألياف الطبيعية جيدًا.
- لاصق التلامس: الأفضل للصق الشبكة مباشرة على الألواح المسطحة. ضعها على كلا السطحين، اتركها لتصبح لزجة، ثم اضغط معًا. استخدم فقط التركيبات التي تجف بشكل شفاف لتجنب البقايا المرئية.
- الغراء الساخن: مقبول للمشاريع الزخرفية السريعة ولكنه ليس متينًا بما يكفي للمقاعد أو التطبيقات عالية الضغط.
تجنب الغراء الفائق (سيانو أكريلات). يجف بشكل صلب ويخلق بقعًا صلبة تتشقق تحت الانثناء. تجنب أيضًا أي لاصق يبقى مطاطيًا، لأنه لن يحافظ على الشد.
مسدسات الدبابيس الهوائية مقابل اليدوية
للإنتاج على نطاق المصنع، مسدس دبابيس هوائي 9 ضروري. يقوم بدفع الدبابيس بشكل متساوٍ وسريع، مما يقلل من إجهاد اليد عبر عشرات القطع يوميًا. للعمل بكميات صغيرة أو أعمال DIY، يعمل مسدس دبابيس يدوي عالي الجودة بدبابيس مقاس 8-10 مم بشكل جيد. فقط تأكد من أن الدبابيس ضيقة بما يكفي لعدم شق خيوط الروطان.
نصيحة من أرضية الإنتاج لدينا: اختبر دائمًا مسدس الدبابيس الخاص بك على قطعة خردة من الشبكة موضوعة فوق سطح خشبي مشابه. اضبط الضغط بحيث تستقر الدبوس بشكل مسطح مع الإطار دون قطع القصب.
كيف يمكنني التحقق من جودة لفائف الخيزران الخاصة بي قبل البدء في المشروع؟
من مصانعنا الثلاثة، نقوم بشحن شبكة قصب الروطان بدرجات تتراوح من الممتازة إلى الاقتصادية. وهنا ما نقوله لكل مشترٍ جديد: افحص دائمًا مادتك قبل البدء في القطع والنقع. اكتشاف عيب بعد التركيب مكلف. اكتشافه على طاولة الفرد لا يكلف شيئًا سوى بضع دقائق من الاهتمام.
افحص نسيج قصب الروطان عن طريق فرده بالكامل على سطح مستوٍ والتحقق من وجود خيوط مكسورة، وأنماط نسج غير متساوية، وتغير اللون، وبقع العفن، والجفاف المفرط أو الهشاشة. قم بثني قسم صغير باليد - يجب أن ينحني القصب عالي الجودة قليلاً دون أن ينكسر، حتى قبل نقعه.

أساسيات الفحص البصري
افرد القطعة بأكملها في منطقة جيدة الإضاءة. تتمتع شبكة الروطان الطبيعية ببعض التباين في اللون - وهذا أمر طبيعي بل ومفضل للمظهر العضوي. ما تبحث عنه هو العيوب، وليس الصفات الطبيعية. ابحث عن:
- خيوط مكسورة أو مفقودة في نمط النسيج. عدد قليل مقبول في لفات الدرجة الاقتصادية، ولكن المواد الممتازة يجب ألا تحتوي على أي منها.
- بقع داكنة أو بقع عفن. تشير هذه إلى تلف بسبب الرطوبة أثناء التخزين أو الشحن. يمكن أن ينتشر العفن إلى إطار أثاثك.
- اصفرار مفرط أو علامات تبييض. يجب أن يكون لون الروطان المبيض متساويًا. يشير التبييض غير المتساوي إلى معالجة غير متسقة.
- أقسام مسحوقة أو مسطحة بسبب سوء التعبئة. قد لا تتعافى هذه حتى بعد النقع.
اختبار المرونة
التقط زاوية من الشبكة وثنيها بلطف حوالي 30 درجة. سيتمدد قصب الروطان الطبيعي عالي الجودة مع بعض المقاومة ولكنه لن يتشقق أو ينكسر. إذا انكسر بسهولة في حالته الجافة، فإن المادة قديمة جدًا، أو جافة جدًا، أو منخفضة الجودة. من المحتمل أن تتشقق أثناء التركيب حتى بعد النقع.
بالنسبة للروطان المبيض، توقع مرونة أقل قليلاً في الحالة الجافة لأن عملية التبييض تزيل بعض الزيوت الطبيعية. سيستعيد النقع القصير معظم المرونة، ولكن القصب المبيض الهش للغاية هو علامة على المعالجة المفرطة.
التأقلم قبل التحضير
تفصيل واحد يتجاهله العديد من المثبتين: اترك الروطان يجلس غير مغلف في مساحة عملك لمدة 24 ساعة على الأقل قبل نقعه وتركيبه. هذا يسمح للمادة بالتكيف مع درجة حرارة ورطوبة غرفتك. يمكن أن ينكمش الروطان المشحون من مصنع استوائي رطب إلى ورشة عمل أوروبية جافة أو يصبح هشًا إذا عملت معه على الفور.
وجد عملاؤنا المصدرون في هولندا وإسبانيا أن خطوة التكييف البسيطة هذه تقلل من التشقق أثناء التركيب بهامش ملحوظ.
ماذا تفعل إذا وجدت عيوبًا
إذا وجدت مشكلات بسيطة - خيط مكسور واحد أو اختلاف بسيط في اللون - يمكنك عادةً تجاوزها عن طريق وضع العيب حيث سيتم إخفاؤه تحت حافة الإطار أو قصه. بالنسبة للعيوب الكبيرة مثل العفن أو الكسر الواسع أو تغير اللون الشديد، اتصل بالمورد الخاص بك على الفور. سيقوم تجار الجملة ذوو السمعة الطيبة باستبدال المواد المعيبة.
عند تقديم الطلبات معنا في Seafan Rattan، نشجع المشترين على طلب لفة عينة قبل الالتزام بشراء كبير. يتيح لك هذا اختبار سلوك النقع والمرونة واتساق النسيج على نطاق صغير قبل أن يصبح مهمًا في أرضية الإنتاج.
أفضل ممارسات التخزين
إذا لم تكن تقوم بالتركيب على الفور، قم بتخزين لفات الروطان الخاصة بك في مكان بارد وجاف بعيدًا عن أشعة الشمس المباشرة. ضعها بشكل مسطح أو علقها بشكل فضفاض - لا تضغط عليها تحت أشياء ثقيلة. الحرارة المفرطة أو التعرض للأشعة فوق البنفسجية تجفف الزيوت الطبيعية وتجعل القصب هشًا بمرور الوقت. غرفة تخزين مكيفة ومتحكم بها مثالية، خاصة للمخزون بالجملة.
خاتمة
التحضير السليم هو أساس كل تركيب ناجح لشبكة قصب الروطان. انقع بذكاء، وقس بعناية، واستخدم الأدوات المناسبة، وافحص دائمًا المواد الخاصة بك قبل القطع. هذه الخطوات تحمي استثمارك وتقدم نتائج احترافية في كل مرة.
ملاحظات سفلية
1. يقدم نظرة عامة شاملة على الروطان واستخداماته. ↩︎
2. يشرح التركيب الكيميائي لللجنين، وهو مكون رئيسي في ألياف النبات. ↩︎
3. يوضح أنماط النسيج المختلفة الموجودة في شبكة القصب. ↩︎
4. يشرح خصائص وعمليات التشطيب، بما في ذلك التبييض، للروطان. ↩︎
5. يحدد قوة الشد، وهي خاصية ميكانيكية حرجة للمواد مثل الروطان. ↩︎
6. يقدم دليلًا خطوة بخطوة لطريقة التركيب بالشقوق لنسيج القصب. ↩︎
7. يقدم وصفًا عامًا واستخدامات شائعة لسكين متعدد الاستخدامات. ↩︎
8. وجد تعريفًا موثوقًا للمواد اللاصقة بالملامسة من بريتانيكا. ↩︎
9. وجد مقالًا يعرف ويشرح مسدسات الدبابيس الهوائية واستخداماتها. ↩︎
10. وجد تعريفًا موثوقًا للرطوبة، والذي ينطبق على المواد الطبيعية، من ويكيبيديا. ↩︎

