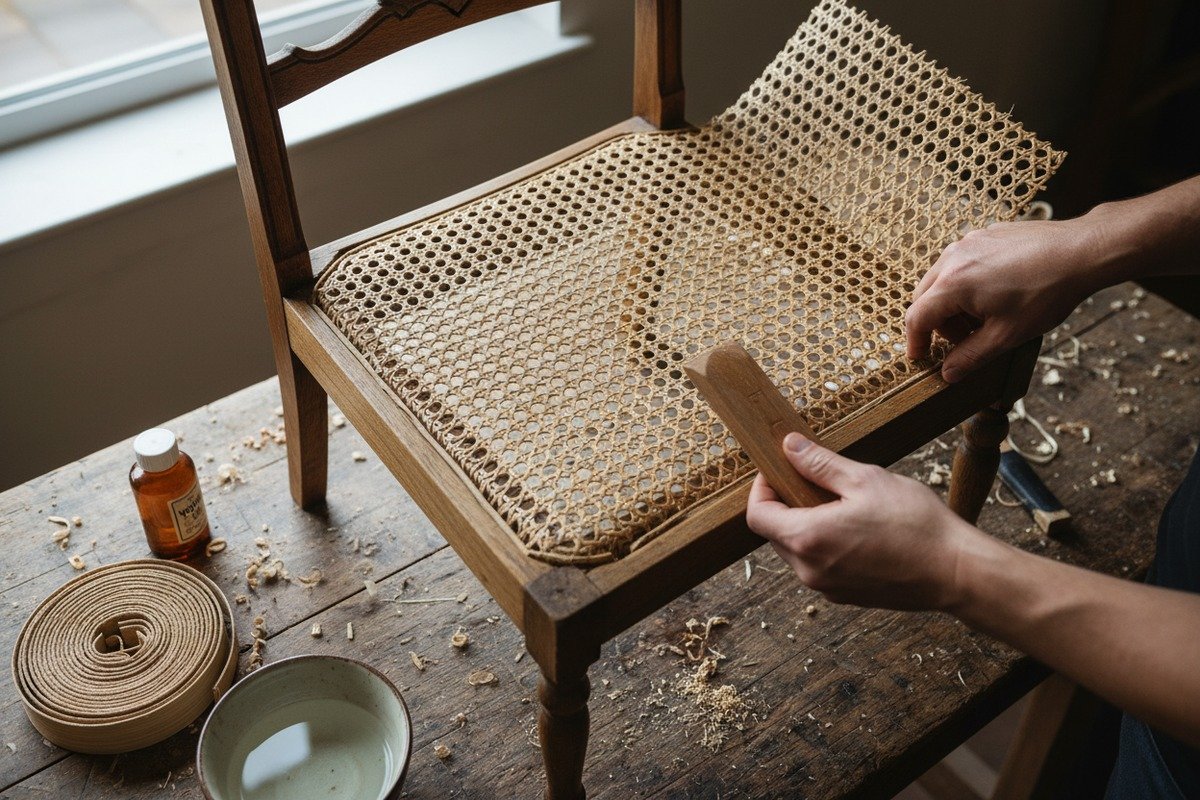
كل أسبوع، يشحن مصنعنا في فوشان مئات اللفائف من نسيج الخيزران الطبيعي 1 إلى مرممي الأثاث حول العالم. ومع ذلك، يستمر سؤال واحد في الوصول إلى صندوق الوارد لدينا: كيف يمكنني بالفعل استبدال الروطان التالف على كرسِي القديم؟ إنه سؤال عادل. قد يبدو الكرسي القديم الجميل ذو المقعد المصنوع من القصب المترهل أو الممزق أو المتفتت وكأنه قضية خاسرة مرممي الأثاث 2. يتزايد الإحباط عندما تدرك أن قطع الغيار غير متوفرة في متجر الأدوات المحلي الخاص بك، وأن تكاليف إعادة القصب الاحترافية يمكن أن تنافس سعر كرسي جديد تمامًا.
لاستبدال الروطان التالف على كرسي قديم، قم بإزالة القصب القديم والشرائح من أخدود المقعد، ونظف القناة جيدًا، وانقع شبكة الروطان المنسوجة مسبقًا لزيادة مرونتها، واضغطها في الأخدود، وثبتها بشرائح القصب اللاصقة، وقلم المواد الزائدة، واتركها تجف لمدة 24 ساعة للحصول على تشطيب محكم ودائم.
هذا الدليل يرشدك خلال كل مرحلة من مراحل العملية مقاعد القصب المضغوط 3. من اختيار الدرجة الصحيحة من الأشرطة إلى العثور على مورد بالجملة يشحن جودة متسقة، سيكون لديك خارطة طريق كاملة في النهاية. لنبدأ بالمواد نفسها.
كيف أختار الدرجة المناسبة من قصب الروطان الطبيعي لتجديد كرسيك؟
عندما نقوم بتصنيف أشرطة قصب الروطان في منشأة المعالجة لدينا في إندونيسيا، نقوم بالفرز حسب سمك الخيوط، وضيق النسيج، والتشطيب السطحي مقاعد القصب المنسوجة يدويًا (من ثقب إلى ثقب) 4. اختيار الدرجة الخاطئة هو أسرع طريقة لإفساد مشروع الترميم قبل أن يبدأ حتى. يحدد طراز الكرسي، وأبعاد الأخدود، والاستخدام المقصود كل ذلك الدرجة التي تحتاجها قطع الأثاث الحديثة من منتصف القرن 5.
اختر درجة نسيج قصب الروطان الطبيعي بمطابقة حجم الشبكة وقطر الخيط مع عرض أخدود كرسيك وفتحة المقعد. تتراوح الخيارات الشائعة من الناعم جدًا (شبكة 1/2 بوصة) إلى الخشن (شبكة 1 بوصة). قم بقياس الأخدود الخاص بك، وتحقق من حقبة الكرسي، وحدد كثافة النسيج التي تتطابق مع النمط الأصلي.

فهم درجات نسيج القصب
تأتي أشرطة قصب الروطان الطبيعية في عدة درجات قياسية. تشير كل درجة إلى عرض الخيوط الفردية وحجم فتحات الشبكة. تبدو الدرجة الدقيقة أكثر رقة وتناسب كراسي الصالون أو القطع الزخرفية. تتعامل الدرجة الخشنة مع الاستخدام اليومي الثقيل، مثل كراسي الطعام أو مقاعد البار.
إليك جدول مرجعي سريع:
| Grade | عرض الخيط | فتحة الشبكة | الأفضل لـ |
|---|---|---|---|
| فائق النعومة | ~2.0 ملم | ~1/2 بوصة | كراسي عتيقة رقيقة، قطع عرض |
| فاين-فاين | ~2.5 مم | ~5/8 بوصة | كراسي جانبية للاستخدام الخفيف، أثاث غرفة نوم |
| دقيق | ~2.75 مم | ~3/4 بوصة | كراسي طعام قياسية، معظم عمليات الترميم |
| متوسط | ~3.0 مم | ~7/8 بوصة | مقاعد للاستخدام المكثف، كراسي مطبخ |
| شائع | ~3.5 مم | ~1 بوصة | مقاعد متينة، أثاث شرفة |
قصب مضغوط مقابل قصب منسوج يدويًا
قبل أن تطلب أي شيء، تحتاج إلى تحديد نوع مقعد القصب الذي تحتويه كرسيك. هذه خطوة أولى حاسمة.
مقاعد القصب المضغوط تحتوي على أخدود مستمر محفور حول فتحة المقعد. يتم ضغط ورقة القصب المنسوجة مسبقًا في هذا الأخدود وتثبيتها بواسطة أوتاد القصب 6. هذا هو النوع الذي نركز عليه هنا. إنه أسرع في التركيب ويناسب معظم الكراسي القديمة المصنوعة بعد عام 1880.
مقاعد القصب المنسوجة يدويًا (من ثقب إلى ثقب) تحتوي على ثقوب فردية محفورة حول المحيط. يتم نسج كل خيط يدويًا عبر هذه الثقوب. هذه العملية تستغرق وقتًا أطول وتتطلب مجموعة مهارات مختلفة تمامًا. إذا كان كرسيك يحتوي على ثقوب محفورة، فلن تعمل ورقة القصب المضغوطة.
مطابقة النمط الأصلي
يرغب العديد من المرممين في أن يبدو القصب الجديد مثل الأصلي. افحص أي بقايا متبقية من النسيج القديم. احسب عدد الخيوط في البوصة. انظر إلى نمط النسيج - يستخدم معظم القصب المضغوط نمطًا سداسيًا قياسيًا (ستة اتجاهات)، ولكن بعض الكراسي تتميز بتصاميم ثمانية الأضلاع أو منسوجة بإحكام. ينتج مصنعنا جميع هذه الأنماط بتشطيبات طبيعية ومبيضة ومصبوغة، لذا فإن المطابقة عادة ما تكون مباشرة بمجرد تحديد النمط.
إذا كان الكرسي قطعة أثرية ذات قيمة تاريخية، فابحث عن العصر. الكراسي الفيكتورية 7 استخدمت عادةً شبكة دقيقة أو شبكة دقيقة جدًا. غالبًا ما استخدمت قطع منتصف القرن الحديث قصبًا متوسطًا أو مفتوح النسيج. الحصول على هذه التفاصيل بشكل صحيح يحافظ على الأصالة وقيمة إعادة البيع.
تحقق من عرض الأخدود
قم بقياس الأخدود على إطار الكرسي الخاص بك باستخدام الفرجار أو مسطرة صغيرة. عرض الأخدود الأكثر شيوعًا هو 1/4 بوصة، ولكن الكراسي القديمة أو الأوروبية لديها أحيانًا أخاديد بعرض 3/16 بوصة أو 5/16 بوصة. يحدد هذا القياس حجم الشريحة التي تحتاجها. الشريحة غير المتطابقة مسؤولة عن حوالي 80٪ من فشل تنجيد القصب بنفسك، وفقًا للمرممين ذوي الخبرة. يجب أن تناسب الشريحة بإحكام - ليست فضفاضة جدًا، وليست ضيقة جدًا لدرجة أنها تشقق الخشب.
ما هي الخطوات الأساسية التي أحتاج إلى اتباعها لتركيب شبكة الروطان الجديدة على كرسيك القديم؟
لقد ساعد فريقنا مئات المرممين لأول مرة في اجتياز هذه العملية. الخطوات بسيطة، لكن الترتيب مهم. تخطي مرحلة أو استعجل التحضير، وينتهي بك الأمر بإعادة القيام بالوظيفة بأكملها. الصبر هنا يوفر ساعات لاحقًا.
لتركيب قش الروطان الجديد، اتبع هذه الخطوات بالترتيب: افحص إطار الكرسي وقم بإصلاحه، قم بإزالة كل القصب والشرائح القديمة، نظف الأخدود، قم بشطف حواف الأخدود الحادة، انقع القصب والشرائح الجديدة، قم بمركز القصب واضغط عليه في الأخدود، قم بقص المواد الزائدة، ضع الغراء، قم بطرق الشرائح، واترك كل شيء ليجف لمدة 24 ساعة.

الخطوة 1: فحص إطار الكرسي
قبل لمس القصب، تحقق من السلامة الهيكلية للكرسي. هزّه. اضغط على المفاصل. إذا كانت أي مفاصل فضفاضة، فقم بتفكيكها، وأعد لصقها بالغراء الخشبي، وثبتها، واتركها لتجف طوال الليل. الإطار المهتز يضع ضغطًا على القصب الجديد ويقصر من عمره.
الخطوة 2: إزالة القصب القديم والشرائط
استخدم إزميل شرائط (من 1/8 إلى 3/8 بوصة، حسب حجم الأخدود) ومطرقة. احفر بعناية تحت الشرائط القديمة واخلعها. اعمل ببطء لتجنب خدش الخشب. بمجرد إزالة الشرائط، اسحب القصب القديم. اكشط كل بقايا الغراء المتبقية من الأخدود بإزميل ضيق أو مثقاب. يجب أن يكون الأخدود نظيفًا تمامًا.
الخطوة 3: تجهيز حواف الأخدود
غالبًا ما يتم تخطي هذه الخطوة، ولا ينبغي ذلك. استخدم ورق صنفرة بحبيبات 120 لتكوير أو شطف الحواف الداخلية للأخدود برفق. تعمل الحواف الحادة مثل شفرات صغيرة يمكن أن تقطع ألياف القصب الرطبة بمرور الوقت. دقيقة واحدة من الصنفرة الآن تضيف سنوات إلى عمر النسيج الجديد الخاص بك.
الخطوة 4: قص القصب ونقعه
قم بقص ورقة القصب المنسوجة مسبقًا أكبر بمقدار 1 إلى 2 بوصة من فتحة المقعد من جميع الجوانب. تمنحك هذه الزيادة مساحة كافية للضغط في الأخدود. اغمر القصب في الماء الدافئ لمدة 20 إلى 30 دقيقة. انقع شرائط القصب لمدة 10 إلى 15 دقيقة. لا تنقعها أكثر من اللازم. يصبح القصب المنقوع أكثر من اللازم طريًا، ويفقد ذاكرته الهيكلية، ويمكن أن يتشوه بشكل دائم.
| المادة | وقت النقع | درجة حرارة الماء | تحذير |
|---|---|---|---|
| ورقة قصب منسوجة مسبقًا | 20-30 دقيقة | دافئ (ليس ساخنًا) | الإفراط في النقع يسبب التشوه ويضعف الألياف |
| حشوة القصب | 10-15 دقيقة | دافئ (ليس ساخنًا) | النقع المفرط يجعل الشرائط طرية جدًا بحيث لا يمكن تثبيتها |
| قصب الربط (إذا تم استخدامه) | 5-10 دقائق | دافئ | مطلوب فقط للكراسي من ثقب إلى ثقب |
الخطوة 5: اضغط القصب في الأخدود
ضع القصب المنقوع فوق المقعد، والجانب الأملس لأعلى. قم بمحاذاة نمط النسيج بحيث يمتد بشكل مستقيم من الأمام إلى الخلف ومن جانب إلى جانب. ابدأ من منتصف مقدمة المقعد. استخدم أداة نسيج القصب (بكرة متخصصة بعجلة مسطحة) أو أوتاد خشبية للضغط على القصب في الأخدود. اعمل من منتصف المقدمة إلى الخارج، ثم انتقل إلى منتصف الخلف، وأخيرًا قم بالجانبين. أدخل أوتادًا مؤقتة لتثبيت القصب في مكانه أثناء العمل حول الإطار.
لا تسحب القصب مشدودًا جدًا. سوف ينكمش ويشد مع جفافه. إذا قمت بتمديده كثيرًا أثناء التركيب، يمكن للقصب الجاف أن يسحب الشرائط أو حتى يكسر الإطار.
الخطوة 6: قص القصب، ولصقه، وتثبيت الشرائط
بمجرد الضغط على القصب في الأخدود بالكامل، استخدم سكينًا حادًا لقص القصب الزائد خارج حافة الأخدود مباشرةً. ضع طبقة رقيقة ومتساوية من الغراء الأبيض غراء PVA 8 (أو غراء الجلد للقطع الأثرية) في الأخدود. ثم اضغط على شريط القصب المبلل في الأخدود، بدءًا من الجزء الخلفي من الكرسي. اضغط عليه برفق بمطرقة وقطعة خشب. بالنسبة للمقاعد المربعة أو المستطيلة، يمكنك قص الزوايا. بالنسبة للمقاعد المستديرة، حاول استخدام قطعة واحدة مستمرة من الشريط.
الخطوة 7: التجفيف والتشطيب
اترك الكرسي دون إزعاج لمدة 24 ساعة على الأقل. يشد القصب أثناء جفافه، ويتصلب الغراء بالكامل في هذا الوقت. بعد التجفيف، قم بقص أي ألياف متناثرة بالمقص. إذا كنت ترغب في مظهر مصبوغ، ضع صبغة خشب أو زيت تونغ بعد أن يجف القصب بالكامل - وليس قبل ذلك أبدًا.
كيف يمكنني العثور على مورد جملة موثوق به للحصول على الروطان عالي الجودة لعملي؟
إن تشغيل سلسلة توريد الروطان الخاصة بنا من مزارع إندونيسية إلى مستودعاتنا في فوشان قد أظهر لنا بالضبط ما يميز المورد الموثوق به عن المورد المحفوف بالمخاطر. إذا كنت مصنع أثاث، أو تاجر جملة للمواد، أو شركة توريد مواد بناء، فإن الحصول على روطان عالي الجودة بأسعار تنافسية هو العمود الفقري لهامشك.
ابحث عن مورد موثوق لمنتجات الخيزران بالجملة من خلال تقييم نظام تصنيف المواد لديهم، وطلب عينات مادية قبل الالتزام، والتحقق من طاقتهم الإنتاجية وشهادات المصنع، والتحقق من متانة التعبئة للشحن الدولي، والتأكد من أنهم يقدمون مجموعة منتجات كاملة بما في ذلك شبكات الخيزران، والشرائح، وأعمدة الخيزران الخام.

Where to Start Your Search
يبدأ معظم المشترين اليوم على Google أو Alibaba. كلا المنصتين تعرضان المصنعين وشركات التجارة. المفتاح هو التمييز بينهما. عادةً ما يعرض المصنع صورًا للمصنع ومقاطع فيديو للإنتاج ويقدم التخصيص. تقوم شركة تجارية بإعادة بيع المنتجات من مصادر متعددة، مما قد يعني جودة غير متسقة بين الطلبات.
اطرح هذه الأسئلة مبكرًا:
- هل تمتلك أو تدير مصنعك الخاص؟
- من أين يتم الحصول على مادة الروطان الخام الخاصة بك؟
- هل يمكنك توفير مواد من الدرجة الأولى باستمرار؟
- ما هي الحد الأدنى لكميات الطلب الخاصة بك؟
- كيف تقومون بالتعبئة للشحن الدولي؟
تقييم اتساق الجودة
يعد اتساق الجودة نقطة الألم رقم واحد لمشتري الخيزران. دفعة واحدة من النسيج السفلي - خيوط أرق، أو نسج غير متساوٍ، أو ألياف هشة - يمكن أن تدمر دفعة إنتاج من 500 كرسي. اطلب عينات من دفعتين إنتاج مختلفتين على الأقل. قارن سمك الخيوط، وتوحيد النسيج، واتساق اللون، والمرونة. يجب أن ينحني الخيزران من الدرجة الأولى دون تشقق وأن يكون له سطح أملس ومتساوٍ خالٍ من البقع السوداء أو العفن.
مقارنة أنواع الموردين
| نوع المورد | الإيجابيات | السلبيات | الأفضل لـ |
|---|---|---|---|
| الشركة المصنعة المباشرة (مثل Seafan Rattan) | جودة متسقة، أحجام مخصصة، أسعار تنافسية | حد أدنى للطلب أعلى، أوقات تسليم أطول للطلبات المخصصة | مصانع الأثاث، تجار الجملة الكبار |
| شركة تجارية | حد أدنى للطلب أقل، نطاق منتج واسع | تختلف الجودة بين الطلبات، تكلفة وحدة أعلى | تجار التجزئة الصغار، المشترون لأول مرة |
| بائع عبر الإنترنت | سهولة الطلب، حماية المشتري | لا يوجد تحقق من المصنع، تخصيص محدود | هواة الأعمال اليدوية، طلبات العينات |
اعتبارات التعبئة والشحن
الخيزران مادة طبيعية. يمتص الرطوبة ويمكن أن يتعفن إذا تم تعبئته بشكل سيء. يستخدم المورد الموثوق به غلافًا حاجزًا للرطوبة، وأنابيب كرتونية قوية للنسيج الملفوف، وعلبًا مقواة للألواح السائبة. لقد رأينا شحنات من موردين آخرين تصل مع لفات مسحوقة أو بقع عفن لأن التغليف الداخلي كان مجرد غلاف بلاستيكي رقيق. اطلب دائمًا مواصفات التعبئة مقدمًا. بالنسبة للشحن البحري إلى الولايات المتحدة أو أستراليا أو أوروبا، فإن أوقات العبور التي تتراوح من 25 إلى 40 يومًا تعني أن التعبئة يجب أن تتحمل تقلبات الرطوبة داخل حاوية الشحن.
بناء علاقة طويلة الأمد
أفضل علاقات الموردين مبنية على الشفافية. شارك توقعات حجم مبيعاتك السنوية. اسأل عن خصومات الكمية. اطلب مدير حساب مخصص. في منشآتنا، نخصص لكل عميل بالجملة جهة اتصال مباشرة تتتبع الطلبات من الإنتاج حتى التخليص الجمركي. هذا يقلل من سوء الفهم ويكتشف المشاكل قبل شحنها.
كيف أنقع وأشدّ قشّ النسيج بشكل صحيح لضمان بقائه متينًا ومشدودًا؟
من خلال سنوات من اختبار أوقات وتقنيات النقع المختلفة على شبكة الخيزران الخاصة بنا قبل الشحن، طورنا فهمًا واضحًا لكيفية تفاعل الماء مع ألياف الخيزران. الحصول على النقع والشد الصحيح هو الفرق بين مقعد يبقى مشدودًا لعقد من الزمان وآخر يرتخي في غضون أشهر.
انقع قش الروطان الطبيعي في ماء دافئ لمدة 20 إلى 30 دقيقة حتى يصبح مرنًا ولكن ليس رخوًا. اضغطه في الأخدود بقوة معتدلة - ليس مشدودًا بإحكام - لأن الروطان الرطب ينكمش بنسبة 5 إلى 8 بالمائة عند جفافه. هذا الانكماش الطبيعي يخلق السطح النهائي المشدود والمتساوي عبر فتحة المقعد.

لماذا النقع مهم
الخيزران الجاف صلب وهش. إذا حاولت الضغط على الخيزران الجاف في أخدود، فسوف يتشقق وينقسم على طول خطوط النسيج. يخترق الماء التركيب الخلوي لألياف الخيزران، مما يجعلها مرنة بما يكفي للانحناء حول الزوايا والضغط في قنوات ضيقة دون أن تنكسر. الهدف هو المرونة، وليس الرطوبة المفرطة.
عملية النقع بالتفصيل
املأ حوض استحمام، أو صينية كبيرة، أو وعاء بلاستيكي بالماء الدافئ. يجب أن يكون الماء مريحًا للمس - حوالي 80 إلى 100 درجة فهرنهايت (27 إلى 38 درجة مئوية). ضع ورقة الخيزران المقطوعة بشكل مسطح في الماء. اغمرها بالكامل. اضبط مؤقتًا.
بالنسبة للخيزران الناعم أو المتوسط القياسي، عادة ما يكون 20 دقيقة كافية. قد تحتاج الأنسجة الأكثر سمكًا أو الدرجات الخشنة إلى ما يصل إلى 30 دقيقة. اسحب الخيزران واختبر المرونة عن طريق ثني زاوية بلطف. يجب أن تنثني دون أن تتشقق. إذا كانت لا تزال تبدو صلبة، انقعها لمدة 5 دقائق أخرى. إذا بدت رخوة والخيوط تنزلق بسهولة، فقد نقعتها أكثر من اللازم.
ماذا يحدث عند النقع المفرط
النقع المفرط خطأ شائع. عندما تمتص ألياف الخيزران الكثير من الماء، فإنها تتورم خارج نطاقها المرن الطبيعي. عندما تجف، لا تعود إلى شدها الأصلي. النتيجة هي مقعد يبقى مرتخيًا وقد يتطور فيه ترهل مرئي في المنتصف. يقوم بعض المحترفين في الواقع بالنقع لفترة أقصر - حوالي 15 دقيقة - لتحقيق نتيجة نهائية أكثر إحكامًا، على الرغم من أن هذا يتطلب قوة أكبر أثناء التركيب.
تقنية الشد
عند الضغط على الخيزران في الأخدود، طبق ضغطًا لأسفل متساويًا ومعتدلاً. اعمل للخارج من نقطة المنتصف على كل جانب. فكر في الأمر مثل شد القماش على إطار - تقوم بتبديل الجوانب المتقابلة للحفاظ على الشد متساويًا.
إليك مرجع سريع للشد:
| الموقف | النهج الصحيح | خطأ شائع |
|---|---|---|
| الضغط على الحافة الأمامية | ابدأ من المنتصف، واعمل للخارج نحو الزوايا | بدءًا من زاوية واحدة، مما يسبب سحبًا قطريًا |
| الانتقال إلى الحافة الخلفية | مطابقة الشد مع الأمام، والحفاظ على خطوط النسيج مستقيمة | السحب بإحكام شديد، مما يشوه النمط |
| القيام بالجوانب | شد لطيف، دع الأوتاد تمسك أثناء عملك | التمدد المفرط، مما يشوه النمط السداسي |
| الفحص النهائي قبل الشريحة | خطوط النسيج متوازية مع حواف الإطار | تجاهل الانحراف القطري الطفيف الذي يصبح واضحًا بعد التجفيف |
التجفيف والشد النهائي
بعد تثبيت الشريحة وتطبيق الغراء، اترك الكرسي في غرفة جيدة التهوية في درجة حرارة الغرفة العادية. لا تستخدم المراوح أو السخانات أو أشعة الشمس المباشرة لتسريع التجفيف. التجفيف السريع يسبب انكماشًا غير متساوٍ، مما قد يؤدي إلى تشققات أو سطح مشوه. فترة التجفيف الكاملة لمدة 24 ساعة تسمح لكل من القصب والغراء بالمعالجة بشكل صحيح.
صيانة طويلة الأمد
بمجرد تركيبه، يدوم قصب الروطان الطبيعي من 5 إلى 15 عامًا حسب الاستخدام والبيئة. تجنب وضع الكراسي المنسوجة في ضوء الشمس المباشر لفترات طويلة - الأشعة فوق البنفسجية تدهور ألياف الروطان وتسبب الاصفرار والهشاشة. في المناخات شديدة الجفاف، قم برش الجزء السفلي من القصب بزجاجة رذاذ كل بضعة أشهر للحفاظ على المرونة. إذا لاحظت أن جزءًا من الشريحة قد انفصل، قم بإعادة لصقه فورًا باستخدام PVA قبل أن يبدأ القصب في الانفصال.
بالنسبة للمرممين المهتمين بالاستدامة، فإن الروطان الطبيعي قابل للتحلل البيولوجي ومتجدد بالكامل. ينمو بسرعة في الغابات الاستوائية 10 دون الحاجة إلى إعادة الزراعة، مما يجعله أحد أكثر المواد الصديقة للبيئة المتاحة للأثاث. هذا هو السبب الرئيسي وراء تفضيل الاتجاه الحالي في مشاريع التجديد وإعادة التدوير للروطان الحقيقي على البدائل الاصطناعية مثل الأشرطة البلاستيكية أو الراتنجية.
خاتمة
استبدال الروطان التالف بشبكة قصب طبيعية هو مشروع مجزٍ وفعال من حيث التكلفة عندما تتبع الخطوات الصحيحة وتستخدم مواد عالية الجودة. من اختيار الدرجة الصحيحة إلى التوريد من مورد جملة موثوق به مثل Seafan Rattan, ، كل التفاصيل مهمة للحصول على نتيجة دائمة.
ملاحظات سفلية
1. يشرح ما هي شبكة قصب الروطان الطبيعي وأصولها. ↩︎
2. يناقش استخدام المواد اللاصقة التقليدية في ترميم الأثاث. ↩︎
3. يصف شبكة القصب، والتي تستخدم لمقاعد القصب المضغوط. ↩︎
4. توفر ويكيبيديا نظرة عامة على طرق القشط، بما في ذلك الثقب بالثقب. ↩︎
5. يشرح خصائص وتاريخ أثاث منتصف القرن الحديث. ↩︎
6. يذكر القصب والريش كأجزاء مختلفة من نبات الروطان. ↩︎
7. يفصل خصائص وأنماط كراسي العصر الفيكتوري. ↩︎
8. تم استبداله بصفحة ويكيبيديا لـ Polyvinyl acetate (PVA)، مما يوفر نظرة عامة موثوقة وشاملة على غراء PVA. ↩︎
9. يشرح ما هو غراء الجيلاتين، وخصائصه، واستخداماته التقليدية. ↩︎
10. يناقش نمو الروطان في الغابات الاستوائية وفوائده البيئية. ↩︎

