سنوات من الشحن rattan cane webbing 1 لقد علمتنا عمليات الشحن من مستودعاتنا في فوشان إلى صانعي الأثاث في جميع أنحاء العالم شيئًا واحدًا: حتى أفضل أنواع الأشرطة من الدرجة الأولى تفشل إذا كان التثبيت خاطئًا. الألواح المرتخية، والقصب المتشقق، والحواف القبيحة - هذه المشاكل تكلف الوقت والمال وثقة العملاء.
To securely attach rattan cane webbing to a wooden frame, soak the webbing in warm water for 15–30 minutes, cut it with 1–3 inches of overhang, then fix it using either a spline pressed into a routed groove with glue or a staple gun on flat frames, starting from the center and working outward.
هذا الدليل يرشدك خلال كل خطوة. نغطي التحضير، وطرق التثبيت، وتقنيات التجفيف، وتشطيب الحواف. سواء كنت تدير مصنع أثاث أو تتعامل مع إعادة البيع بعلامة تجارية خاصة، فإن هذه الطرق ستمنحك نتائج نظيفة ودائمة في كل مرة.
كيف أجهز قش الروطان بشكل صحيح قبل تثبيته على الإطار؟
عبر مصانعنا الثلاثة - بما في ذلك منشأة معالجة الخيزران لدينا في إندونيسيا - رأينا دفعات لا حصر لها تُفسد بسبب تخطي مرحلة التحضير. الخيزران الجاف ينكسر. الأشرطة المقطوعة بشكل سيء تهدر المواد. التحضير ليس اختياريًا.
انقع قش الروطان الخاص بك في ماء دافئ لمدة 15-30 دقيقة لجعله مرنًا، ثم قم بقصه أكبر بمقدار 1-3 بوصات من فتحة الإطار من جميع الجوانب. ضع دائمًا الجانب اللامع والناعم متجهًا للأعلى أثناء التركيب للحصول على أفضل نتيجة مرئية.

لماذا النقع مهم
الخيزران الجاف هش. سوف يتشقق وينقسم في اللحظة التي تحاول فيها ثنيه أو شده في مكانه. الماء الدافئ يريح الألياف الطبيعية 2. هذا يجعل الأشرطة مرنة بما يكفي للضغط في الأخاديد أو الشد عبر الإطار. عندما تجف الأشرطة لاحقًا، تنكمش الألياف. هذا الانكماش الطبيعي هو ما يخلق السطح المشدود، الشبيه بالطبول، الذي تريده.
ومع ذلك، لا تنقع لفترة طويلة جدًا. النقع الزائد يمكن أن يضعف الألياف ويجذب العفن. النقطة المثالية هي 15 دقيقة للألواح الرقيقة ذات النسيج المفتوح، وما يصل إلى 30 دقيقة للأنسجة الأكثر سمكًا وكثافة.
كيفية قطع الأشرطة بشكل صحيح
قم بقياس فتحة الإطار أولاً. ثم أضف مادة إضافية على كل جانب. تعتمد الكمية على طريقة التثبيت الخاصة بك.
| طريقة التثبيت | تراكب إضافي مطلوب | لماذا |
|---|---|---|
| شريحة 3 و أخدود | 1-2 بوصة لكل جانب | كافٍ للضغط في الأخدود والتشذيب |
| دباسة 4 على إطار مسطح | 2-3 بوصة لكل جانب | يسمح بالشد والطي للأسفل |
| التفاف حول مع شرائط حافة 5 | 1.5–2 بوصة لكل جانب | تحتاج إلى طي للحصول على حافة نظيفة |
استخدم مقصًا حادًا أو سكين متعدد الاستخدامات 6. الشفرات غير الحادة تمزق الحواف قبل أن تبدأ. اقطع على طول خطوط النسيج قدر الإمكان. هذا يحافظ على النمط نظيفًا ويمنع الخيوط السائبة من التفكك.
تحقق من اتجاه النسيج
كل ورقة من نسيج الروطان لها جانب أملس وجانب خشن. يجب أن يكون الجانب الأملس اللامع قليلاً دائمًا للخارج - باتجاه المستخدم. ضع علامة على ذلك بنقطة قلم رصاص صغيرة على الظهر قبل النقع حتى لا تختلط بمجرد أن يصبح النسيج مبللاً.
انتبه أيضًا إلى اتجاه نمط النسيج. إذا كنت تقوم بتركيب عدة ألواح على نفس قطعة الأثاث، مثل مجموعة من أبواب الخزانة، فتأكد من أن جميع الألواح تسير في نفس الاتجاه. الأنماط غير المتوازية تبدو غير احترافية وهي واحدة من أكثر الأخطاء شيوعًا التي نراها من المشترين لأول مرة.
اجمع أدواتك قبل البدء
إليك قائمة مرجعية سريعة:
| أداة / مادة | الغرض |
|---|---|
| حوض ماء دافئ أو حوض استحمام | نقع الشرائح |
| شريط قياس وقلم رصاص | قطع دقيق |
| مقص حاد أو مشرط | قطع نظيفة |
| منشفة | امسح الماء الزائد قبل التركيب |
| أوتاد خشبية | ثبت النسيج مؤقتًا في الأخاديد |
| شريط حافة، دباسة، أو شرائط حافة | المرفق النهائي (يختلف حسب الطريقة) |
إن تجهيز كل شيء قبل نقع القصب أمر بالغ الأهمية. بمجرد أن يصبح النسيج مبللاً، يكون لديك نافذة عمل. لا تريد التوقف في منتصف التركيب للبحث عن أداة مفقودة.
هل يجب أن أستخدم شريطًا أو دبابيس لتثبيت شبكة الروطان بأثاثي الخشبي؟
هذا هو السؤال الذي نسمعه أكثر من تجار الأثاث بالجملة ومديري المشتريات في المصانع. عندما نشحن النسيج إلى عملاء في هولندا أو الولايات المتحدة أو أستراليا، يسألنا الكثيرون مباشرة أي طريقة تعمل بشكل أفضل لمشروعهم المحدد. الإجابة الصادقة: يعتمد الأمر على نوع الإطار الخاص بك.
استخدم شريطًا لاصقًا مع غراء الخشب للإطارات ذات الأخدود الموجه - فهذا يعطي نتيجة أنظف وأكثر متانة. استخدم دباسة لتثبيت الإطارات المسطحة بدون أخاديد، بدءًا من المنتصف والسحب للخارج. كلا الطريقتين تعملان بشكل جيد عند القيام بهما بشكل صحيح، ولكن تركيب الشريط يبدو أكثر احترافية.

طريقة الشريحة (الإطارات المحززة)
هذا هو النهج التقليدي. يتطلب إطارًا خشبيًا بقناة - عادةً بعرض 1/4 بوصة - مخرطة حول الفتحة. إليك كيفية عملها:
- ضع النسيج المنقوع فوق الفتحة، والجانب اللامع لأعلى.
- استخدم إسفينًا خشبيًا لدفع النسيج لأسفل في الأخدود. ابدأ من زاوية واحدة.
- اعمل في طريقك حول الإطار، واضغط النسيج في الأخدود على الجوانب الأربعة. اسحب القصب مشدودًا قليلاً أثناء تقدمك.
- بمجرد أن يستقر النسيج في الأخدود على جميع الجوانب، ضع طبقة رقيقة من غراء خشب 7 داخل الأخدود.
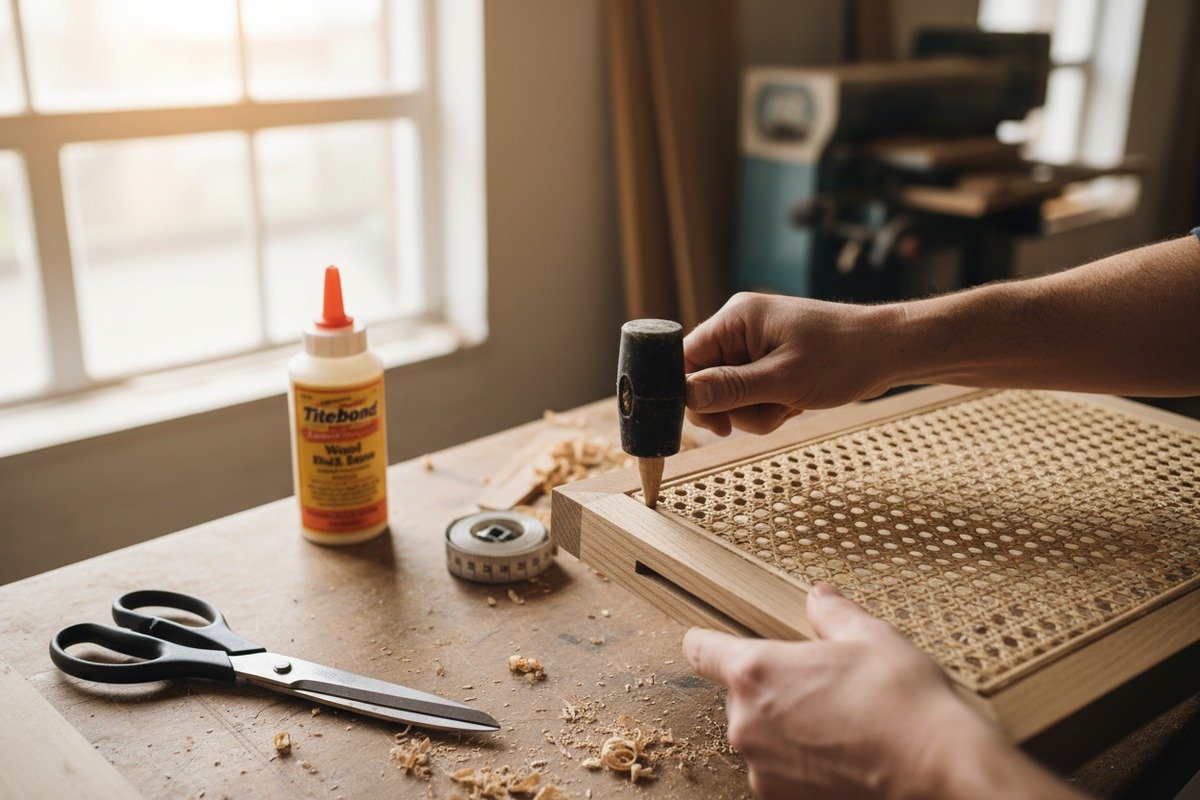
- اضغط على شريحة قصب الروطان في الأخدود فوق النسيج. استخدم مطرقة أو بكرة شريحة. انقر بقوة ولكن ليس بقوة لدرجة إتلاف القصب.
- اترك كل شيء ليجف لمدة 24-48 ساعة.
- قم بقص النسيج الزائد باستخدام سكين متعدد الاستخدامات حاد أو إزميل، مع القطع بشكل مستوٍ على طول الحافة الخارجية للأخدود.
يقوم الشريط بتثبيت النسيج في مكانه. بالاشتراك مع الغراء، يخلق هذا رابطًا قويًا جدًا. النتيجة النهائية نظيفة لأن الشريط يخفي مكان دخول القصب في الأخدود.
طريقة الدباسة (الإطارات المسطحة)
لا تحتوي كل إطارات على أخدود. تستخدم أبواب الخزائن والألواح المخصصة وبعض تصميمات الأثاث الحديثة إطارات مسطحة. بالنسبة لهذه، فإن مسدس الدبابيس هو الخيار الأسرع والأكثر عملية.
- ضع النسيج المبلل فوق فتحة الإطار. قم بتوسيطه بعناية.
- قم بتدبيس منتصف أحد الجوانب أولاً. دبوس أو اثنان فقط.
- اسحب النسيج بلطف باتجاه الجانب المقابل. قم بتدبيس منتصف ذلك الجانب.
- كرر ذلك للجوانب المتبقية - ابدأ بالمنتصف، ثم اعمل باتجاه الزوايا.
- عد وأضف دبابيس كل 1-2 بوصة على طول كل حافة.
- قم بقص النسيج الزائد.
- ضع شرائط زخرفية أو قوالب زخرفية فوق الحواف المدبسة لإخفائها.
القاعدة الأساسية: اعمل دائمًا من المنتصف إلى الحواف. هذا يمنع التجاعيد والتوتر غير المتساوي.
مقارنة الطريقتين
| عامل | شريط + أخدود | مسدس دبابيس |
|---|---|---|
| متطلبات الإطار | أخدود مخرط 8 مطلوب | أي إطار مسطح |
| تشطيب بصري | نظيف، سلس | دبابيس مرئية (تحتاج إلى تشذيب) |
| Durability | ممتاز | جيد (يعتمد على عمق الدباسة) |
| مستوى المهارة المطلوب | متوسط | مبتدئ |
| قابلية العكس | متوسط (يمكن نزع الشريحة) | سهل (اسحب الدبابيس) |
| الأفضل لـ | مقاعد الكراسي، الأثاث التقليدي | أبواب الخزائن، ألواح زخرفية |
| الأدوات المطلوبة | أوتاد، مطرقة، شريحة، غراء | مسدس دبابيس، شريط تشذيب |
ملاحظة حول اختيار الغراء
لمشاريع الأثاث الحديثة، يعمل غراء الخشب القياسي بشكل مثالي. إنه يلتصق جيدًا ويجف شفافًا. لاستعادة القطع الأثرية، ضع في اعتبارك غراء مخفي 9. غراء الجلد قابل للعكس - يمكنك تليينه بالحرارة والرطوبة لإزالة الشريحة لاحقًا دون إتلاف الخشب الأصلي. هذا مهم عند العمل مع قطع عتيقة قيمة.
نوصي دائمًا بأن يحدد عملاؤنا بالجملة الاستخدام النهائي عند الطلب. إذا كانوا يزودون مرممي القطع الأثرية، نقترح إقران طلب النسيج بتوصية بغراء الجلد.
كيف يمكنني التأكد من أن شبكة الروطان الخاصة بي تظل مشدودة وتبدو احترافية بعد جفافها؟
عندما نجري اختبارات الجودة على أشرطتنا في منشأتنا في نانهاي، فإن مرحلة التجفيف هي المكان الذي يحدث فيه السحر الحقيقي - والمكان الذي يرتكب فيه العديد من الهواة أخطائهم الكبرى. إذا كانت مشدودة جدًا وهي رطبة، فإن الشريط يتمزق أثناء انكماشه. إذا كانت فضفاضة جدًا، تحصل على لوحة مترهلة.
بعد التركيب، اترك شبكة قصب الروطان لتجف في الهواء بشكل طبيعي لمدة 24-48 ساعة. ستنكمش الألياف مع فقدان الرطوبة، مما يؤدي إلى شد الشبكة عبر الإطار. تجنب التمدد المفرط أثناء التركيب الرطب، ولا تستخدم الحرارة أبدًا لتسريع التجفيف، لأن ذلك يسبب التشقق والالتواء.

فهم الانكماش الطبيعي
الخيزران مادة طبيعية. عندما يمتص الماء، تنتفخ الألياف. عندما يجف، تنكمش. هذا الانكماش هو حليفك. إذا قمت بتركيب الشريط بتوتر معتدل وهو رطب، فإن عملية التجفيف تضيف الشد النهائي الذي تحتاجه. فكر في الأمر مثل شد قماش - لا تحتاج إلى شده بإحكام شديد عند التركيب لأن الطبيعة تكمل المهمة.
الخطأ هو الشد المفرط. إذا قمت بشد الخيزران الرطب بقوة شديدة، فلن يكون لدى الألياف مجال للانكماش أكثر. والأسوأ من ذلك، أن القوة يمكن أن تشوه نمط النسيج أو تمزق خيوطًا فردية. استهدف "الشد المريح"، وليس "الشد الأقصى"."
تقنية البدء من المنتصف
هذه هي التقنية الأكثر أهمية للحصول على تشطيب خالٍ من التجاعيد:
- قم بتثبيت نقطة المنتصف لأحد الحواف أولاً.
- انتقل إلى منتصف الحافة المقابلة وطبق توترًا لطيفًا.
- قم بتثبيت مركزي الحافتين المتبقيتين.
- الآن اعمل للخارج من كل مركز باتجاه الزوايا.
هذه الطريقة توزع التوتر بالتساوي. إنها تمنع الشريط من التكتل في منطقة واحدة بينما يكون مشدودًا بشكل مفرط في منطقة أخرى. نقوم بتعليم هذه الطريقة لكل عميل جديد يشتري بكميات كبيرة لخطوط إنتاج الأثاث الخاصة بهم.
ظروف التجفيف مهمة
اترك الشريط ليجف في منطقة جيدة التهوية في درجة حرارة الغرفة. لا تضع الأثاث في ضوء الشمس المباشر أو بالقرب من السخانات. التجفيف السريع يتسبب في انكماش الألياف الخارجية بشكل أسرع من الألياف الداخلية. هذا يؤدي إلى التجعد والتشقق وسطح غير متساوٍ.
إذا كنت تعمل في مناخ رطب - وهو أمر شائع لعملائنا في تايلاند والفلبين وإندونيسيا - فامنح وقتًا إضافيًا للتجفيف. في الظروف شديدة الرطوبة، يمكن أن يستغرق التجفيف 48-72 ساعة. كن صبورًا.
ماذا لو كان الشريط لا يزال فضفاضًا بعد التجفيف؟
في بعض الأحيان لا تكون النتيجة مثالية من المحاولة الأولى. إليك خياراتك:
- الرش الخفيف: رش النسيج برفق بالماء واتركه ليجف مرة أخرى. هذا يعيد تنشيط عملية الانكماش قليلاً.
- إعادة التركيب: إذا كان النسيج مرتخيًا بشكل كبير، قم بإزالة الشريط أو الدبابيس، وأعد نقعه، وابدأ من جديد. لا تحاول إصلاح الترهل الكبير بالترقيع.
- دعم القاعدة: لمقاعد الكراسي التي تتحمل الوزن، فكر في إضافة دعم رقيق من الخشب الرقائقي أسفل لوحة القصب. هذا لا يؤثر على المظهر من الأعلى ولكنه يضيف سلامة هيكلية.
نصائح الصيانة للحفاظ على الشد لفترة طويلة
الغبار الخفيف المنتظم يمنع تراكم الأوساخ التي يمكن أن تضعف الألياف. امسح النسيج من حين لآخر بقطعة قماش مبللة - ليست مبللة تمامًا - للحفاظ على مرونة الروطان. تجنب وضع أشياء ثقيلة على لوحات القصب التي لم يتم تصميمها لتحمل الوزن.
لعملائنا بالجملة الذين يعيدون البيع للمستهلكين النهائيين، نوصي بتضمين بطاقة عناية بسيطة مع كل منتج. هذا يقلل من المرتجعات ويبني الثقة.
ما هي أفضل التقنيات لمنع تآكل الروطان الخاص بي عند حواف الإطار؟
تآكل الحواف هو الشكوى التي نسمعها أكثر من عملائنا - خاصة أولئك الذين يديرون إنتاج الأثاث على نطاق واسع. عند قطع نسيج الروطان، فإن الخيوط المنسوجة عند الحواف ترغب بشكل طبيعي في التفكك. إذا لم تعالج هذا، فإن القطعة النهائية تبدو رخيصة وتتفكك بسرعة.
لمنع التآكل، قم دائمًا بقص شبكة الروطان على طول خطوط النسيج بشفرة حادة، أو قم بإخفاء الحواف الخام داخل أخدود مشكل باستخدام شريط، أو قم بتغطيتها بزخرفة. يؤدي وضع كمية صغيرة من غراء الخشب الشفاف على الحواف المقطوعة إلى إغلاق الألياف وإيقاف التفكك بشكل دائم.

القطع بدقة
يبدأ الدفاع الأول ضد التآكل في مرحلة القطع. الشفرة غير الحادة تسحق الألياف بدلاً من قطعها. هذا يخلق نهايات فضفاضة تبدأ في التفكك على الفور. استخدم شفرة سكين متعددة الاستخدامات جديدة تمامًا أو مقص قماش حاد. استبدل الشفرة إذا بدأت في السحب.
عند الإمكان، اقطع على طول خطوط النسيج بدلاً من قطعها. قطع الأوتار المائلة يقطع المزيد من الألياف ويخلق المزيد من النهايات الفضفاضة. القطع النظيف الموازي للنسيج يحافظ على أقصى عدد من الأوتار سليمة.
إخفاء الحواف في الأخدود
إذا كان إطارك يحتوي على قناة مشكلة، فهذا هو الحل الأنظف. الحافة الخام للنسيج تجلس داخل الأخدود، مخفية بواسطة الشريط. لا شيء مرئي من الخارج. لهذا السبب تُفضل الإطارات ذات الأخدود للأثاث الراقي.
تأكد من أن النسيج يمتد بعمق كافٍ في الأخدود - على الأقل 1/4 بوصة بعد الشريط. إذا كانت الحافة بالكاد تصل إلى الأخدود، يمكن أن يسحب النسيج للخارج تحت الشد أثناء جفافه.
تشذيب القوالب للإطارات المسطحة
في الإطارات المسطحة حيث تُستخدم الدبابيس، ستكون الحواف الخام مرئية ما لم تغطيها. تشذيب القوالب هو الحل القياسي. يمكن أن يكون هذا:
- شرائط خشبية رفيعة مصبوغة لتتناسب مع الإطار
- قوالب زخرفية نصف دائرية
- شرائط قصب الروطان المسطحة لمظهر طبيعي متماسك
ألصق القوالب في مكانها فوق الحواف المثبتة بالدبابيس. لزيادة القوة، أضف مسامير صغيرة أو دبابيس. تخدم القوالب غرضين: فهي تخفي الحواف الخام وتضغط النسيج بقوة على الإطار، مما يقلل من أي فرصة للسحب.
ختم الحواف المقطوعة بالغراء
بالنسبة للحواف المكشوفة التي لا يمكن إخفاؤها - مثل الألواح الجدارية الزخرفية أو فواصل الغرف - فإن خطًا رفيعًا من غراء الخشب الذي يجف بوضوح على طول الحافة المقطوعة يعمل بشكل جيد. استخدم إصبعك أو فرشاة صغيرة لنشر الغراء في النسيج. اتركه ليجف تمامًا. يلصق الغراء الأوتار الفضفاضة معًا ويمنعها من الانفصال.
يستخدم بعض عملائنا أيضًا ورنيشًا شفافًا أو مطفيًا بخاخ البولي يوريثين 10 على طول الحواف. هذا مفيد بشكل خاص لبطانة الروطان الاصطناعية التي سيتم استخدامها في الهواء الطلق أو في البيئات ذات الرطوبة العالية.
مقارنة معالجة الحواف
| تقنية | الأفضل لـ | صعوبة | رؤية الحافة |
|---|---|---|---|
| أخدود + شق | كراسي، أثاث تقليدي | متوسط | مخفي تمامًا |
| قوالب زخرفية | أبواب خزائن، ألواح حديثة | سهل | مغطى بالزخرفة |
| ختم غراء شفاف | ألواح زخرفية، معلقات جدارية | سهل | مرئي قليلاً ولكنه أنيق |
| بخاخ الورنيش | أثاث خارجي، راتان صناعي | سهل | مرئي قليلاً، محمي |
| طي للأسفل + تدبيس | دورات إنتاج سريعة | سهل | مخفي بالأسفل |
التعامل مع الحواف المتآكلة بالفعل
إذا بدأ التآكل بالفعل، فلا داعي للذعر. قم بقص الخيوط السائبة بأقرب ما يمكن من النسيج. ثم ضع الغراء الشفاف على المنطقة المتأثرة. اضغط على الألياف معًا واترك الغراء يجف. للتآكل الشديد، قد تحتاج إلى القص حتى خط نظيف وإعادة التثبيت ببروز جديد.
في تجربتنا في توريد مصانع الأثاث في جميع أنحاء أوروبا والشرق الأوسط، فإن العامل الأكبر في منع مشاكل الحواف هو استخدام شبك عالي الجودة ومحكم النسيج من البداية. الألواح الرخيصة ذات النسيج الفضفاض تتآكل بسهولة أكبر بكثير من الألواح الكثيفة من الدرجة الأولى. لهذا السبب نوصي دائمًا بأن يطلب عملاؤنا عينات قبل تقديم طلبات بالجملة - حتى يتمكنوا من اختبار كثافة النسيج واستقرار الحواف بأنفسهم.
خاتمة
يعتمد تثبيت شبك الروطان بشكل آمن على النقع المناسب، وطريقة التثبيت الصحيحة للإطار الخاص بك، والتجفيف بصبر، وتشطيب الحواف النظيف. اتبع هذه الخطوات وستكون نتائجك احترافية في كل مرة.
ملاحظات سفلية
1. يوفر دليلاً شاملاً لشبك الروطان، وأنماطه، واستخداماته، وخياراته. ↩︎
2. يوفر تعريفًا وتصنيفًا وخصائص للألياف الطبيعية من موسوعة موثوقة. ↩︎
3. تم استبدال رابط HTTP غير المعروف بتعريف موسوعة ويكيبيديا الموثوق به لمفصل شريحة. ↩︎
4. تم استبدال رابط HTTP 403 بتعريف موسوعة ويكيبيديا الموثوق به لمسدس الدبابيس. ↩︎
5. تم استبدال رابط HTTP غير المعروف بتعريف موسوعة ويكيبيديا الموثوق به للزخرفة، بما في ذلك زخرفة الحواف. ↩︎
6. يقدم إرشادات أساسية واحتياطات السلامة لاستخدام سكاكين الأدوات في مكان العمل. ↩︎
7. إرشادات حول اختيار غراء الخشب المناسب لمختلف المشاريع، مع تحديد الأنواع المختلفة واستخداماتها. ↩︎
8. يقدم دليلاً مفصلاً حول كيفية عمل أخدود في الخشب لمختلف الإنشاءات في صناعة الأثاث. ↩︎
9. دليل كامل لغراء الجيلاتين، وتكوينه، وخصائصه، وتطبيقاته التقليدية في النجارة. ↩︎
10. يشرح ما هو البولي يوريثين، وأنواعه، وكيفية استخدامه لحماية وتعزيز أسطح الخشب. ↩︎

