Every week, our production team in Foshan receives photos from customers showing worn-out vintage chairs with sagging, cracked cane seats. The frustration is real — a beautiful mid-century Cesca chair 1 sits unused because the webbing has given out. Many people assume professional re-caning is their only option, but the truth is that replacing rattan cane webbing is a surprisingly accessible DIY project.
To use rattan cane webbing for vintage chair restoration, remove the old spline and cane from the groove, clean out residual glue, soak pre-woven rattan webbing in warm water for 20–30 minutes, center it over the seat opening, press it into the groove, then glue and tap in a new reed spline to secure it.
This guide walks you through every step — from choosing the right grade of webbing to finding a reliable wholesale supplier. Whether you are restoring one heirloom chair or managing bulk orders for a furniture workshop, you will find practical advice below. Let’s start with the material itself.
How do I choose the right grade of rattan cane webbing for my vintage chair project?
When we ship rattan cane webbing to furniture factories across the US and Europe, the most common question we hear is about grading. Buyers often receive mismatched webbing because they did not specify the right grade. This leads to wasted material, delayed projects, and unhappy end customers.
Choose your rattan cane webbing grade based on the chair's groove width, the desired pattern density, and whether you need natural, bleached, or synthetic material. Grade A webbing offers uniform color and tight weave, making it ideal for visible vintage restorations where appearance matters most.

Understanding Webbing Types
Not all rattan cane webbing is the same. The three main types you will encounter are natural rattan 2, bleached rattan, and synthetic rattan. Natural rattan has a warm, earthy tone — light beige to straw yellow — with organic variations in each strand. Bleached rattan offers a lighter, more uniform appearance. Synthetic rattan mimics the look of natural fibers but uses durable plastic.
For authentic vintage chair restoration, natural rattan is usually the best choice. It matches the original material and ages beautifully. Bleached rattan works well when you want a brighter, cleaner look. Synthetic rattan is practical for outdoor furniture or high-humidity environments.
Weave Patterns and Their Uses
The weave pattern affects both aesthetics and strength. Here are the most common patterns:
| Weave Pattern | Description | Best For |
|---|---|---|
| Open Hexagonal (Radio Weave) | Six-sided open mesh, airy and decorative | Mid-century modern chairs, Cesca-style seats |
| Close Basketweave | Dense, tight square pattern | Traditional dining chairs, heavy-use seats |
| Diamond Motif | Complex geometric design | Decorative panels, cabinet doors |
For most vintage chair seats, the open hexagonal weave 3 or close basketweave will be your go-to. The open weave is lighter and allows airflow, while the close weave provides more support for heavier use.
Grading Quality: What to Look For
Grade matters. At our rattan processing facility in Indonesia, we sort webbing into grades based on color consistency, strand thickness, and weave tightness. Grade A webbing 4 has minimal color variation and no broken strands. Lower grades may have darker spots, uneven weaving, or thinner sections.
For a visible seat restoration, always request Grade A. For hidden panels or practice projects, a mid-range grade saves money without sacrificing structural integrity. When ordering, specify the groove width of your chair frame — typically 3mm to 5mm — so the webbing thickness matches properly.
Also consider the roll width. Pre-woven rattan webbing comes in standard widths from 18 inches to 36 inches. Measure your chair seat opening and add at least 2 inches on each side. This overhang gives you room to press the webbing into the groove without pulling it too tight.
How should I soak and prepare my rattan webbing before I start the restoration?
Over the years, our team has fielded hundreds of calls from customers who skipped or botched the soaking step. Dry rattan cane webbing is stiff and brittle. Try to press it into a groove without soaking, and it will crack, split, or refuse to conform to the frame. This single mistake ruins more restoration projects than any other.
Soak your rattan cane webbing in warm water for 20 to 30 minutes until it becomes pliable enough to fold without cracking. Soak the reed spline separately for about 15 minutes. Test flexibility by gently bending a corner — it should curve smoothly without snapping or leaving white stress marks.

The Soaking Process Step by Step
Start by filling a bathtub, large basin, or plastic tub with warm water — not hot, not cold. Lay the cut piece of rattan webbing flat in the water. Make sure it is fully submerged. Set a timer for 20 minutes.
After 20 minutes, lift a corner and fold it gently. If it bends smoothly, it is ready. If it feels stiff or you see white stress lines at the fold, let it soak for another 5 to 10 minutes. Do not exceed 30 minutes for most webbing. Over-soaking causes the fibers to swell excessively, which can loosen the weave and cause color changes.
For the reed spline 5, soak it in a separate container for about 15 minutes. The spline is denser than the webbing, so it needs less time. It should feel flexible but not mushy.
Soaking Duration Debate
There is genuine disagreement about how long to soak rattan. Here is what we have seen from different approaches:
| Soak Duration | Pros | Cons | Best For |
|---|---|---|---|
| 15–20 minutes | Retains color, weave stays tight | May be slightly stiff for tight grooves | Thin webbing, warm water |
| 20–30 minutes | Good flexibility, easy to work with | Slight color lightening possible | Standard restoration projects |
| Up to 3 hours | Maximum pliability | Risk of fiber weakening, color fading | Very thick or dried-out old stock |
Most experienced restorers — and our own production team — recommend the 20 to 30 minute range. The 3-hour soak is occasionally mentioned in older guides, but we have found it weakens the natural fibers and makes the weave loose.
Preparing the Chair Frame
While your webbing soaks, prepare the chair frame. If you are replacing old cane, start by removing the existing spline. Score the perimeter with a sharp utility knife. Then use a cane chisel 6 or flathead screwdriver to pry the old spline out of the groove. Work slowly. Angle the chisel away from the wood to avoid gouging the frame.
If old glue is stubborn, dampen it with warm water or a vinegar solution and let it sit for 10 minutes. Then scrape the groove clean with the chisel. Every bit of old glue and debris must come out. A dirty groove prevents the new spline from seating properly.
Once the groove is clean, do any staining or painting of the frame now — before installing new webbing. Paint on raw rattan stains the fibers and looks terrible.
Keeping Webbing Workable
Rattan dries fast once you pull it from water. If you are a beginner, keep a damp cloth nearby. Drape it over sections you are not actively working on. This extends your working time. You can also lightly mist the webbing with a spray bottle if it starts to stiffen during installation.
What tools do I need to secure the rattan cane webbing to my chair frame?
When we pack rattan webbing orders for export, customers sometimes ask us to include a basic tool kit. The tools for cane webbing installation are simple and affordable, but using the wrong tool — or improvising with whatever is in your garage — often causes damage to the chair frame or the webbing itself.
You need a cane webbing tool (or plastic putty knife) to press webbing into the groove, a cane chisel for spline removal, a sharp utility knife for trimming, a rubber mallet for tapping the spline, white PVA glue, masking tape, scissors or caning nippers, a measuring tape, and a damp cloth for keeping the rattan workable.

Essential Tools Breakdown
Let me walk you through each tool and its purpose. A cane webbing tool 7 is a roller-style device with a rounded edge designed to push webbing cleanly into the groove without cutting or tearing it. A plastic putty knife works as an alternative, but it requires more care and effort.
The cane chisel is your best friend during removal. Its flat, beveled edge slides under old spline to lift it out. Do not use a regular screwdriver for this — the narrow tip concentrates force and can crack the groove walls.
A sharp utility knife is critical. You will use it to score old spline, trim excess webbing after installation, and cut the new spline to length. Always use a fresh blade. Dull blades tear rattan instead of cutting it cleanly.
Tools and Alternatives Compared
| Tool | Purpose | Alternative | Risk with Alternative |
|---|---|---|---|
| Cane webbing tool | Press webbing into groove | Plastic putty knife | Slower, less even pressure |
| Cane chisel | Remove old spline | Flathead screwdriver | May crack groove walls |
| Rubber mallet | Tap spline into groove | Soft hammer, wood block | Metal hammer dents wood |
| Utility knife (fresh blade) | Trim webbing and spline | Scissors | Uneven cuts, fraying |
| Caning nippers | Trim flush splinters and hairs | Nail clippers | Less precise |
| White PVA glue 8 | Bond spline in groove | Elmer's white glue | Works fine as backup |
| Masking tape | Protect frame edges during scoring | Painter's tape | Either works well |
Why Avoid Wooden Wedges?
Older tutorials often recommend wooden wedges to hold the webbing in the groove during installation. While this works, recent guides — especially those from 2025 — caution against it. Wedges concentrate pressure on small points. On vintage chairs with aged, dry wood, this can crack or chip the groove edges. A cane webbing tool distributes pressure evenly and gives you better control.
If you do use wedges, choose soft wood like pine, never hardwood. And tap them gently. The goal is to hold the webbing in place temporarily, not to drive it to the bottom of the groove.
The Installation Process with Your Tools
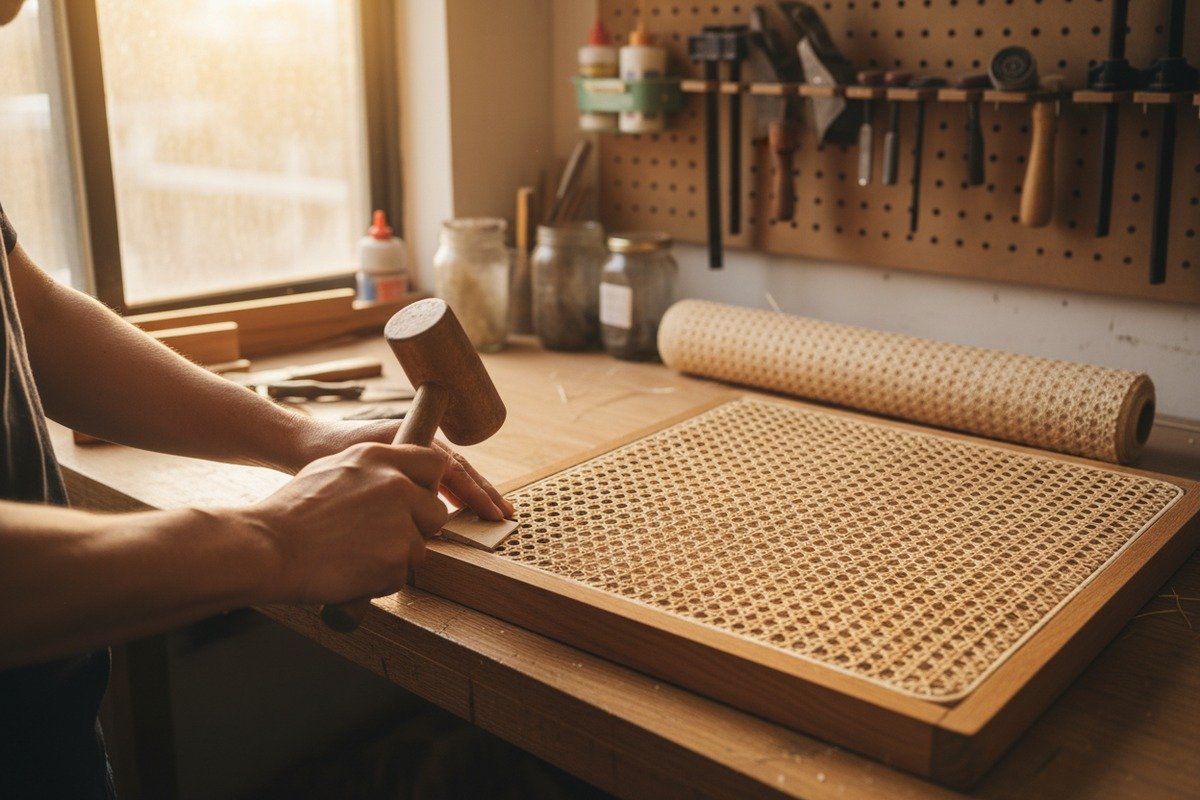
Here is how the tools come together during installation. First, center your soaked webbing over the seat opening, smooth side up. Use masking tape to hold it in position on the frame. Then, with the cane webbing tool, start pressing the webbing into the front groove. Work from the center outward. Repeat on the back, then the sides.
Apply a thin stream of white PVA glue into the groove. Avoid flooding it — too much glue squeezes out and stains the webbing. With your pre-soaked spline, begin tapping it into the groove using the rubber mallet. Start at one corner and work progressively around the seat. At corners, miter the spline ends at a 45-degree angle for a clean joint.
Once the spline is fully seated, use the utility knife to trim excess webbing flush with the outside edge of the groove. Wipe any glue squeeze-out immediately with a damp cloth. Then let the chair sit undisturbed for at least 24 hours. As the rattan dries, it shrinks and tightens, creating a taut seat surface.
Finishing Touches
After 24 hours, inspect the seat. Use caning nippers to trim any stray hairs or splinters sticking up. If you want to enhance the color and protect the rattan, apply a thin coat of tung oil 9 with a soft cloth. Tung oil penetrates the fibers, adds a warm glow, and improves resistance to moisture. Avoid polyurethane or lacquer — they sit on the surface and can crack or peel over time.
How can I find a reliable wholesaler for my bulk rattan webbing restoration needs?
Running our own rattan supply chain — from raw material processing in Indonesia to finished product shipping from Foshan — has given us a clear view of what separates a dependable wholesaler from a risky one. Many buyers have told us about receiving inconsistent webbing rolls, damaged packaging, or materials that looked nothing like the samples. These problems multiply when you are sourcing in bulk for a restoration business or furniture factory.
To find a reliable rattan webbing wholesaler, verify their supply chain transparency, request Grade A samples before committing, confirm they offer consistent sizing and pattern options, check their export track record to your region, and ensure they provide sturdy packaging that protects the webbing during international shipping.

What to Look for in a Wholesaler
First, check if the supplier controls their own production. Middlemen add cost and reduce quality oversight. At our facility, we process raw rattan in Indonesia and manufacture finished webbing in Foshan. This vertical integration lets us control quality from harvest to shipment.
Second, ask about grading standards. A serious wholesaler will clearly define what Grade A, B, and C mean for their products. They should send physical samples, not just photos. Photos can hide color inconsistencies, uneven weaving, and strand thickness issues.
Third, evaluate their product range. A one-stop supplier saves you time and shipping costs. If you need natural, bleached, and synthetic rattan — plus reed spline, rattan poles, and woven panels — sourcing everything from one place simplifies logistics.
Key Questions to Ask a Potential Supplier
Before placing a bulk order, ask these questions:
- Do you have your own factory or processing facility?
- Can you provide samples of each grade and weave pattern?
- What are your minimum order quantities?
- How do you package webbing for international shipping?
- What is your lead time from order to delivery?
- Do you offer custom sizing or pattern weaving?
- Can you provide references from buyers in my region?
Red Flags to Watch For
Be cautious if a supplier cannot provide clear photos of their factory, avoids sharing references, or offers prices that seem too low. Extremely cheap rattan often means lower-grade material, thinner strands, or a mix of grades in a single roll. In our experience exporting to the US, Australia, and Europe, buyers who chase the lowest price often end up reordering because the first batch failed quality checks.
Packaging is another tell. Rattan webbing should arrive in protective wrapping — cardboard tubes for rolls, plastic wrap to prevent moisture absorption during transit. If a supplier ships loosely packed webbing in thin bags, expect crushed or bent material.
Sustainability Matters
The rattan industry faces increasing scrutiny around sustainable harvesting 10. Responsible wholesalers source rattan from managed forests and can document their supply chain. This matters not just ethically but commercially — many European and North American buyers now require sustainability certifications from their suppliers. Ask your wholesaler about their sourcing practices and whether they can provide documentation.
The trend toward sustainable sourcing is growing fast. In 2025, more furniture companies are requesting proof of ethical labor and environmental practices before signing supply contracts. Partnering with a transparent wholesaler protects your brand reputation and ensures long-term material availability.
Online vs. Trade Show Sourcing
Many buyers find wholesalers through Google, Alibaba, or trade platforms. These are good starting points, but nothing replaces an in-person visit or a video call tour of the factory. Trade shows like the Canton Fair in Guangzhou also let you compare suppliers side by side, feel material quality, and negotiate directly. We meet many of our long-term partners at these events.
Conclusion
Restoring a vintage chair with rattan cane webbing is a rewarding project that combines craftsmanship with practical skill. Choose the right grade, soak properly, use the correct tools, and source from a reliable wholesaler — your restored chair will look beautiful and last for years.
Footnotes
1. Wikipedia provides an authoritative and comprehensive overview of the Cesca chair’s history and design. ↩︎
2. Explains the definition, origin, and characteristics of natural rattan as a material. ↩︎
3. Details the characteristics and common uses of the open hexagonal weave pattern in caning. ↩︎
4. Explains the criteria and importance of Grade A quality in rattan cane webbing. ↩︎
5. Describes the material and function of reed spline in securing cane webbing. ↩︎
6. Explains the specialized design and use of a cane chisel for removing old spline. ↩︎
7. Details the design and benefits of a specialized tool for installing cane webbing. ↩︎
8. Provides a general overview of polyvinyl acetate (PVA) glue, its composition, and common applications. ↩︎
9. Describes the properties and benefits of tung oil as a natural wood finish. ↩︎
10. Highlights the importance and practices of sustainable rattan harvesting for environmental and economic benefits. ↩︎

