Staring at plain, outdated cabinet doors can feel frustrating — especially when a beautiful refresh seems expensive Grade A or Grade AA natural rattan 1. Having produced rattan cane webbing 2 in our own processing facility in Indonesia for years, we know firsthand that this simple material can completely transform tired cabinetry into stunning, on-trend pieces. The good news? You do not need professional carpentry skills to pull it off.
To decorate cabinet doors with rattan cane webbing, remove the doors, soak the webbing for 30 minutes to make it pliable, cut it slightly larger than the frame opening, staple it from the back starting at the center and working outward, trim excess material, and let it dry for 24 hours to achieve a taut, professional finish.
Below, I will walk you through every step — from choosing the right grade of rattan to keeping your finished cabinets looking beautiful for years open hexagonal "radio weave" 3. Whether you are a first-time DIYer or a seasoned furniture flipper, this guide covers the materials, techniques, and insider tips you need.
How do I choose the right grade of rattan cane webbing for my cabinet project?
Picking the wrong grade of rattan is one of the most common mistakes we see from buyers placing their first orders. It leads to uneven weaves, premature sagging, and a finished result that looks cheap rather than charming.
Choose Grade A or Grade AA natural rattan cane webbing for cabinet doors, as these grades feature uniform strand thickness, consistent weave patterns, and minimal discoloration. For decorative cabinets, an open hexagonal "radio weave" offers a classic look, while a tighter basketweave provides more privacy and structure.

Understanding Rattan Grades
Not all rattan cane webbing is the same. Grades range from premium (Grade AA) down to utility-level material. The difference lies in strand uniformity, color consistency, and the number of visible defects like knots or broken fibers. When we grade webbing at our processing facility, we inspect every roll for these factors before it ships.
For cabinet doors, you want webbing that looks clean and even because it will be highly visible. A lower grade might work fine for the back panel of a bookshelf, but on a kitchen or bathroom cabinet, imperfections stand out quickly.
Weave Pattern Options
The weave pattern you choose determines both the look and function of your cabinet door. Here is a quick comparison:
| Weave Pattern | Transparency | Best For | Aesthetic |
|---|---|---|---|
| Open Hexagonal (Radio Weave) | High — contents visible | Display cabinets, china hutches | Classic, airy, bohemian |
| Square Basketweave | Medium — partially concealed | Kitchen uppers, bathroom vanities | Clean, structured, modern |
| Diamond Geometric | Low — contents mostly hidden | Bar cabinets, bedroom storage | Intricate, artisanal, statement |
Natural vs. Synthetic Rattan
You also need to decide between natural and synthetic rattan. Natural vs. Synthetic Rattan 4 Natural rattan has a warm, organic texture with slight color variations — that is what gives it character. Synthetic rattan, which we also produce in durable plastic versions, mimics the look of natural fibers but resists moisture better. If your cabinets are in a humid bathroom or near a kitchen sink, synthetic may be the smarter choice.
Bleached rattan 5 is another option. It has a lighter, more uniform cream tone that pairs well with white or pastel-painted frames. We have shipped bleached cane webbing to buyers in the Netherlands and Australia who love combining it with Scandinavian-style interiors.
Size and Roll Dimensions
Most standard cane webbing rolls measure around 36 inches wide by 84 inches long, which is enough for four to six average cabinet doors. Measure your door openings first. Always buy at least 15% more material than you think you need to account for cutting waste and pattern alignment.
What is the best way for me to soak and prepare the rattan before I start?
Many first-time DIYers skip soaking or rush through it. From our experience producing and testing rattan across dozens of export markets, we can say this step makes or breaks your entire project.
Soak natural rattan cane webbing in warm water for 30 to 60 minutes before installation. This softens the fibers, makes the material pliable for stretching and stapling, and allows it to shrink uniformly as it dries — pulling itself taut across the frame for a drum-tight, wrinkle-free finish.

Why Soaking Matters
Dry rattan is rigid and brittle. If you try to stretch it over a frame without soaking, the strands will crack, and you will struggle to get a flat surface. Water rehydrates the natural fibers and makes them flexible. As the webbing dries after installation, it contracts slightly. This natural shrinkage is actually your best friend — it creates the taut finish that makes professional-looking cane doors so appealing.
Soaking Time Guidelines
Getting the soak time right is important. Too little and the rattan stays stiff. Too much and it becomes overly soft, leading to excessive shrinkage, warping, or even mold if left damp too long.
| Weave Type | Recommended Soak Time | Water Temperature | Notes |
|---|---|---|---|
| Open Hexagonal (Radio Weave) | 30 minutes | Warm (not hot) | Thinner strands absorb quickly |
| Square Basketweave | 45–60 minutes | Warm | Denser weave needs more time |
| Diamond Geometric | 45–60 minutes | Warm | Complex pattern, soak evenly |
| Bleached Rattan | 20–30 minutes | Cool to warm | Over-soaking can affect color |
Use a bathtub, large storage bin, or even a clean kiddie pool for soaking. Lay the cut piece flat so every part gets submerged evenly. Avoid folding or crumpling the webbing — this can create permanent creases.
Preparing Your Cabinet Doors Before Installation
While the rattan soaks, use that time to prepare your cabinet doors. Remove them from the hinges and lay them on a flat work surface. If your doors have glass panels, carefully pry them out using an oscillating tool 6. Some DIYers prefer to leave the glass in place and glue the rattan over it — this preserves the original door but limits your attachment options.
If you plan to paint or stain the frames, do it now. Apply one to two coats of primer followed by your chosen color. Sherwin Williams Svelte Sage 7 and matte black are popular choices that complement rattan beautifully. Let the paint dry completely before attaching the cane — wet paint plus damp rattan is a recipe for adhesion problems and staining.
Cutting the Webbing to Size
After soaking, remove the rattan and let excess water drip off for a minute or two. Then lay it flat over the back of your cabinet door frame. Cut it with sharp scissors or a utility knife, leaving a 2 to 4 inch overhang on all sides. Follow the weave lines when cutting — cutting diagonally across the pattern causes fraying and looks messy. A straight cut along the weave keeps the edges clean and makes trimming easier later.
How do I securely attach and tension the cane webbing to my cabinet door frames?
This is where the project comes together — and where most mistakes happen. We have tested thousands of attachment samples across our three factories, and the method you choose directly affects how long your cane doors last.
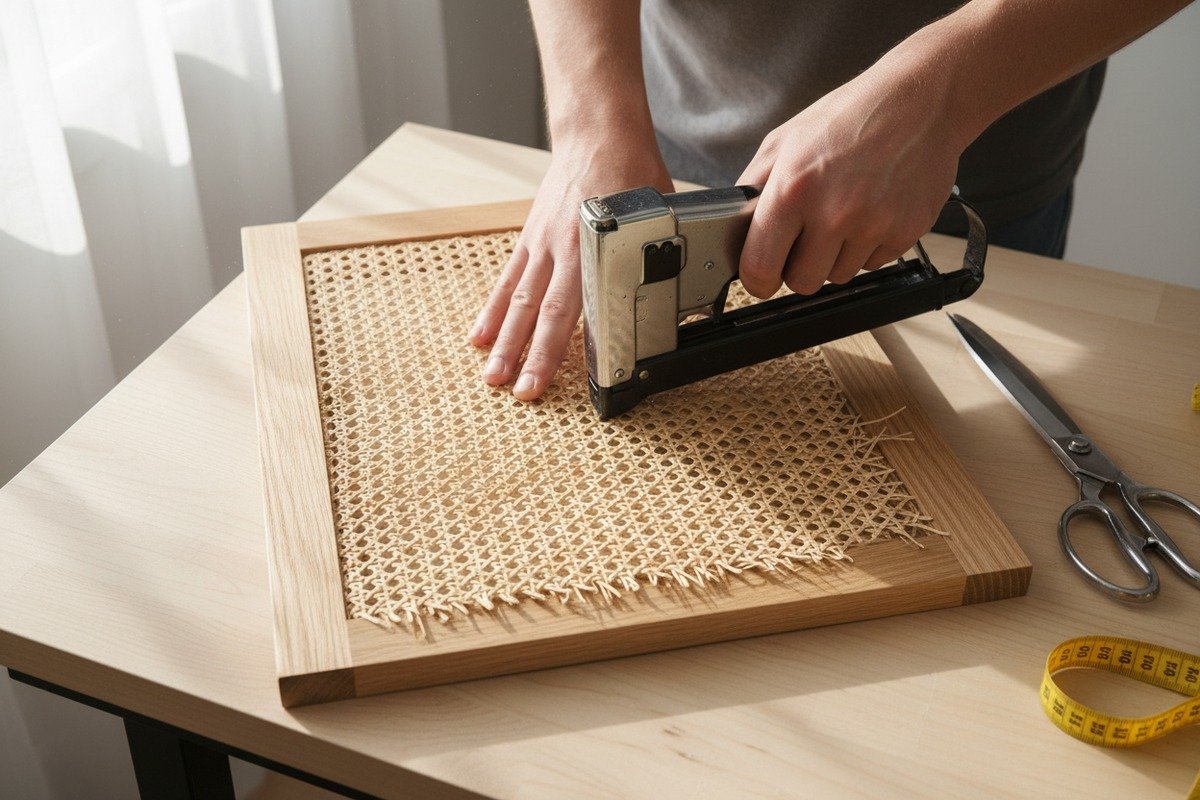
Attach soaked rattan cane webbing to the back of your cabinet door frame using a staple gun with 1/4-inch staples. Start at the center of one side, pull the webbing taut, staple the opposite center, then work outward to the corners. This center-out technique distributes tension evenly and prevents wrinkles or sagging.

The Center-Out Stapling Technique
Think of this like stretching a canvas. If you start at one corner and work around, you will end up with slack on one side and overtight areas on the other. Instead, staple the center of the top edge first. Then pull the webbing down firmly and staple the center of the bottom edge. Repeat for the left and right center points. Now work outward from each center point toward the corners, adding staples every half inch to one inch.
Keep the webbing slightly taut — not overly stretched. Remember, it will shrink as it dries. If you pull it too tight while wet, the shrinkage force can warp the frame or tear the strands at the staple points.
Staples vs. Glue vs. Spline
There are three primary attachment methods, and each has trade-offs:
| Method | Pros | Cons | Best For |
|---|---|---|---|
| Staple Gun (1/4" staples) | Strong mechanical hold, easy tensioning, fast | Visible from back, can split thin frames | Most DIY projects, back-mounted cane |
| Wood Glue or Super Glue | Invisible attachment, clean finish | Slower cure, prone to peeling if uneven drying | Over-glass installations, decorative overlays |
| Spline and Routed Groove | Most professional, traditional look | Requires router, more skill needed | High-end furniture, custom builds |
For most cabinet door projects, stapling from the back is the easiest and most reliable method. The staples are hidden because they sit on the reverse side of the door. If you want a cleaner look, add thin wooden backing strips over the stapled edges. Glue these strips down with wood glue and clamp them for 30 minutes. This sandwiches the cane webbing between the frame and the backing strip for extra security.
Over-Glass Installation
If you prefer not to remove your existing glass panels, you can install the rattan over the front of the glass. Cut the cane to match the glass area precisely. Apply a thin line of super glue around the perimeter of the glass, press the dry or lightly dampened cane into place, and hold it with painter's tape until the glue sets. Then apply mitered wood molding strips around the edges to frame the cane and hide the glue line.
This method looks great but requires precision. If the cane is too wet, shrinkage can crack the glue bond before it fully cures. We recommend using an accelerator spray (insta-set) to speed up super glue curing 8 if you go this route.
Trimming and Finishing
Once the webbing is secured, let it dry for a full 24 hours. Then use a sharp utility knife or scissors to trim any excess material flush with the frame edge. Sand any rough spots lightly. If you see small areas where the weave looks loose after drying, you can add a couple of extra staples in those spots.
Touch up any scuffed paint or primer. Reattach your hardware — hinges, knobs, or pulls. If you want to elevate the design, this is a great time to swap in new brass hardware or leather pulls that complement the rattan's natural tone.
Adding LED Backlighting
For an extra design element, consider mounting LED strip lighting behind the cane webbing inside your cabinet. The light shines through the open weave pattern and creates a warm, ambient glow. This works especially well with radio weave on display cabinets or bar areas. Use battery-operated LED strips for easy installation without wiring.
How can I ensure my finished rattan cabinets remain durable and maintain their quality?
We ship rattan materials to over a dozen countries with vastly different climates — from the dry heat of Saudi Arabia to the humidity of the Philippines. Through that experience, we have learned exactly what keeps rattan looking great for years and what causes it to deteriorate.
To maintain durable rattan cabinet doors, apply a clear matte polyurethane or lacquer sealant after installation, keep them away from direct sunlight and excessive moisture, dust regularly with a soft brush, and avoid harsh chemical cleaners. Properly sealed and maintained rattan cabinets can last ten years or more without sagging or discoloration.

Sealing Your Rattan
Once the cane webbing is fully dry and taut — typically after 24 hours — consider applying a protective finish. A thin coat of clear matte polyurethane 9 or a spray lacquer creates a barrier against moisture, dust, and kitchen grease. This is especially important for cabinets near stovetops or sinks. Apply one to two light coats with a foam brush or spray can, allowing each coat to dry fully before the next.
Avoid thick, glossy finishes. They obscure the natural texture of the rattan and can cause the fibers to look plasticky. A matte or satin finish preserves the organic character that makes cane webbing so appealing.
Environmental Factors
Rattan is a natural material. It responds to its environment. High humidity causes it to expand and soften. Very dry conditions make it contract and become brittle. Direct sunlight fades the natural color over time.
Here are practical tips to manage environmental exposure:
- Keep rattan cabinets out of direct sunlight or use UV-filtering window film.
- In very humid climates, use a dehumidifier in the room or choose synthetic rattan instead.
- In dry climates, an occasional light misting with water (once a month) can prevent brittleness.
- Ensure good ventilation behind the cabinet to prevent mold buildup.
Cleaning and Maintenance
Regular cleaning is simple. Use a soft-bristle brush or a dry microfiber cloth to remove dust from the weave pattern. For deeper cleaning, wipe with a cloth lightly dampened with water and a tiny drop of mild dish soap. Avoid soaking the cane — remember, water softens it. Never use bleach, ammonia-based cleaners, or abrasive scrubbers.
If a section of the cane becomes damaged — from a pet scratch, an accidental bump, or general wear — you can patch it. Cut out the damaged area following the weave lines. Cut a matching piece from leftover webbing, soak it briefly, and glue it in place with wood glue. Clamp and let it dry. The patch blends in well because natural rattan has organic color variation.
Longevity Expectations
How long will your rattan cabinet doors last? With proper installation and basic care, here is what to expect:
- Natural rattan, sealed and maintained: 8 to 15 years.
- Synthetic rattan, indoor use: 15 to 20 years.
- Natural rattan, unprotected in humid environment: 3 to 5 years before visible wear.
Sourcing high-quality material from the start makes the biggest difference. This is why our purchasing manager clients, like Ranoo in Thailand, insist on Grade A quality — because their end customers expect furniture and cabinetry that lasts. When you invest in better webbing and take 30 minutes to seal it, you avoid the frustration of sagging, yellowing, or fraying two years down the road.
Sustainability and Ethical Sourcing
Rattan is one of the most sustainable materials available. It grows rapidly in tropical forests without requiring replanting — harvesters cut the vine, and it regrows. Choosing ethically sourced rattan supports forest communities and reduces demand for synthetic alternatives made from petroleum-based plastics. At our processing facility in Indonesia 10, we work directly with local harvesters, ensuring fair practices and sustainable yield management. If eco-conscious living matters to you, rattan cabinet doors align perfectly with that philosophy.
Conclusion
Decorating cabinet doors with rattan cane webbing is one of the most rewarding and affordable DIY upgrades you can do. Choose the right grade, soak properly, staple with care, and seal for longevity — your cabinets will look stunning for years.
Footnotes
1. Explains the quality grades of natural rattan webbing for furniture. ↩︎
2. Provides a general overview and definition of rattan cane webbing. ↩︎
3. Describes the characteristics and uses of the radio weave pattern. ↩︎
4. Compares natural and synthetic rattan, highlighting their differences and applications. ↩︎
5. Explains the process and aesthetic of bleached rattan cane webbing. ↩︎
6. Details the versatile uses of an oscillating multi-tool in various projects. ↩︎
7. Found the official Sherwin-Williams product page for Svelte Sage (SW 6164). ↩︎
8. Explains the chemical process of how super glue bonds and cures. ↩︎
9. Discusses the benefits and characteristics of a matte polyurethane finish. ↩︎
10. Highlights Indonesia’s significant role in global rattan production. ↩︎

