Cada semana, nuestro equipo de producción en Foshan atiende docenas de consultas de fábricas de muebles que luchan con una cosa: bordes de ratán desordenados moldura decorativa de madera 1. Cortas la cincha, la grapas en su lugar y luego miras esos bordes crudos y deshilachados preguntándote cómo hacer que se vean limpios. Es un detalle pequeño, pero hace o deshace el producto final. Los compradores se dan cuenta. Los clientes finales se dan cuenta. Y cuando los bordes se deshilachan después de unos meses, todos culpan al material, no a la técnica de acabado.
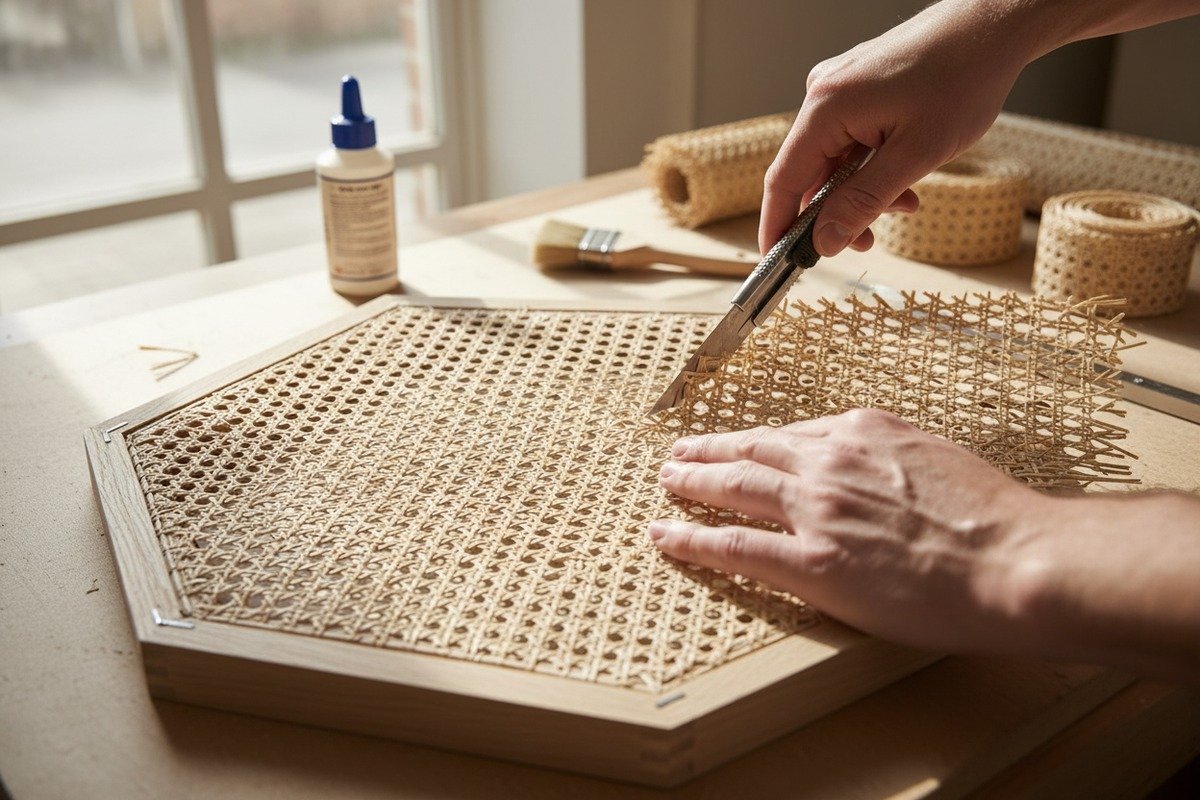
Para terminar los bordes al instalar el tejido de ratán natural, recorte el material sobrante con un cúter afilado, luego asegure los bordes utilizando una moldura presionada en una ranura fresada, grapas en la parte posterior o caña de encuadernación enrollada sobre el borde crudo. Aplique cola de madera para una adhesión duradera y cubra con molduras decorativas o adornos para un resultado profesional.
La buena noticia es que el acabado de bordes no es complicado una vez que conoces los métodos correctos. A continuación, desglosamos las preguntas más comunes que hacen nuestros clientes, desde elegir entre espigas y grapas hasta sellar y proteger sus bordes a largo plazo. Vamos a repasar cada una paso a paso.
¿Cómo elijo entre usar un junquillo o grapas para el acabado del borde de mi ratán?
Esta es la pregunta que más escuchamos de nuestros compradores mayoristas, especialmente de fábricas de muebles que están montando nuevas líneas de puertas de gabinetes. Quieren velocidad, pero también durabilidad. La elección incorrecta aquí puede significar devoluciones, quejas y material desperdiciado.
Elija una cuña cuando su marco tenga una ranura fresada: proporciona el borde más limpio y duradero. Use grapas cuando trabaje con marcos planos, respaldos de paneles o proyectos rápidos de bricolaje donde el borde estará oculto o cubierto por molduras. Las cuñas bloquean la cincha mecánicamente, mientras que las grapas dependen únicamente de la fuerza de sujeción.

Comprendiendo el Método de la Espiga
Una espiga es una tira delgada y redondeada de junco o caña que se presiona en una ranura (llamada rebaje o canal) cortada en tu marco. espiga presionada en una ranura fresada 2 La cincha se coloca sobre la ranura y la espiga la sujeta firmemente. Este es el método tradicional utilizado en el tejido de sillas 3 durante siglos. Funciona porque crea un bloqueo mecánico: la cincha no puede salirse a menos que se retire la espiga.
Para usar una espiga, necesitas un marco con unaranura fresada 4, típicamente de 3-5 mm de ancho y 5-8 mm de profundidad. Remojas la espiga en agua tibia durante unos 20 minutos para que se vuelva flexible. Luego colocas la cincha sobre la ranura, presionas la espiga con una herramienta de cuña o un mazo de goma, y recortas el exceso de cincha al ras con un cúter.
Por experiencia en nuestra planta de producción, siempre decimos a los clientes: si estás fabricando muebles para estanterías minoristas o mercados de exportación, el método de la espiga vale la pena el tiempo adicional de configuración. El acabado es impecable. No hay herrajes visibles. Y resiste bien en ambientes húmedos como los del sudeste asiático y el Medio Oriente.
Comprendiendo el Método de la Grapa
Las grapas son más rápidas y sencillas. Estiras la cincha sobre el marco, doblas el borde hacia abajo (si es posible) y lo grapas en la parte posterior o el borde interior del marco. Una pistola de grapas neumática 5 hace que esto sea un trabajo rápido. La mayoría de nuestros clientes que producen en grandes volúmenes utilizan grapas para los insertos de puertas de gabinetes y los paneles de cabeceros porque los bordes se cubren con molduras de madera después.
¿La desventaja? Las grapas pueden rasgar la caña con el tiempo, especialmente si la cincha no se remojó correctamente antes de la instalación. El ratán seco es quebradizo. Un tirón fuerte y la fibra se rompe justo en el punto de la grapa.
Spline vs. Grapas: Una comparación rápida
| Factor | Método de Spline | Método de grapas |
|---|---|---|
| Lo mejor para | Marcos con ranuras fresadas | Marcos planos, bordes ocultos |
| Apariencia del borde | Limpio, sin costuras | Visible a menos que esté cubierto |
| Durabilidad | Alto — bloqueo mecánico | Moderado — depende del estado de la caña |
| Velocidad | Más lento (requiere ranura + remojo) | Rápido (grapadora) |
| Nivel de habilidad | Intermedio | Principiante |
| Costo | Superior (fresadora + listón) | Inferior (solo grapas) |
| Aplicación ideal | Sillas, muebles de alta gama | Inserciones de gabinetes, paneles, proyectos de bricolaje |
Cuándo usar ambos juntos
Algunos de nuestros clientes combinan ambos métodos. Grapan la cincha para mantenerla en su posición, luego insertan un listón para un bloqueo permanente. Este enfoque híbrido funciona bien en paneles más grandes donde el control de la tensión es crítico. Las grapas actúan como anclajes temporales mientras trabajas el listón en la ranura de un extremo a otro. Una vez que el listón está colocado, las grapas se vuelven redundantes pero añaden una capa adicional de seguridad.
¿Qué puedo usar para ocultar los bordes crudos de mi tejido de ratán natural?
Cuando enviamos rollos de cincha de ratán a mayoristas de materiales para muebles en Europa y EE. UU., esta es la pregunta de seguimiento que siempre surge. La cincha está instalada. Los bordes están asegurados. Pero la línea de corte en bruto todavía es visible. No se ve terminado. Parece un trabajo en progreso.
Puedes ocultar los bordes de ratán crudo con molduras decorativas de madera, caña de atar envuelta sobre el borde, junco redondo presionado a lo largo del borde del marco o tiras de celosía planas. Para un aspecto minimalista, un fino cordón de masilla del color de la madera o una moldura pintada también funciona bien para ocultar la transición entre la cincha y el marco.

Adorno y moldura de madera decorativa
Este es el enfoque más popular entre nuestros clientes fabricantes de gabinetes. Después de que la cincha se fija con grapas o listones, clavan o pegan una fina tira de moldura de madera sobre el borde en bruto. Funcionan molduras de cuarto de círculo, listones planos o perfiles fresados a medida. La moldura cubre completamente el borde cortado y da un aspecto limpio y enmarcado.
La clave es terminar tu marco — lijarlo, teñirlo o pintarlo — antes de instalar la cincha. Si intentas teñir después de que la cincha esté en su lugar, corres el riesgo de decolorar el ratán. Hemos visto este error muchas veces con compradores primerizos.
Ratán de encuadernación
Ratán de encuadernación 6 es una tira estrecha de ratán (generalmente de 4 mm de ancho) que se envuelve sobre el borde crudo. En el ratán tradicional de sillas, el ratán de encuadernación se enlaza a través de los agujeros de la cincha con una hebra separada debajo, creando un borde limpio. Para la cincha en lámina, puedes pegar y clavar el ratán de encuadernación a lo largo del borde del marco.
Remoja el ratán de encuadernación durante 15-20 minutos primero. Coloca el lado brillante hacia arriba. Aplica una línea fina de pegamento para madera 7 a lo largo del borde del marco, presiona el ratán de encuadernación hacia abajo y asegúralo con pequeños alfileres o tachuelas cada 2-3 cm hasta que el pegamento se fije. Una vez seco, retira los alfileres. El resultado es un acabado tradicional de calidad artesanal.
Comparación de opciones de revestimiento
| Método de revestimiento | Estilo estético | Dificultad | Mejor caso de uso |
|---|---|---|---|
| Moldura / recorte de madera | Moderno, limpio | Fácil | Puertas de armario, paneles de pared |
| Ratán de encuadernación (4 mm) | Tradicional, artesanal | Moderada | Sillas, muebles de herencia |
| Junco redondo | Rústico, bohemio | Fácil | Pantallas, cabeceros |
| Masilla (tono madera) | Minimalista | Fácil | Proyectos económicos, soluciones rápidas |
| Tira pintada plana | Personalizado / contemporáneo | Fácil | Muebles de colores o temáticos |
| Cinta de tela | Suave, decorativo | Fácil | Marcos tapizados, artículos blandos |
Consejos para un aspecto impecable
Alinea el patrón de tejido de tu malla de ratán con el marco antes de asegurarla. Cuando el patrón hexagonal corre recto y paralelo a los bordes del marco, la pieza en general se ve intencional y pulida. Las líneas de tejido torcidas atraen la mirada hacia las imperfecciones.
Si vas a cubrir los bordes con moldura, elige un ancho de moldura que oculte completamente la línea de grapas o la ranura de la espiga. Recomendamos al menos 10 mm de solape en cada lado. Y usa siempre una cuchilla afilada al recortar el exceso de malla; un cuchillo desafilado aplastará las fibras en lugar de cortarlas limpiamente, dejando un borde irregular que es más difícil de ocultar.
Para clientes que producen en masa, a menudo sugerimos pedir paneles de malla precortados con un tamaño de 1 a 2 pulgadas más grandes que la abertura del marco. Esto te da suficiente material para envolver detrás del marco o meter en la ranura, de modo que el borde cortado en bruto nunca esté en la cara visible.
¿Cómo evito que mi tejido de ratán se deshilache o se deshilache en los bordes?
En nuestra planta de procesamiento de ratán en Indonesia, vemos de primera mano cómo se comporta el ratán crudo cuando se corta. Las fibras quieren separarse. Los hilos tejidos se aflojan. Y si no abordas esto durante la instalación, el deshilachado empeora con el tiempo debido al manejo y los cambios de humedad. Nuestros clientes mayoristas en Australia y el Medio Oriente preguntan constantemente sobre esto porque sus climas llevan el ratán a sus límites.
Previene el deshilachado remojando la cincha antes de cortarla, utilizando herramientas afiladas para cortes limpios, aplicando pegamento para madera o adhesivo transparente en los bordes cortados inmediatamente, y asegurando los bordes con una espiga, grapas o caña de encuadernación. Sellar el borde con una capa fina de aceite de linaza o sellador transparente añade protección a largo plazo contra el deshilachado.

Por qué el ratán se deshilacha en primer lugar
Rejilla de ratán natural 8 está tejido con finas tiras de corteza de ratán. Cada tira se entrelaza con sus vecinas, pero el tejido solo se mantiene bajo tensión. Cuando cortas el tejido, rompes esas conexiones entrelazadas en la línea de corte. Los hilos del borde ahora son libres de separarse. Agrega humedad, manejo y vibración, y esos hilos sueltos se separan lentamente del cuerpo del tejido.
Esto no es un defecto del material. Es simplemente cómo se comportan los materiales tejidos. La tela de algodón se deshilacha de la misma manera. La solución es la misma también: asegurar el borde.
Prevención de deshilachado paso a paso
Paso 1: Remojar antes de cortar. Las fibras de ratán húmedas son flexibles y menos propensas a astillarse o agrietarse al cortarlas. Remoja el tejido en agua tibia durante 30-60 minutos. Algunos de nuestros clientes agregan una pequeña cantidad de glicerina al agua (aproximadamente una cucharadita por litro) para mejorar la flexibilidad. No remojes en exceso: dejar el ratán en agua durante la noche puede fomentar el crecimiento de moho, especialmente en climas cálidos.
Paso 2: Cortar con una cuchilla afilada. Un cúter desafilado aplasta las fibras. Una cuchilla afilada las corta limpiamente. Corta sobre una superficie plana y dura. Usa una regla como guía. Reemplaza tu cuchilla cada 3-4 cortes para obtener los mejores resultados.
Paso 3: Aplica pegamento al borde cortado. Mientras el borde aún está húmedo, aplica una fina línea de pegamento para madera o adhesivo artesanal de secado transparente a lo largo de la línea de corte. Usa tu dedo o un pincel pequeño para trabajar el pegamento ligeramente en el tejido. Esto une los hilos sueltos a medida que se seca.
Paso 4: Asegura el borde mecánicamente. Usa una junta, grapas o caña de encuadernación para fijar el borde en su lugar. Esto evita cualquier movimiento que pueda hacer que la unión del pegamento se rompa con el tiempo.
Paso 5: Sella y protege. Después de completar la instalación y que todo esté seco, aplique una capa fina de aceite de linaza o aceite danés a lo largo de los bordes. Esto acondiciona las fibras, reduce la fragilidad y crea una barrera sutil contra la humedad.
Errores comunes que causan deshilachado
| Error | Por qué causa deshilachado | Cómo evitarlo |
|---|---|---|
| Cortar caña seca y sin remojar | Las fibras se agrietan y se astillan en la línea de corte | Remojar siempre 30-60 minutos antes de cortar |
| Usar tijeras o cuchillos desafilados | Tritura las fibras en lugar de cortarlas | Use una cuchilla de navaja utilitaria nueva |
| Omitir pegamento en los bordes cortados | Nada mantiene las hebras sueltas en su lugar | Aplique pegamento para madera inmediatamente después de cortar |
| Tensión excesiva durante la instalación | Separa las hebras en puntos débiles | Estire uniformemente del centro hacia afuera |
| Exponer los bordes a la luz solar directa | Los rayos UV secan y quebrantan las fibras | Use aceite o sellador; evite el sol prolongado |
| Remojo excesivo (más de 2 horas) | Las fibras se hinchan, se debilitan y corren riesgo de moho | Limite el remojo a 30–60 minutos |
Una nota sobre los grados de tejido
En nuestras instalaciones, la corteza de ratán 9 el tejido se clasifica de la A a la D. El tejido de grado A tiene el tejido más uniforme y menos rebabas naturales, lo que significa que los bordes se comportan de manera más predecible al cortarse. Los grados inferiores pueden tener uniones empalmadas o irregularidades menores que aumentan la posibilidad de deshilachado en esos puntos. Si la calidad del borde es fundamental para su aplicación —por ejemplo, bordes expuestos en un cabecero— siempre recomendamos material de grado A.
También ofrecemos tejido que ha pasado por nuestro proceso de carbonización, donde se queman las pequeñas rebabas superficiales. Esto no elimina por completo el deshilachado, pero reduce el número de extremos de fibra sueltos en el borde.
¿Debo aplicar un sellador o pegamento específico a los bordes de mi ratán para un aspecto profesional?
Nuestro equipo de investigación y desarrollo ha probado docenas de acabados a lo largo de los años, desde el aceite de linaza tradicional hasta los modernos aerosoles de poliuretano. Los resultados varían mucho según la aplicación del producto, el clima donde terminará el mueble y si el ratán es natural, blanqueado o teñido. Elegir el sellador incorrecto puede oscurecer la caña, bloquear su transpirabilidad o incluso hacer que se agriete.
Sí, aplicar un sellador o pegamento mejora tanto la apariencia como la durabilidad de los bordes de ratán. Use pegamento para madera (PVA) para unir las fibras sueltas, luego termine con aceite de linaza, aceite danés o un sellador transparente mate fino para proteger. Evite los recubrimientos gruesos de poliuretano, que pueden amarillear con el tiempo y atrapar la humedad dentro de las fibras.

Pegamento: La base estructural
Pegamento para madera — específicamente Pegamento PVA (acetato de polivinilo) 10 — es el adhesivo ideal para el acabado de bordes de ratán. Se seca transparente, se adhiere bien a las fibras naturales y permanece flexible después del curado. Aplícalo en los bordes cortados, a lo largo de las ranuras de las espigas o debajo del mimbre de encuadernación. Hace el trabajo pesado de mantener las hebras bloqueadas en su lugar.
Para áreas que puedan mojarse (tocadores de baño, pantallas exteriores), considera una variante de pegamento para madera impermeable como Titebond III. El pegamento PVA estándar se ablanda cuando se expone a la humedad prolongada, lo que va en contra del propósito en ambientes húmedos.
Las pistolas de pegamento caliente a veces se usan en proyectos rápidos de bricolaje, pero no las recomendamos para muebles comerciales. El pegamento caliente se vuelve quebradizo con el tiempo y puede desprenderse de las fibras de ratán a medida que el material se expande y contrae con los cambios de humedad.
Selladores: Protección y Estética
Una vez que el pegamento se haya secado y los bordes estén seguros, un sellador agrega la capa final. Aquí hay lo que funciona — y lo que no.
Aceite de Linaza (Hervido): Esta es la opción clásica. Penetra en las fibras de ratán, profundiza ligeramente el color natural y proporciona una sutil barrera contra la humedad. Aplica con un paño suave, retira el exceso y deja secar durante 24 horas. Vuelve a aplicar una vez al año para mantenimiento. Recomendamos esto a clientes que envían a climas secos.
Aceite Danés: Similar al de linaza pero con resinas añadidas para un acabado ligeramente más duro. Bueno para muebles que se manipularán con frecuencia, como brazos de sillas y tiradores de gabinetes.
Sellador Mate Transparente (en aerosol): Una ligera pulverización de laca mate transparente o sellador acrílico funciona bien para un recubrimiento rápido y uniforme. Usa capas finas — dos o tres pasadas — para evitar acumulaciones que parezcan plásticas. Esto es popular entre nuestros clientes que producen paneles de ratán pintados o blanqueados.
Tinte a Base de Aceite: Si deseas cambiar el color del ratán, los tintes a base de aceite penetran mejor que los a base de agua. Los productos a base de agua pueden hinchar las fibras y causar una absorción desigual. Aplica con un paño, retira inmediatamente y sella con aceite después.
Qué evitar
Las capas gruesas de poliuretano lucen geniales en madera, pero son incorrectas para el ratán. Crean una capa dura en la superficie mientras que las fibras debajo continúan absorbiendo y liberando humedad. Esta discrepancia causa grietas y descamación. De manera similar, los barnices gruesos pueden amarillear con la exposición a los rayos UV, haciendo que las correas blanqueadas o de color claro se vean sucias en un año.
La pintura en aerosol funciona para piezas decorativas, pero requiere de tres a cinco capas muy finas. La pintura en aerosol espesa obstruye las aberturas del tejido y oculta la hermosa textura que hace que el ratán sea atractivo en primer lugar.
Opciones de sellador y acabado de un vistazo
| Tipo de acabado | Mejor para | Pros | Contras |
|---|---|---|---|
| Pegamento de madera PVA | Unión de bordes estructural | Secado transparente, flexible, fuerte | No es impermeable (versión estándar) |
| Aceite de linaza hervido | Realce del color natural | Penetra las fibras, fácil de aplicar | Necesita reaplicación anual |
| Aceite danés | Superficies de muebles de alto uso | Acabado más duro, duradero | Ligero oscurecimiento del mimbre |
| Sellador en aerosol mate transparente | Correas pintadas o blanqueadas | Cobertura uniforme, aplicación rápida | Puede parecer plástico si se aplica en exceso |
| Tinte a base de aceite | Personalización de color | Penetración profunda, tonos ricos | Permanente — no se puede eliminar |
| Poliuretano (espeso) | No recomendado para ratán | Capa protectora dura | Se agrieta, amarillea, atrapa la humedad |
Combinar el acabado con el clima
Nuestros clientes en los Países Bajos y España trabajan en climas relativamente moderados, por lo que un simple tratamiento con aceite de linaza en los bordes es suficiente. Pero los compradores en Arabia Saudita, Dubái y Tailandia se enfrentan a un calor y una humedad extremos. Para estos mercados, recomendamos pegamento PVA impermeable combinado con aceite danés y un spray sellador mate ligero. Este enfoque de triple capa mantiene los bordes sellados sin sacrificar la transpirabilidad natural del ratán.
Para el ratán blanqueado —que es cada vez más popular en diseños minimalistas modernos— sugerimos evitar cualquier aceite que oscurezca las fibras. En su lugar, utilice un sellador acrílico transparente a base de agua aplicado en capas finas. Preserva el aspecto claro y aireado que hace que el ratán blanqueado sea tan deseable.
Conclusión
Acabar bien los bordes de ratán requiere un poco de paciencia, las herramientas adecuadas y la técnica correcta, pero no es difícil. Ya sea que elija ranuras, grapas, molduras, caña de encuadernación o selladores, la clave es adaptar su método a su proyecto y clima. Comience con cortes limpios, asegure los bordes, oculte las líneas en bruto y selle todo para una mayor longevidad.
Notas al pie
1. Ofrece una guía de diferentes tipos y estilos de molduras decorativas de madera. ↩︎
2. Detalla el método tradicional de ranura para asegurar el tejido de caña en muebles. ↩︎
3. Proporciona contexto histórico y detalles sobre el oficio de enea de sillas. ↩︎
4. Explica el término ‘ranura fresada’ en el contexto de la enea de sillas. ↩︎
5. Explica la función y las ventajas de una pistola de grapas neumática en carpintería. ↩︎
6. Explica qué es la caña de atar y sus aplicaciones en la enea y los muebles. ↩︎
7. Describe las propiedades generales y los usos del pegamento para madera, a menudo PVA. ↩︎
8. Proporciona características y aplicaciones de la malla de ratán natural. ↩︎
9. Describe la corteza de ratán como la materia prima para la malla de ratán. ↩︎
10. Reemplazado con una página autorizada de Wikipedia sobre acetato de polivinilo. ↩︎

