Cada semana, nuestro equipo de atención al cliente recibe llamadas de compradores cuyos clientes finales han arruinado tejido de caña de ratán 1 perfectamente buenos durante la instalación. Es frustrante ver cómo se desperdician materiales de calidad debido a errores evitables. El problema es real, es costoso y ocurre mucho más de lo que la mayoría de la gente espera.
Los errores más comunes en la instalación de tejido de ratán para principiantes incluyen tiempos de remojo inadecuados, estirar demasiado el material, cortar las láminas al tamaño incorrecto, usar herramientas incorrectas, desalinear los patrones, elegir el pegamento equivocado y apresurar el proceso de secado. Cada uno de estos errores puede arruinar el resultado final y desperdiciar materiales.
A continuación, analizamos las cuatro áreas problemáticas más importantes que vemos entre los instaladores primerizos fibra vegetal 2. Ya sea que dirija un taller de muebles o sea un entusiasta del bricolaje, estos consejos le ahorrarán tiempo, dinero y dolores de cabeza. Vamos a repasar cada uno.
¿Cuánto tiempo debo remojar mi tejido de ratán para evitar que se hunda después de la instalación?
El remojo es el primer paso en cualquier instalación de tejido de ratán y es el paso en el que vemos la mayor cantidad de errores por parte de los compradores nuevos. tiempos de remojo inadecuados 3 A través de años de envío de tejido de ratán a fábricas de muebles en toda Europa, EE. UU. y el Sudeste Asiático, hemos aprendido que los errores de remojo representan aproximadamente la mitad de todas las quejas de instalación.
Debe remojar la caña de ratán natural en agua tibia durante 30 a 60 minutos antes de la instalación. La varilla solo necesita de 5 a 15 minutos. Un remojo insuficiente deja la caña rígida y propensa a agrietarse, mientras que un remojo excesivo la vuelve demasiado flácida y difícil de tensar correctamente.

Por qué es importante el remojo
Mimbre de ratán natural 4 es una fibra vegetal. Cuando está seca, es rígida y quebradiza. Cuando está mojada, se vuelve flexible. Esta flexibilidad es esencial. Necesita que la caña se doble suavemente en la ranura del marco de sus muebles sin romperse. Pero la flexibilidad tiene un límite. Si remoja demasiado tiempo, las fibras absorben el exceso de agua. Se vuelven blandas. Cuando se secan más tarde, se encogen de manera desigual. Esa contracción es lo que causa el pandeo.
Piénselo de esta manera. La caña de ratán se contrae 5 aproximadamente entre un 10 y un 20 por ciento al secarse. Si la instala perfectamente tensa mientras está empapada, se tensará demasiado y podría agrietar o deformar el marco. Si la instala mientras todavía está rígida por falta de remojo, no se asentará correctamente en la ranura y podría salirse una vez que ranura 6 esté en su lugar.
Tabla de referencia de tiempos de remojo
| Material | Tiempo de remojo recomendado | Temperatura del agua | Error común |
|---|---|---|---|
| Rejilla de ratán natural | 30–60 minutos | Tibio (no caliente) | Remojo durante 2+ horas, causando flacidez |
| Junquillo de ratán | 5–15 minutos | Tibio (no caliente) | Remojar tanto como el tejido |
| Caña de ratán blanqueada | 20–45 minutos | Tibio | Usando agua caliente, que daña las fibras blanqueadas |
| Esterilla de ratán sintético | No se necesita remojo | N/A | Remojar material sintético innecesariamente |
Consejos de nuestra planta de producción
En nuestras instalaciones de procesamiento en Indonesia, los trabajadores prueban cada lote de ratán para detectar la respuesta a la humedad antes de enviarlo. Esto es lo que les decimos a nuestros clientes:
- Use una tina poco profunda o una bañera. Coloque la lámina plana. No la enrolle ni la doble en el agua.
- Verifique el ratán a los 30 minutos. Debe ser flexible pero aún tener algo de elasticidad. Si se siente como una toalla mojada, ha estado demasiado tiempo.
- Nunca use agua hirviendo. El agua caliente descompone las fibras naturales más rápido y debilita la estructura del tejido.
- Seque la lámina con una toalla seca antes de instalarla. Retire el agua superficial, pero mantenga la humedad interna.
- Remoje la espiga solo justo antes de necesitarla. Si la espiga permanece mojada demasiado tiempo, se hincha y no encajará en la ranura.
Una cosa más. La humedad ambiental importa. Si está instalando en un ambiente muy húmedo como la costa de Tailandia o Florida, reduzca el tiempo de remojo en 5 a 10 minutos. El ratán absorberá la humedad del aire a medida que se seca, lo que le dará un tensado adicional. En climas secos como el interior de Australia o el Medio Oriente, puede acercarse a los 60 minutos completos.
¿Por qué se está rajando mi tejido de ratán y cómo puedo evitar estirarlo demasiado?
El desgarro es la segunda queja más común que escuchamos en los talleres de nuestros clientes mayoristas. Cuando realizamos auditorías de calidad en nuestras fábricas asociadas de Foshan, siempre verificamos la tolerancia de tensión de cada lote de tejido de ratán. Pero incluso el mimbre de Grado A se desgarrará si el instalador aplica demasiada fuerza.
La esterilla de ratán se rompe si se tensa demasiado durante la instalación o si no se ha remojado lo suficiente. Las fibras naturales de caña tienen una capacidad de estiramiento limitada. Debe mantener la esterilla tensa pero nunca apretada; se contraerá y tensará naturalmente entre un 10 y un 20 por ciento a medida que se seque durante dos o tres días.

Comprendiendo la regla "Tirante, no apretado"
Esta es una frase que verás en casi todos los tutoriales profesionales de tejido de mimbre. Pero, ¿qué significa realmente? Tirante significa que el tejido queda plano sobre la abertura del marco sin hundimientos ni arrugas visibles. Apretado significa que estás tirando activamente del material con fuerza para eliminar cualquier holgura. La diferencia es crítica.
Cuando tiras del mimbre de ratán con fuerza, estresas las hebras individuales en sus puntos de intersección. Estas intersecciones son donde el tejido se cruza consigo mismo. Son los puntos más débiles. Bajo tensión, las fibras en estos cruces se separarán. Eso es el desgarro. Y una vez que comienza, se propaga rápidamente.
Causas del desgarro: Un desglose
| Causa | Por qué sucede | Cómo prevenirlo |
|---|---|---|
| Estiramiento excesivo durante el acuñamiento | Tirar del tejido con demasiada fuerza en la ranura | Presiona suavemente con una cuña; deja que la espiga haga la sujeción |
| Remojo insuficiente | Las fibras secas tienen cero tolerancia al estiramiento | Remoja durante el tiempo completo recomendado |
| Usar un martillo de metal directamente | La fuerza de impacto aplasta las fibras en el punto de contacto | Use un mazo de goma 7 o acolcha el martillo con una toalla |
| Forzar el mimbre en una ranura demasiado estrecha | Manojo de caña y desgarros en el borde de la ranura | Verifique que el ancho de la ranura coincida con la estría y el grosor de la cincha |
| Tirando en ángulo | Tensión desigual en el tejido | Tire siempre recto y paralelo al borde del marco |
La técnica correcta de acuñamiento
Muchos principiantes empujan la cuña de madera 8 directamente hacia abajo en la ranura. Esto empuja la caña demasiado profundo y la estira de manera desigual. El enfoque correcto es inclinar ligeramente la cuña hacia el borde exterior de la ranura. Esto asienta la caña contra la pared de la ranura sin tirar de ella excesivamente de la superficie.
Comience en el centro del lado más largo del marco. Trabaje hacia las esquinas. Luego haga el lado opuesto. Luego los dos lados restantes. Este patrón alterno distribuye la tensión de manera uniforme. Si trabaja de una esquina a otra, un lado estará tenso mientras que el otro estará flojo. Esa desigualdad es una receta para la división.
Un escenario real de nuestra base de clientes
Una fábrica de muebles en los Países Bajos pidió el año pasado 500 metros de nuestra cincha de ratán natural de malla abierta hexagonal. Dentro de la primera semana, su taller informó de roturas en aproximadamente el 15 por ciento de las sillas. Enviamos un asesor técnico. La causa raíz fue simple: sus trabajadores usaban alicates para agarrar y tirar de la caña en la ranura. Los alicates concentran la fuerza en un área diminuta. Les mostramos cómo usar una cuña de madera plana en su lugar. La tasa de rotura se redujo a casi cero.
La lección es clara. Respete el material. El ratán es fuerte, pero no es elástico como la goma. Trátelo con cuidado y le recompensará con décadas de hermoso y tenso tejido.
¿Cómo me aseguro de que estoy cortando mis láminas de ratán al tamaño correcto para los marcos de mis muebles?
Conseguir el corte correcto es algo que enfatizamos con cada nuevo cliente mayorista. Nuestro equipo en Foshan empaqueta el mimbre en rollos y láminas planas para adaptarnos a diferentes tamaños de proyecto. Pero una vez que el material llega a su taller, el paso de corte está completamente en sus manos. Y es donde se desperdicia mucho buen material.
Siempre corte su tejido de caña de ratán 1 a 2 pulgadas más grande que la medida de ranura a ranura en cada lado. Este voladizo le da suficiente material para encajar firmemente la caña en la ranura. Cortar demasiado cerca no deja espacio para el ajuste, mientras que cortar demasiado generosamente hace que el encaje sea desordenado y difícil.

Medir antes de cortar
Antes de siquiera tomar unas tijeras, mida la abertura de su marco de muebles. Mida desde el borde interior de una ranura hasta el borde interior de la ranura opuesta. Haga esto tanto para la longitud como para el ancho. Anote los números. Luego agregue de 1 a 2 pulgadas en cada lado.
Por ejemplo, si la abertura de su asiento mide 16 pulgadas por 16 pulgadas (de ranura a ranura), su lámina de caña debe cortarse a un mínimo de 18 pulgadas por 18 pulgadas y un máximo de 20 pulgadas por 20 pulgadas.
Por qué importa el tamaño del voladizo
Muy poco voladizo y se encontrará con problemas de inmediato. Cuando comience a encajar la caña en la ranura, el material se moverá. Si no hay suficiente caña adicional más allá de la ranura, se separará del lado opuesto. Terminará con huecos o manchas desnudas. Y una vez que la caña esté parcialmente colocada, reposicionarla es muy difícil sin rasgarla.
Demasiado voladizo crea un problema diferente. El exceso de caña se amontona alrededor del marco. Se interpone durante el encaje. Puede doblarse sobre sí mismo dentro de la ranura, creando bultos que impiden que la tablilla se asiente al ras. Un margen de 1 a 2 pulgadas es el punto ideal.
Guía de referencia de corte
| Tamaño de la abertura del marco | Tamaño de corte recomendado | Voladizo por lado | Notas |
|---|---|---|---|
| 12" × 12" | 14"–16" × 14"–16" | 1"–2" | Asiento de silla pequeño estándar |
| 16" × 16" | 18"–20" × 18"–20" | 1"–2" | Asiento de silla de comedor estándar |
| 24" × 18" | 26"–28" × 20"–22" | 1"–2" | Banco o asiento ancho |
| Redondo, 14" de diámetro | 16"–18" cuadrado | 1"–2" más allá de la ranura | Cortar cuadrado, luego recortar después de la instalación |
| Panel de puerta de gabinete | Panel + 2"–4" en total | 1"–2" | Alinee el patrón cuidadosamente antes de cortar |
Alineación del patrón antes de cortar
Este es un paso que muchos principiantes se saltan. La tela de ratán tiene un patrón de tejido visible. Ya sea una malla hexagonal abierta, una cesta cuadrada o un motivo de diamantes, el patrón debe alinearse con el marco antes de cortar. El lado brillante del ratán debe quedar hacia arriba. Las líneas verticales y horizontales del tejido deben ser paralelas a los bordes del marco.
Si corta primero y alinea después, puede que el patrón quede en ángulo. Esto se ve desequilibrado en la pieza terminada. Es un problema estético, pero para muebles profesionales, es inaceptable. Nuestros clientes que suministran a tiendas minoristas en España y Australia nos han dicho que la desalineación del patrón es una de las principales razones por las que sus clientes finales devuelven sillas terminadas.
Herramientas para un corte limpio
Use tijeras afiladas para tela o un cortador giratorio 9. Nunca use un cúter o navaja multiusos a mano alzada: la hoja puede resbalar por las hebras de ratán y crear bordes irregulares. Si va a cortar grandes volúmenes, un cúter giratorio con una guía de borde recto proporciona el resultado más limpio. También recomendamos cortar sobre una superficie plana con una alfombrilla de corte debajo para proteger tanto el ratán como su mesa.
Una última nota: corte siempre el ratán mientras esté seco. El ratán húmedo es más difícil de cortar limpiamente porque las fibras se estiran y resbalan bajo la hoja. Corte primero, luego remoje. Este orden es más importante de lo que la mayoría de la gente piensa.
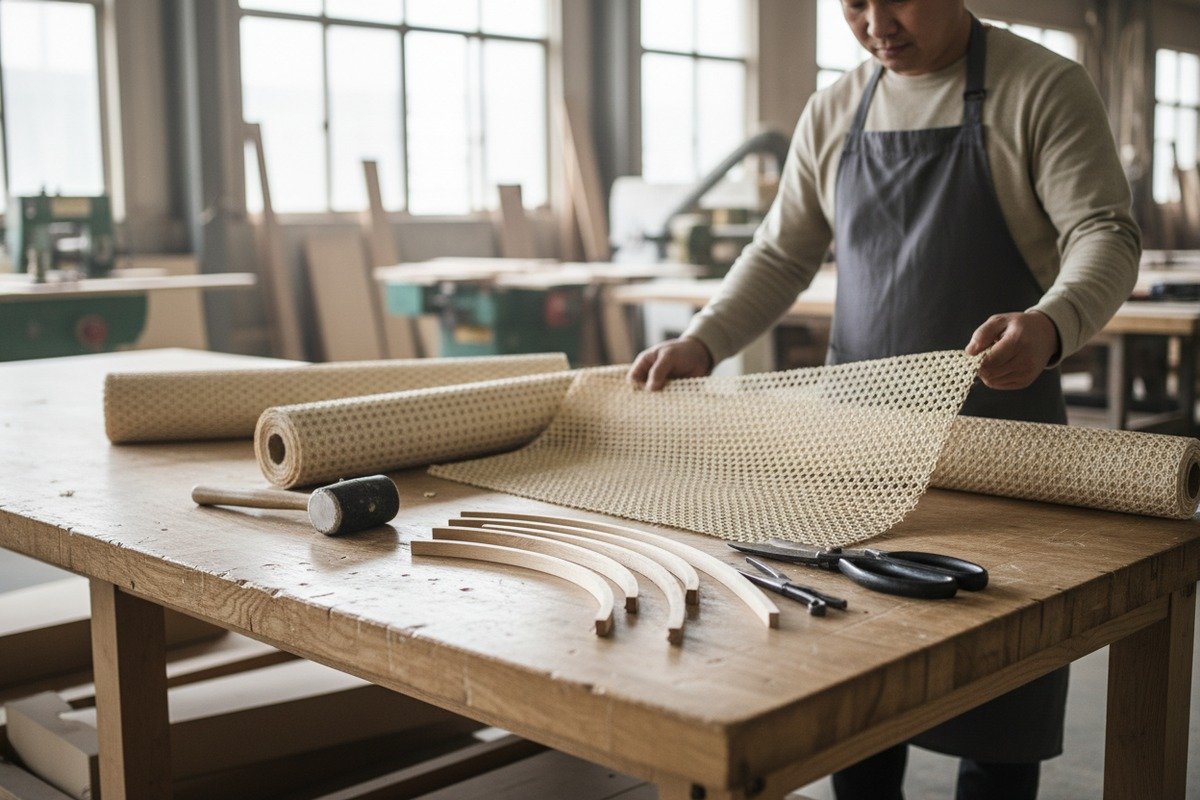
¿Qué herramientas debo usar para evitar dañar la caña mientras la presiono en la ranura?
Cuando enviamos kits de muestras a nuevos clientes, siempre incluimos una lista de herramientas recomendadas. La razón es simple: las herramientas incorrectas causan más daño que la técnica incorrecta. A lo largo de los años, hemos visto rejillas de caña aplastadas por martillos de metal, cortadas por cinceles afilados y rasgadas por alicates de punta de aguja. Cada uno de esos resultados fue evitable.
Use cuñas de madera o plástico, un mazo de goma, tijeras afiladas para tela y pegamento para madera de secado transparente para instalar la malla de ratán sin dañarla. Evite martillos de metal, cúteres y pegamento acrílico blanco. Las herramientas adecuadas protegen las delicadas fibras de caña y garantizan un acabado limpio y profesional.

El kit de herramientas esencial
Repasemos cada herramienta y su propósito.
Cuñas de madera o plástico: Estas se utilizan para presionar la rejilla en la ranura antes de que se coloque la varilla. La madera es más blanda que el metal, por lo que asienta la rejilla sin cortarla. Las cuñas de plástico funcionan de manera similar. Algunos profesionales utilizan la parte posterior de un palillo de madera dura para ranuras pequeñas. La clave es que la punta de la cuña debe ser redondeada, no afilada.
Mazo de goma: Una vez que la varilla está en la ranura, debe golpearla firmemente. Un mazo de goma distribuye la fuerza de impacto de manera uniforme. Un martillo de metal la concentra, y esa fuerza concentrada puede aplastar la varilla o agrietar las fibras de la rejilla debajo. Si solo tiene un martillo de metal, envuelva la cabeza en una toalla gruesa. Pero un mazo de goma es siempre la mejor opción.
Tijeras afiladas para tela o cúter rotatorio: Para recortar el exceso de rejilla después de instalar la varilla. El corte de recorte debe ser limpio y cercano a la ranura. Las tijeras desafiladas tirarán y rasgarán las hebras en lugar de cortarlas. Un cúter rotatorio proporciona el resultado más suave a lo largo de un borde recto.
Pegamento para madera de secado transparente o cola de piel: Necesita adhesivo para fijar la varilla en su lugar. Aplique una fina línea de pegamento dentro de la ranura después de haber calzado la rejilla, pero antes de colocar la varilla. El pegamento de secado transparente es esencial porque cualquier exceso será invisible en la pieza terminada. La cola de piel es tradicional y permite su futura eliminación si la rejilla necesita ser reemplazada. El pegamento blanco PVA o el pegamento de carpintero amarillo se secan opacos y se unen permanentemente, lo que hace que las reparaciones futuras sean extremadamente difíciles.
Herramientas a evitar
| Herramienta | Por qué daña la rejilla | Mejor alternativa |
|---|---|---|
| Martillo de metal (sin acolchado) | Tritura las fibras, aboya la caña | Mazo de goma |
| Cúter / navaja multiusos | Corta las hebras del tejido de forma impredecible | Tijeras afiladas para tela o cúter rotatorio |
| Destornillador plano como cuña | El borde afilado corta la caña dentro de la ranura | Cuña de madera redondeada |
| Alicates de punta fina | Pellizca y rasga hebras individuales | Dedos o cuña plana para ajustes |
| Pegamento blanco PVA | Se seca opaco, se adhiere permanentemente, previene reparaciones futuras | Pegamento para madera de secado transparente 10 o cola de piel |
| Pistola de calor para secar | Seca la caña demasiado rápido, provoca grietas y encogimiento desigual | Secado natural al aire durante 2-3 días |
El Proceso de Instalación de la Galleta
La selección de la galleta es tan importante como las herramientas. La galleta debe ser ligeramente más pequeña que el ancho de la ranura. Esto suena contradictorio, pero el espacio es necesario para acomodar la estera de caña doblada en la ranura y la capa de pegamento. Si la galleta tiene el mismo ancho que la ranura, estará demasiado apretada. Forzarla hará que la caña se salga o que la galleta se rompa.
Al golpear la galleta para insertarla, comience en un extremo y avance hacia el otro. Use golpes cortos y firmes con el mazo de goma. No golpee fuerte en un solo lugar. Muévase a lo largo de la ranura con un ritmo constante. Si está trabajando en un asiento redondo, comience en la parte posterior central y avance en sentido contrario a las agujas del reloj.
Después de la Instalación: La Fase de Secado
No se apresure. Una vez que la galleta y el pegamento estén en su lugar, deje la pieza en reposo sin moverla durante al menos 48 horas. La caña necesita secarse lenta y uniformemente. A medida que se seca, se contrae y se tensa sobre el marco. Si mueve los muebles o aplica peso al asiento antes de que esté completamente seco, corre el riesgo de deformar la caña o aflojar la galleta.
Algunos profesionales sujetan ligeramente la galleta durante el secado. Esta es una buena práctica. Mantiene la galleta presionada de manera uniforme en la ranura mientras el pegamento se asienta. Las pequeñas pinzas de resorte funcionan bien para esto. Solo asegúrese de que las pinzas no presionen directamente sobre la superficie expuesta de la caña; coloque un pequeño trozo de cartón o tela entre la pinza y la caña.
Una vez seco, recorte el exceso de caña restante con sus tijeras afiladas. Corte aproximadamente 1/4 de pulgada por debajo de la superficie de la ranura. Esto asegura que el borde recortado quede oculto debajo de la galleta y no se deshilache hacia afuera.
Conclusión
La instalación de estera de ratán no es difícil, pero exige paciencia, las herramientas adecuadas y respeto por el material. Evite estos errores comunes de principiante y su pieza terminada se verá profesional y durará años.
Notas al pie
1. Proporciona una definición e historia de la estera de ratán. ↩︎
2. Reemplazó HTTP 403 con una página autorizada de Wikipedia que proporciona una definición completa y tipos de fibras vegetales. ↩︎
3. Explica la importancia de los tiempos de remojo correctos para la estera de ratán. ↩︎
4. Describe las propiedades y beneficios del material de ratán natural. ↩︎
5. Explica cómo el ratán se contrae y tensa al secarse. ↩︎
6. Detalla el papel de la espiga en la fijación de la malla de ratán durante la instalación. ↩︎
7. Destaca los beneficios de usar un mazo de goma para un impacto suave y controlado. ↩︎
8. Describe el acuñamiento del ratán (espiga) que se utiliza para fijar la malla de ratán en su lugar. ↩︎
9. Proporciona una guía para principiantes sobre el uso de un cúter rotatorio para cortes precisos. ↩︎
10. Describe un pegamento de PVA para madera de secado transparente adecuado para líneas de unión invisibles. ↩︎

