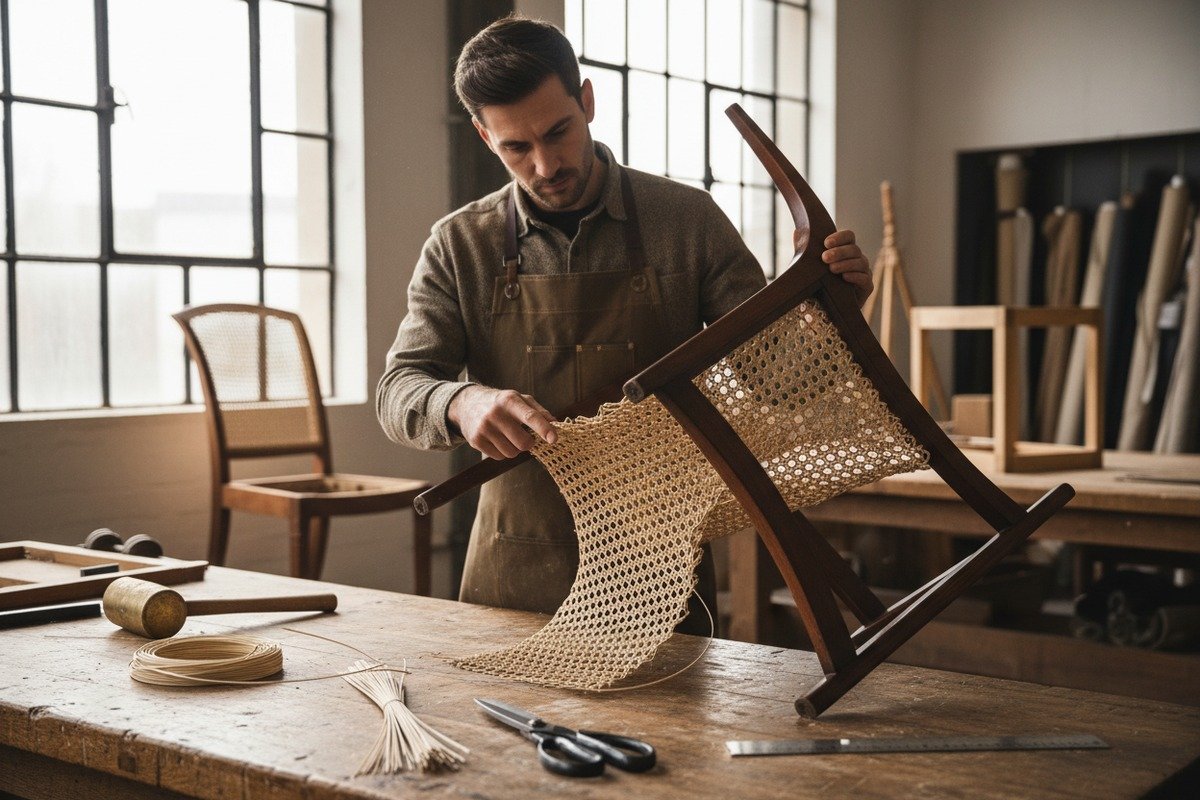
After years of producing rattan cane webbing 1 across our three factories, we see the same installation errors come back to us in customer complaints — sagging seats, popping splines, and wrinkled panels that ruin the look of beautiful furniture.
The most common rattan cane webbing installation mistakes include insufficient soaking time, incorrect tension during mounting, cutting webbing too small, and using the wrong spline size. Each of these problems has a straightforward fix when you understand why it happened and follow a proper step-by-step correction method.
Let’s walk through the four biggest mistakes we hear about from furniture makers and DIY enthusiasts alike plant fiber 2. Each section below breaks down the root cause and gives you a clear path to fix it.
How long should I soak my rattan cane webbing to prevent it from sagging after it dries?
One question we get daily from our wholesale buyers — from Thailand to the Netherlands — is about soak time rattan palm 3. Too many installers skip this step or rush it, and the result is cracked, brittle cane that never sits flat.
Natural rattan cane webbing should be soaked in room-temperature water for 30 minutes to 3 hours depending on the type. Roll cane needs 30 to 60 minutes. Pre-woven sheet cane needs 1 to 3 hours. Proper soaking makes the material pliable, prevents cracking, and allows natural shrinkage that creates a drum-tight finish after drying.

Why Soaking Matters
Natural rattan 4 is a plant fiber. When dry, it is stiff and will snap under pressure. When wet, it becomes flexible and easy to work with. More importantly, wet cane shrinks as it dries. This shrinkage is what pulls the webbing tight after installation. If you skip soaking or cut it short, the cane stays rigid. You cannot push it into grooves. You cannot stretch it across a frame. And it will not tighten on its own.
From our production floor in Foshan, we test every batch of rattan webbing for flexibility. We know that cane harvested in different seasons absorbs water at different rates. Thicker weaves need more time. Thinner, open-mesh patterns need less.
Soak Time Guide by Webbing Type
| Webbing Type | Recommended Soak Time | Water Temperature | Notes |
|---|---|---|---|
| Open-mesh radio weave 5 (natural) | 30–60 minutes | Room temperature | Check pliability by bending a corner |
| Dense square basketweave (natural) | 60–120 minutes | Room temperature | Thicker strands need more time |
| Pre-woven sheet cane (natural) | 2–3 hours | Room temperature | Large sheets absorb slowly |
| Bleached rattan cane webbing 6 | 45–90 minutes | Room temperature | Bleaching weakens fibers slightly; do not over-soak |
| Synthetic rattan matting 7 | No soaking needed | N/A | Synthetic does not shrink; tension must be set manually |
Common Soaking Mistakes
Many installers use hot water thinking it speeds up the process. Warm water can help flatten curled sheets, but water that is too hot can warp the fibers and weaken the weave. Stick with room-temperature or lukewarm water.
Another mistake is soaking for too long. Over-soaked cane becomes mushy. The fibers lose structural integrity. If you notice the cane feels overly soft or the weave pattern distorts easily, you have gone too far. Drain it and let it air-dry for 10 to 15 minutes before installing.
How to Test Readiness
Pick up the soaked cane and bend a corner gently. It should flex without cracking or snapping. It should feel like a damp towel — soft but still holding its shape. If it cracks, soak longer. If it feels like wet paper, you have over-soaked it.
One trick our team uses: lay the soaked cane on a flat surface and press the center gently. If it conforms to your hand pressure without resistance, it is ready.
Why is my rattan webbing loose after installation and how can I tighten it properly?
When we ship rattan cane webbing to our furniture factory clients in Australia and the US, we always include handling notes. Yet loose webbing after installation remains the number one complaint we hear.
Loose rattan webbing after installation is usually caused by installing the cane too dry, applying too much tension while wet, or using insufficient fasteners. To tighten it, mist the surface lightly with water and allow it to dry completely. If the sag is severe, you may need to remove the webbing, re-soak it, and reinstall with proper tension and adequate staple or spline support.

Understanding the Tension Paradox
This is where most people get confused. Natural rattan shrinks when it dries. So if you pull it very tight while wet, it can shrink too much. This over-shrinkage pulls the cane out of the groove or rips it away from staples. On the other hand, if you leave it too loose while wet, it may not shrink enough to become taut.
The correct approach is what professionals call "install loose, let dry tight." Place the wet cane with a slight sag — just enough that it is not hanging — and secure it. As it dries over 24 to 48 hours, it will contract and pull itself flat.
Quick Fix for Minor Sagging
If your webbing is only slightly loose, try this before removing it:
- Mist the entire surface evenly with a spray bottle. Do not soak it — just dampen it.
- Let it air-dry in a well-ventilated room for 24 hours.
- The moisture reactivates the fibers and allows them to shrink again.
This works for minor issues. If the sag is more than half an inch, you will likely need to reinstall.
Full Reinstallation Steps
If misting does not work, here is the process:
- Remove the spline or staples carefully. Use a flat-head screwdriver to pry up the spline. Pull staples with pliers.
- Clean the groove or frame surface. Scrape out old glue and debris with a chisel.
- Re-soak the webbing for the appropriate time (see the table above).
- Reposition the cane with the shiny side facing up. Align the weave pattern straight with the frame.
- Secure starting from the center and work outward. Use wedges to hold the cane in the groove before inserting the spline.
- Install the spline with hide glue 8. Tap it in with a rubber mallet.
- Let it dry for 48 hours before use.
Staple vs. Spline: Which Holds Better?
| Method | Best For | Hold Strength | Longevity | Ease of Repair |
|---|---|---|---|---|
| Staples + glue | Flat frames, cabinet doors, modern panels | Moderate | 5–10 years | Easy to remove and redo |
| Spline in groove | Chair seats, traditional furniture | Strong | 15–25 years | Requires groove cleaning |
| Staple + spline combo | Heavy-use furniture, commercial projects | Very strong | 20+ years | Moderate difficulty |
For our clients who build chairs for the hospitality industry, we always recommend the spline method or the hybrid approach. Staples alone work fine for decorative panels, but anything bearing weight needs the groove-and-spline system.
The Role of Environment
Humidity matters more than most people think. If you install cane on a humid day, the fibers are already partially expanded. When the humidity drops, the cane may shrink too much and tear. If you install on a very dry day, the cane dries too fast and does not shrink evenly.
Ideal conditions: 40–60% relative humidity 9, room temperature around 20–25°C. Avoid direct sunlight during drying.
How do I fix mistakes if I have cut my rattan cane webbing too small for the furniture frame?
We produce rattan webbing in standard roll widths — 40cm, 50cm, 60cm, 90cm, and wider. Even so, our buyers sometimes miscalculate when cutting pieces for specific furniture. It happens more often than you would think.
If you have cut your rattan cane webbing too small, the best fix depends on how short it is. For gaps under half an inch, you can stretch the soaked cane slightly to fit. For larger shortfalls, you will need to cut a new piece with proper margins — always add 2 to 3 inches beyond the frame edge on all sides. Splicing two pieces together is not recommended for visible surfaces as it weakens the structure and looks unprofessional.

Measure Twice, Cut Once
This old carpentry rule applies perfectly to rattan webbing. Before cutting, measure the frame opening. Then add your margins. For groove-and-spline installations, you need at least 1 inch of extra cane on each side to tuck into the groove. For staple-on installations, add 2 inches on each side for folding and securing.
Here is a simple formula we share with our wholesale customers:
Cut size = Frame opening + (2 × margin)
For a chair seat that measures 16 × 16 inches with a groove, your cut should be at least 18 × 18 inches.
What If It Is Already Too Small?
If the gap is minimal — say, a quarter inch — you can sometimes rescue the piece. Soak the cane thoroughly. Natural rattan expands slightly when wet. While wet, stretch it gently into position. Secure one side first, then pull toward the opposite side. This only works for very small shortfalls.
If the gap is larger than half an inch, do not force it. You will weaken the weave and create stress points that will fail quickly under use. Cut a new piece.
Can You Splice Two Pieces Together?
Technically, yes. Some restorers join two pieces by overlapping them in the groove. But we do not recommend this for any visible surface. The overlap creates a bump, and the joint is always weaker than a single piece. For hidden areas — like the underside of a shelf or the back panel of a cabinet — splicing can work as a temporary fix.
Preventing Cutting Mistakes
| Step | Action | Why It Matters |
|---|---|---|
| 1 | Measure the frame opening at its widest and tallest points | Frames are rarely perfectly square |
| 2 | Add 2–3 inches to each dimension | Provides material for tucking, stapling, or groove insertion |
| 3 | Mark the cut line on the webbing with a pencil | Ensures straight cuts aligned with the weave |
| 4 | Cut with sharp scissors or a utility knife against a straight edge | Dull blades fray the rattan fibers |
| 5 | Dry-fit before soaking | Confirms the piece covers the full frame with margin to spare |
That last step — dry-fitting — is the most overlooked. Simply lay the dry cane over the frame before you soak it. Make sure it hangs over every edge by at least your required margin. If it does not, you have time to cut a new piece before wasting your soak time.
A Note on Our Webbing Rolls
When we ship to our clients, we always recommend ordering webbing rolls that are wider than needed. A 60cm roll gives more flexibility than a 40cm roll, even if the frame only needs 45cm. The leftover material can be used for small projects, patches, or test pieces. Waste is minimal because rattan webbing stores well in a cool, dry place for years.
What should I do if my spline is popping out or won't fit into the groove during my installation?
Spline problems are the most frustrating part of rattan installation. When we train new wholesale partners on installation techniques, this is where we spend the most time. A spline that pops out or refuses to seat properly can turn a one-hour project into a full-day headache.
If your spline is popping out, it is likely too thick for the groove, not soaked enough, or installed without adequate glue. If it will not fit at all, the spline size is wrong or the groove has old debris blocking it. Fix this by cleaning the groove thoroughly, soaking the spline for 10 to 15 minutes, selecting the correct spline diameter, and applying a thin bead of hide glue before tapping the spline in with a rubber mallet.

Choosing the Right Spline Size
Spline comes in various diameters. The correct size is slightly smaller than the groove width. If your groove measures 5mm across, use a 4mm or 4.5mm spline. A spline that matches the groove exactly will be extremely difficult to press in with the cane webbing already sitting in the channel. One that is too small will rattle loose.
Most furniture with cane seats uses standard groove widths. Here is a general guide:
Spline Sizing Reference
| Groove Width | Recommended Spline Diameter | Common Furniture Type |
|---|---|---|
| 3mm | 2.5mm | Small decorative panels, cabinet inserts |
| 4mm | 3.5mm | Standard dining chairs, side chairs |
| 5mm | 4–4.5mm | Large armchairs, rocking chairs |
| 6mm | 5–5.5mm | Heavy-duty seats, commercial furniture |
If you are not sure about your groove width, push a piece of scrap spline into an empty section of the groove without any cane. It should slide in with moderate finger pressure. If you need a hammer, it is too thick. If it falls in freely, it is too thin.
Preparing the Groove
Old grooves often have dried glue, broken spline fragments, and dirt packed inside. If you do not clean this out, nothing will seat properly. Use a narrow chisel or a flathead screwdriver to scrape the groove walls. Then vacuum or blow out the debris. Run the screwdriver along the channel one more time to make sure it is clear.
On antique chairs, the groove may have been widened by years of use or previous repairs. In this case, you may need a slightly thicker spline than the original. Test-fit before committing.
Soaking the Spline
Yes, the spline needs soaking too — but for much less time than the webbing. Ten to fifteen minutes in room-temperature water is enough. Soaking makes the spline pliable so it bends around corners without cracking. A dry spline will split when you try to push it into a curved groove.
Installation Technique
Start at one corner. Apply a thin, even bead of hide glue along the groove — not too much, or it will squeeze out and stain the cane. Press the soaked cane into the groove with a wooden wedge. Then lay the spline on top and tap it in with a rubber mallet. Work in 4 to 6 inch sections. Do not try to push the entire spline in at once.
At corners, use a sharp utility knife to miter the spline at a 45-degree angle. This gives you a clean joint and prevents the spline from bunching up. Some installers prefer to use a continuous piece and bend it around corners. This works on gentle curves but not on sharp 90-degree turns.
Why Hide Glue?
We always recommend hide glue over wood glue 10 or acrylic adhesive. Here is why:
- Hide glue dries clear, remains slightly flexible, and is reversible with water. This means future repairs are possible without destroying the groove.
- Wood glue (PVA) is strong but rigid. It makes future repairs very difficult because it bonds permanently.
- Acrylic adhesive hardens rigidly and often cracks over time. It also turns yellow, which is visible through the cane mesh.
After installation, let the glue and spline dry for at least 48 hours before using the furniture. If the spline still pops up in spots during this period, press it back down and add a small clamp or weight. Once fully dry, trim any excess cane with a sharp chisel held flat against the frame.
Conclusion
Every rattan cane webbing installation mistake has a fix — the key is understanding what went wrong and taking the right corrective steps before the problem becomes permanent.
`
Footnotes
1. Explains what rattan cane webbing is and its historical use in furniture. ↩︎
2. Defines plant fibers and lists their types, properties, and examples. ↩︎
3. Wikipedia provides an authoritative definition and description of rattan, which is a climbing palm. ↩︎
4. Describes natural rattan as a climbing palm and its key properties. ↩︎
5. Explains the distinctive square design and uses of radio weave rattan. ↩︎
6. Explains the process and characteristics of bleached rattan cane webbing. ↩︎
7. Describes synthetic rattan’s composition, properties, and differences from natural rattan. ↩︎
8. Provides a comprehensive guide to hide glue, its composition, and unique properties. ↩︎
9. Defines relative humidity and explains its measurement and significance. ↩︎
10. Explains why PVA adhesives are widely used in woodworking and their properties. ↩︎

