Every week at our Foshan production facility, we ship thousands of meters of rattan cane webbing to furniture factories 1 and restoration workshops around the world. One question keeps coming back from buyers, DIY enthusiasts, and even seasoned upholsterers: how do you actually install this material so it looks great and lasts for years? If you have ever tried working with natural rattan and ended up with a saggy seat or cracked webbing, you know the frustration. The problem is not the material itself. It is the technique.
To install natural rattan cane webbing on a chair frame, soak the webbing in warm water for 30 to 60 minutes, cut it oversized by 1 to 2 inches on each side, then secure it into the frame’s routed groove using wood glue and a reed spline, or staple it directly to a flat frame. Allow 24 to 48 hours of drying for the cane to shrink and tighten into a drum-like finish.
This guide walks you through every step, from soaking and cutting to tensioning and finishing. Whether you use the spline-groove method or the staple-and-glue approach, you will find clear instructions, tool lists, comparison tables, and pro tips below. Let’s get your chair looking like it came straight from a Scandinavian design 2 studio.
How long should I soak my natural rattan webbing before I start the installation?
When we prepare rattan webbing samples for our overseas clients, soaking time is one of the first details we discuss. Get it wrong, and the cane either cracks during installation or turns soft and moldy before it ever reaches the chair frame. This single step sets the tone for your entire project.
Soak natural rattan cane webbing in warm water for 30 to 60 minutes before installation. This makes the fibers flexible enough to press into grooves or stretch across frames without cracking. Soak the reed spline separately for 5 to 15 minutes. Avoid soaking longer than 3 hours, as over-soaking can weaken the cane and invite mold.

Why Soaking Matters
Rattan cane is the outer peel of the rattan palm 3. When dry, it is rigid and brittle. Warm water softens the fibers and increases flexibility by roughly 20 to 30 percent. This lets you bend, stretch, and press the webbing without splitting it. Think of it like softening pasta before you shape it.
Warm Water, Not Hot
Use warm water, not boiling. Boiling water can strip the natural oils from the rattan and cause discoloration. Room temperature water works too, but it takes longer. A large plastic tub or a bathtub works well for full sheets.
Timing Guidelines by Material
Different materials need different soak times. Here is a quick reference table we share with our furniture factory clients:
| Material | Recommended Soak Time | Water Temperature | Notes |
|---|---|---|---|
| Standard rattan cane webbing (½" pattern) | 30–60 minutes | Warm (not hot) | Most common; flexible after 30 min |
| Fine rattan cane webbing (fine ½" pattern) | 60–90 minutes | Warm | Thinner strands need more time |
| Reed spline 4 | 5–15 minutes | Warm | Over-soaking makes it too soft |
| Bleached rattan webbing | 20–40 minutes | Lukewarm | Bleaching weakens fibers slightly |
Signs the Webbing Is Ready
Press a corner of the soaked webbing between your fingers. It should bend easily without cracking or feeling mushy. If it still snaps, soak for another 10 minutes. If it feels slimy or overly limp, you have gone too far. In our experience shipping to humid markets like Thailand and the Philippines, we always remind buyers: humidity in your workspace also affects how quickly the cane absorbs water. A dry room means you may need the full 60 minutes. A humid workshop may only need 30.
What Happens If You Skip Soaking
We have seen this mistake many times. Dry rattan splits the moment you try to press it into a groove. The fibers fracture along the weave, leaving visible cracks and weak spots. Repairing a split section means cutting it out and starting over. A half hour of patience saves hours of frustration.
Can You Over-Soak?
Yes. One source recommends up to 3 hours for very fine patterns. We advise caution. Anything beyond 90 minutes risks mold growth, especially in warm weather. If you must pause your project, remove the webbing from the water, wrap it in a damp towel, and store it in a cool place for up to a few hours.
What specific tools and materials do I need to secure the webbing to my chair frame?
Our warehouse in Nanhai stocks not just the rattan webbing but also the splines, wedges, and accessories that go with it. From years of fulfilling orders for furniture factories across Europe, the Middle East, and North America, we have learned that having the right tools on hand before you start is the difference between a smooth install and a stressful one.
You need natural rattan cane webbing, a reed spline sized to your frame's groove, clear-drying wood glue, wooden wedges or a spline roller, a utility knife, scissors, a staple gun (for flat frames), a measuring tape, a hammer, and a spray bottle. A straightedge and damp cloth are also helpful for clean, professional results.

Core Materials
Before you pick up a single tool, make sure you have the correct materials. The two essentials are the cane webbing sheet and the reed spline. The webbing comes in rolls, typically 12 to 72 inches wide. The spline is the inner core of the rattan palm, sold in 6-foot coils. It is wedge-shaped and must match the width of the groove on your chair frame.
Measuring Your Groove
This step is critical. Grooves on chair frames range from 1/8 inch to 3/8 inch wide. Use calipers or a small ruler to measure the groove width and depth. Then buy a spline that is slightly smaller than the groove. If the spline is too wide, it will not seat properly. If it is too narrow, it will pop out over time.
Complete Tool and Material Checklist
Here is the full list we recommend to our wholesale clients and their end customers:
| Category | Item | Purpose |
|---|---|---|
| Materials | Natural rattan cane webbing (pre-woven sheet) | The seat surface |
| Materials | Reed spline (6 ft coil per chair) | Locks webbing into groove |
| Materials | Clear-drying wood glue 6 (non-acrylic) | Bonds spline and webbing to groove |
| Tools | Wooden wedges 7 (set of 4–6) | Press webbing into groove temporarily |
| Tools | Spline roller 8 or flat chisel | Drive spline into groove permanently |
| Tools | Hammer (small, lightweight) | Tap wedges and spline |
| Tools | Utility knife 9 or razor blade | Trim excess webbing |
| Tools | Scissors | Cut webbing to rough size |
| Tools | Measuring tape | Measure frame and webbing |
| Tools | Straightedge / ruler | Align pattern |
| Tools | Spray bottle with water | Keep webbing damp during install |
| Tools | Damp cloth | Wipe excess glue |
| Optional | Staple gun (1/4" staples) | For flat-frame staple method |
| Optional | Small finishing nails | Alternative to staples |
| Optional | Sandpaper (220 grit) | Smooth groove edges |
| Optional | Varnish or clear sealant | Protect finished cane |
A Note on Glue
Use clear-drying wood glue. We always warn against acrylic-based adhesives. Acrylic dries rigid and makes it very hard to adjust the spline once it is in place. If you ever need to remove the cane for a future repair, acrylic glue turns the job into a nightmare. Standard wood glue stays slightly flexible and cleans up with a damp cloth.
Spline Method vs. Staple Method Tools
If your chair has a routed groove around the seat opening, use the spline method. You will need the wedges, spline roller, glue, and spline. If your frame is flat with no groove, such as a cabinet door or a decorative panel, use the staple gun or small nails. Some restorers use a hybrid approach: staple first for a temporary hold, then add spline for a clean finish.
Preparing Your Frame First
Before you unpack any tools, prep the frame. Strip all old cane, spline, and dried glue from the groove. A flathead screwdriver or a small chisel works well. Sand the inner edge of the groove lightly with 220-grit sandpaper. This removes sharp edges that could cut the new cane. If you plan to paint or stain the frame, do it now and let it dry completely before installation.
How do I achieve the perfect tension so my rattan seat doesn't sag over time?
When we test rattan webbing samples at our processing facility in Indonesia, tension is one of the metrics we pay close attention to. We have seen beautifully woven cane installed on gorgeous mid-century modern frames 10 only to sag within weeks because the installer did not understand how natural rattan behaves as it dries. The secret is not about pulling harder. It is about working with the material's natural shrinkage.
To achieve perfect tension, install the rattan webbing while it is damp, stretch it evenly across the frame, secure it from the center outward using wedges or staples, and then allow 24 to 48 hours for drying. As the cane dries, it shrinks and tightens naturally, creating a firm, drum-like surface that resists sagging under regular use.

The Science of Shrinkage
Natural rattan absorbs water when soaked and expands. When it dries, it contracts. This contraction is your best friend. If you install the webbing while it is still damp and slightly stretched, the drying process pulls the fibers tight. The result is a seat that feels firm and bounces back when you press on it. This is the "drum-tight" finish that professional restorers aim for.
Step-by-Step Tensioning for the Spline Method
- Center the wet webbing over the seat opening. The shiny side faces up. Make sure the weave pattern is straight and aligned with the frame edges.
- Start with the center wedge. Press a wooden wedge into the groove at the center of one side. This anchors the webbing.
- Move to the opposite side. Pull the webbing gently across the opening and press a wedge into the groove on the opposite side. Do not over-pull. Let the material feel snug, not stretched to its limit.
- Repeat on the other two sides. Wedge the center of each remaining side.
- Work outward. From each center wedge, add more wedges toward the corners. Keep the tension even. Check the pattern alignment frequently.
- Apply glue and set the spline. Once all wedges are in place and the webbing is evenly tensioned, remove one wedge at a time, apply a thin bead of wood glue into the groove, and tap the spline into place with a hammer and spline roller.
- Let it dry. Do not sit on the chair for 24 to 48 hours.
Step-by-Step Tensioning for the Staple Method
For flat frames without a groove, the approach is slightly different. Staple the center of one side first, then the opposite side, then the remaining two sides. Work outward from the center on each side. Pull the webbing taut but not over-stretched. Fold the raw edges under before stapling for a cleaner line.
Common Tensioning Mistakes
| Mistake | What Happens | How to Fix |
|---|---|---|
| Over-stretching wet webbing | Cane splits or tears as it dries | Apply moderate tension; let shrinkage do the work |
| Uneven pulling from one side | Seat sags on one side, pattern skews | Always work from center outward, alternating sides |
| Installing dry cane | Cannot achieve any tension; cane cracks | Re-soak for 30–60 minutes and start over |
| Sitting on chair before drying | Cane stretches permanently before shrinking | Wait full 24–48 hours before use |
| Ignoring ambient humidity | Slow or uneven drying | Dry in a well-ventilated room at moderate humidity (<60%) |
Environmental Factors
Temperature and humidity matter more than most people realize. If you install the webbing in a very humid room, drying takes longer and the cane may not achieve full tension. Conversely, blasting it with a fan or placing it in direct sunlight can cause it to dry too fast, leading to uneven tightness or cracking. Our recommendation from years of shipping to climates as different as the Netherlands and Saudi Arabia: aim for a room between 40 and 60 percent humidity, and let air circulate naturally.
How Tight Is Tight Enough?
After 48 hours, press the center of the seat with your palm. It should feel firm with a slight give, similar to a stretched canvas. If it sags more than half an inch under gentle pressure, the tension was insufficient during installation. In that case, you may need to remove the spline, re-soak the webbing, and reinstall with more even tension.
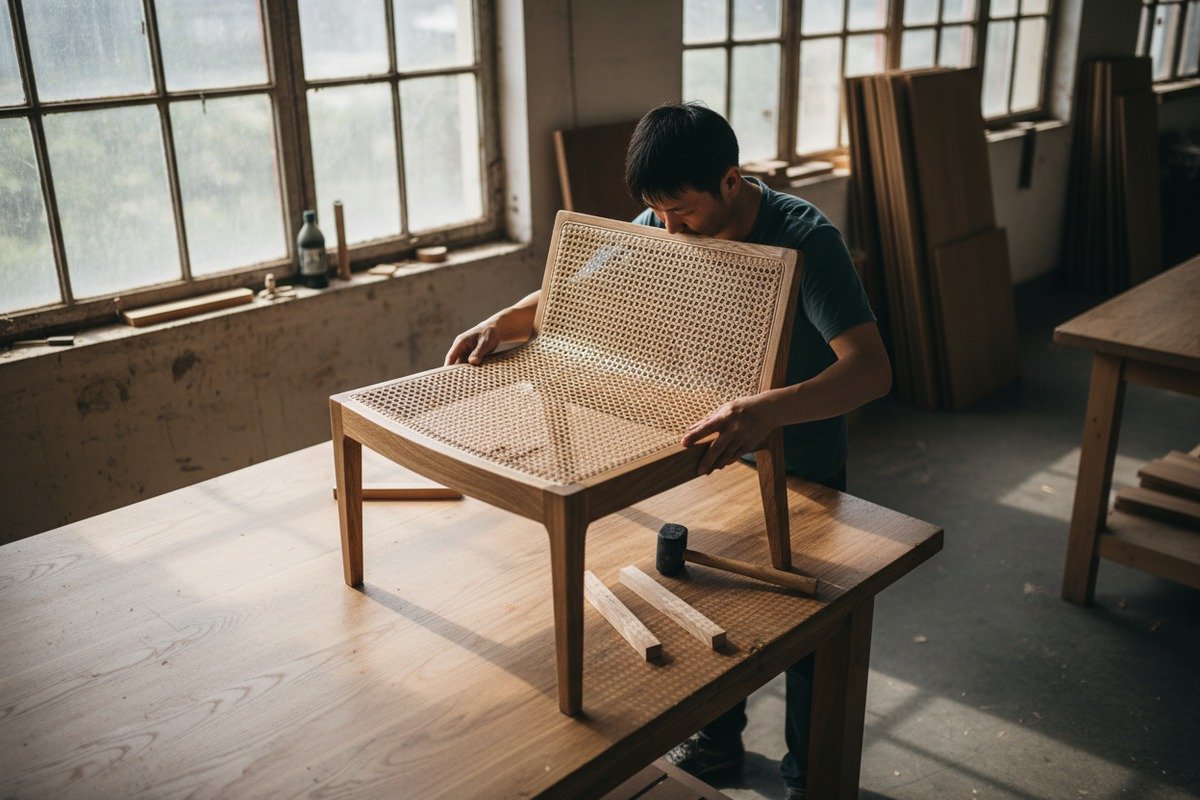
How can I hide the staples or spline to give my finished chair a professional look?
One of the most common complaints we hear from our wholesale buyers' end customers is visible staples or messy edges on freshly caned chairs. It is the detail that separates a DIY project from a professional restoration. Over the years, working with furniture factories across more than a dozen countries, we have picked up and shared finishing techniques that make a real difference.
To hide staples or spline and achieve a professional finish, trim all excess webbing flush with the groove using a sharp utility knife, ensure the spline sits perfectly level with the frame surface, and apply a matching stain or clear varnish. For staple methods, cover raw edges with a decorative lath strip, gimp braid, or folded-under cane, then seal with a light protective finish.

Trimming the Excess
After the spline is tapped into the groove and the glue has dried, you will have excess webbing sticking up around the perimeter. Use a fresh razor blade or a very sharp utility knife. Hold the blade at a slight angle against the outer edge of the groove. Cut away from you in steady, smooth strokes. Do not saw back and forth, as this creates ragged edges. One clean pass per section is the goal.
Making the Spline Flush
The spline should sit flush with the top of the frame or just slightly below. If it sticks up above the groove, tap it down gently with a hammer and a flat piece of wood (to distribute the force). If it sinks too deep, you may have used a spline that is too narrow. A flush spline creates a seamless transition between the frame and the cane, which is the hallmark of a professional job.
Covering Staples on Flat Frames
If you used the staple method, the staples are visible along the edges. There are several ways to cover them:
- Decorative lath or half-round molding. Glue and pin a thin strip of wood over the stapled edges. Stain it to match the frame.
- Gimp braid or binding tape. This is a woven trim that glues directly over the staple line. It is common on upholstered furniture and works well on cane panels too.
- Fold-under technique. Before stapling, fold the raw edge of the webbing under itself by about half an inch. This hides the cut edge and gives a cleaner line when stapled.
Staining and Finishing
If you want the cane to match a specific frame color, pre-stain the webbing before installation. Staining after installation can lead to uneven color because the spline groove area absorbs stain differently. For protection, apply a thin coat of clear water-based varnish or polyurethane to the cane surface after everything has dried. This adds UV resistance and makes cleaning easier. Avoid oil-based sealants, which can darken the cane unevenly.
Pro Tips from Our Production Line
At our rattan processing facility, we test different finishes on every batch. Here are three tips our team swears by:
- Lightly sand the dried cane surface with 320-grit sandpaper before applying finish. This removes tiny fibers that stick up after drying and gives the varnish a smoother base.
- Apply adhesive backing underneath for high-traffic chairs. A thin, clear adhesive film on the underside of the cane adds structural support and slows wear from repeated flexing.
- Use a hair dryer on low to speed up the final drying of varnish in a controlled way, especially in humid environments.
Long-Term Care
Natural rattan is best suited for indoor use. Keep it away from direct rain, extreme humidity, and prolonged sunlight. Dust it regularly with a soft brush. If the cane loosens after years of use, you can re-moisten it with a damp cloth and let it dry again to restore some tension. For deep cleaning, wipe with a cloth dampened with mild soapy water, then dry immediately.
Cost Breakdown for a Complete Installation
Many of our buyers ask what this project costs for the end user. Here is a typical estimate for a single chair:
| Item | Estimated Cost (USD) |
|---|---|
| Natural rattan cane webbing (1 chair portion) | $8–$15 |
| Reed spline (6 ft coil) | $3–$6 |
| Wood glue | $4–$8 |
| Wooden wedges (set) | $5–$10 |
| Utility knife / razor blades | $3–$5 |
| Varnish or sealant (small can) | $5–$10 |
| Total per chair | $28–$54 |
This makes cane webbing restoration one of the most affordable furniture upgrades you can do yourself. The material cost is low, the tools are simple, and the result can transform a worn chair into a statement piece.
Conclusion
Installing natural rattan cane webbing is a rewarding project that anyone can tackle with the right preparation, tools, and technique. Soak properly, tension evenly, and finish neatly for results that last decades. If you need quality rattan webbing, spline, or advice for your next project, visit us at www.rattanwholesaler.com.
Footnotes
1. Offers an overview of the global furniture manufacturing industry and its trends. ↩︎
2. Replaced with a Wikipedia entry on Mid-century modern, which discusses Scandinavian design. ↩︎
3. Discusses the sustainability and harvesting practices related to the rattan palm plant. ↩︎
4. Explains the material, purpose, and installation of reed spline in caning projects. ↩︎
5. Provides comprehensive information on the characteristics and uses of rattan material. ↩︎
6. Compares different types of wood glue, including clear-drying options, for woodworking. ↩︎
7. Describes the use of wooden wedges as a tool for chair caning and basket making. ↩︎
8. Explains the function and proper technique for using a spline roller tool. ↩︎
9. Replaced with an authoritative Wikipedia entry defining and detailing utility knives. ↩︎
10. Replaced with an authoritative Wikipedia entry on Mid-century modern design. ↩︎

