Every week, our customer service team fields dozens of calls from furniture factories struggling with torn cane, uneven tension, and messy edges—problems that almost always trace back to using the wrong tools. Without the right equipment, even premium rattan webbing ends up wasted, and installation time doubles.
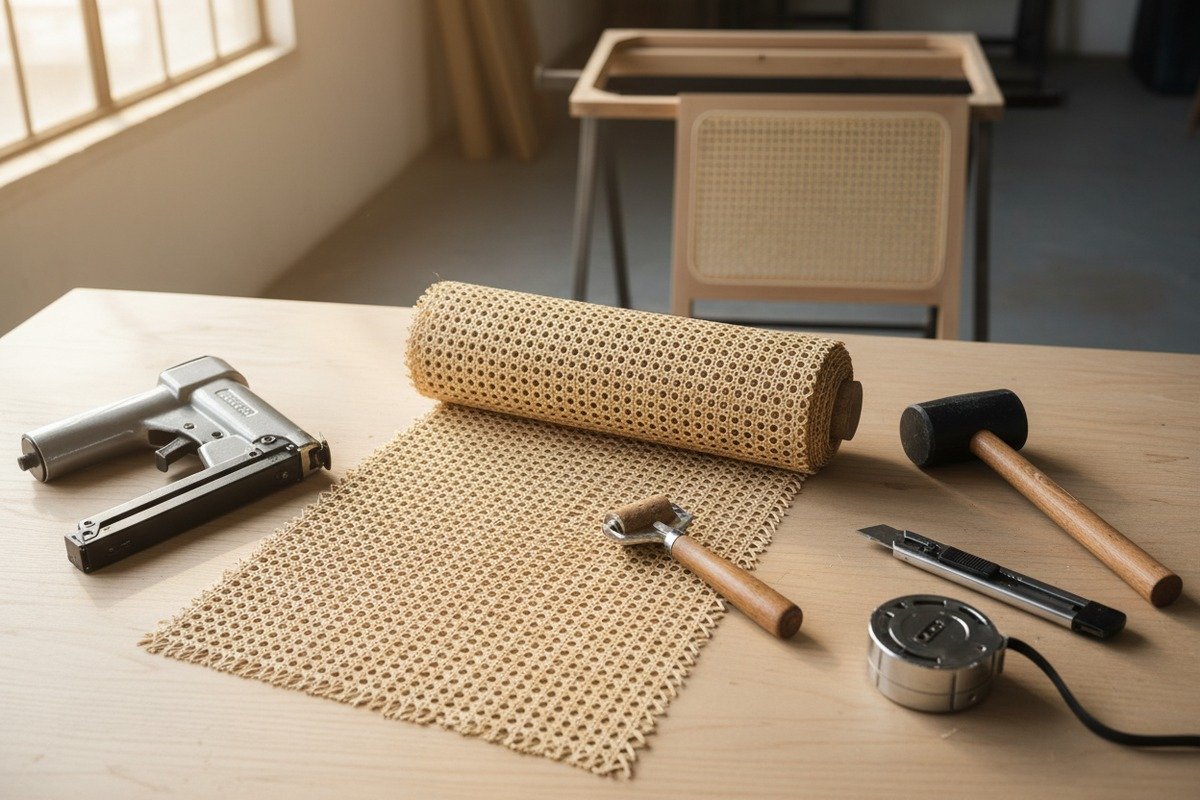
Installing rattan cane webbing professionally requires a core toolkit of staple guns, utility knives, spline rollers, rubber mallets, measuring tapes, soaking containers, caning awls, and groove-cleaning chisels. These tools ensure clean cuts, tight fits, even tension, and durable results across furniture and cabinet projects.
Below, we break down every tool category you need—from basic hand tools to heavy-duty pneumatic equipment—so you can match your toolkit to your project scale and skill level. Let’s walk through each stage of the installation process.
What essential hand tools do I need to start installing rattan cane webbing?
When we pack sample kits for first-time buyers at furniture workshops, the number one question is always about tools. Many installers lose hours and waste material simply because they skip a $5 tool that would have saved them grief.
To start installing rattan cane webbing, you need a staple gun, utility knife, scissors, tape measure, pencil, rubber mallet, spline roller, caning awl, flathead screwdriver, and wood glue. These ten hand tools cover measuring, cutting, securing, and finishing for most furniture projects.

The Core Ten: Your Starter Toolkit
You do not need a huge budget to get started. Most of these tools cost under $20 each. Here is a breakdown of what each tool does and why it matters.
A staple gun is your primary fastening tool. It drives staples through the webbing and into the wood frame in seconds. Manual staple guns 1 work fine for small projects. A utility knife handles precise cuts and trims excess webbing flush against the spline or frame. Keep the blade sharp—dull blades crush rattan fibers instead of cutting them cleanly.
Scissors are useful for rough-cutting the webbing to size before final trimming. A tape measure and pencil let you mark the frame opening and plan your 1–2 inch overhang on each side. This overhang gives you adjustment room during installation.
The rubber mallet gently taps the spline into the groove without cracking the frame or damaging the cane. A spline roller presses the spline evenly and firmly into the channel. This is one tool many beginners skip, and it shows in the final result—uneven spline means loose webbing.
A caning awl helps tuck webbing edges into tight grooves. A flathead screwdriver serves as a backup pry tool for corrections. And wood glue (white PVA or carpenter's glue) bonds the spline permanently inside the groove.
Beginner vs. Professional Toolkit Comparison
| Tool | Beginner Use | Professional Use | Approx. Cost |
|---|---|---|---|
| Manual staple gun | Small frames, DIY | Quick tacking before spline | $15–$25 |
| Utility knife | Trimming excess | Precision flush cuts | $5–$10 |
| Scissors | Rough cutting webbing | Cutting curves | $5–$12 |
| Tape measure | Measuring openings | Layout and overhang planning | $5–$10 |
| Rubber mallet 2 | Tapping spline | Even spline seating | $8–$15 |
| Spline roller 3 | Basic groove work | Fast, even spline insertion | $10–$20 |
| Caning awl 4 | Tucking edges | Detail work in tight grooves | $8–$15 |
| Flathead screwdriver | Prying corrections | Lifting spline for adjustments | $3–$8 |
| Wood glue 5 (PVA) | Bonding spline | Permanent hold in humid climates | $5–$10 |
| Pencil | Marking cuts | Layout lines on frames | $1–$2 |
Why Each Tool Earns Its Spot
From our experience shipping rattan webbing to furniture factories across 15+ countries, we see a pattern. Factories that invest in even this basic kit report roughly 20–30% less material waste. The reason is simple. Proper measuring prevents over-cutting. A sharp knife prevents fraying. A spline roller prevents gaps.
One common mistake is relying only on glue without staples, or only on staples without glue. The hybrid method—staple first for immediate hold, then glue for permanent bond—gives the best results. This is especially true in humid climates like Southeast Asia, where glue alone can fail if moisture softens the adhesive.
The total cost for this starter kit runs between $65 and $130. That is a small investment compared to the cost of ruined webbing or a returned piece of furniture.
Which heavy-duty staplers or pneumatic tools will speed up my factory's production?
On our production floor in Foshan, we learned years ago that manual staple guns become a bottleneck the moment you scale past ten pieces a day. Hand fatigue slows workers down, and inconsistent staple depth causes rework.
Pneumatic staple guns, air-powered brad nailers, and electric staple guns dramatically increase production speed for rattan webbing installation. They deliver consistent staple depth, reduce worker fatigue, and can cut installation time per piece by 40–60% compared to manual tools in factory settings.

Manual vs. Pneumatic vs. Electric: A Factory Decision
Choosing between manual, electric, and pneumatic fastening tools depends on your daily output, budget, and workspace setup. Here is how they compare for rattan webbing work.
Manual staple guns are cheap and portable. They need no power source. But they require significant hand force per staple. After 20–30 frames, worker hands cramp. Staple depth varies with user fatigue.
Electric staple guns plug into a wall outlet or run on battery. They provide consistent driving force with a light trigger pull. They cost more upfront but pay for themselves quickly in labor savings. Battery models offer portability.
Pneumatic staple guns connect to an air compressor 6. They fire staples with the most consistent force and the fastest cycle time. They are the standard in professional upholstery shops and furniture factories worldwide. The downside is you need a compressor, air hoses, and proper ventilation.
Production Speed Comparison
| Tool Type | Staples Per Minute | Consistent Depth? | Worker Fatigue (8-hr shift) | Best For |
|---|---|---|---|---|
| Manual staple gun | 10–15 | Variable | High | Small shops, DIY |
| Electric staple gun | 20–30 | Good | Low–Moderate | Mid-size workshops |
| Pneumatic staple gun | 40–60 | Excellent | Low | Factories, high volume |
| Pneumatic brad nailer | 30–50 | Excellent | Low | Hardwood frames, trim |
Choosing the Right Staple Size
Not all staples work for rattan webbing. Staples that are too long split thin frame rails. Staples that are too short do not grip. For most rattan cane webbing 7 on softwood frames, use 6mm to 10mm (1/4" to 3/8") staples. For hardwood frames, a brad nailer with 15mm brads may be better since staples can bounce off dense wood.
We recommend testing your staple on a scrap piece of your frame material before starting production. Set the air pressure so the staple crown sits flush with the webbing surface—not sunk too deep (which tears the rattan) and not raised (which snags).
Air Compressor Considerations
If you go pneumatic, your compressor matters. A small pancake compressor (6-gallon, 150 PSI) handles one staple gun easily. For a factory line with multiple stations, invest in a larger tank (20+ gallons) or a continuous-duty compressor to avoid pressure drops during peak use.
Keep the air line dry. Moisture in pneumatic lines causes rust inside the tool and misfires. Use an inline moisture filter, especially in tropical climates.
The ROI Argument
Switching from manual to pneumatic staple guns 8 in a 10-worker factory can save 2–3 hours of labor per day. At typical labor rates, the tool investment pays back within one to two months. Several of our clients in Turkey and Thailand reported exactly this timeline after upgrading their lines.
How can I choose the right cutting and trimming tools to prevent my rattan from fraying?
Fraying is the complaint we hear most from buyers who are new to working with natural rattan cane webbing. They order beautiful rolls of hexagonal open-mesh or tight basketweave, and then the edges unravel the moment they cut. The culprit is almost always the cutting tool.
To prevent rattan from fraying, use a sharp utility knife with a fresh blade, a rotary cutter for long straight cuts, or fine-toothed scissors for curved edges. Always cut rattan while it is slightly damp, and cut along the weave direction—never against it—for the cleanest results.

Understanding Why Rattan Frays
Natural rattan cane webbing is made from interwoven plant fibers. Each strand is thin and semi-rigid when dry. Cutting across these strands with a dull blade crushes and separates the fibers instead of slicing them. This creates loose ends that unravel over time.
Synthetic rattan (plastic woven webbing) is more forgiving. But even synthetic material benefits from a clean, sharp cut. The key principle is the same: sharp blade, minimal pressure, smooth motion.
Tool-by-Tool Breakdown
Utility knife: The workhorse for trimming. Use a fresh snap-off blade for every project. Press the webbing flat against a cutting mat or the frame edge. Draw the blade in one smooth pass. Do not saw back and forth—that tears fibers.
Rotary cutter: Ideal for long, straight cuts on flat sheets of webbing. The rolling blade slices through rattan strands cleanly. a rotary cutter 9 Use a metal straightedge as a guide. Rotary cutters are popular among professional upholsterers for their speed and precision.
Fine-toothed scissors: Best for trimming curves or small adjustments. Choose scissors with a serrated edge or micro-serrations. These grip the rattan strands as they cut, preventing the material from sliding and fraying.
Craft shears or tin snips: Some pros use these for thicker, denser weave patterns like tight basketweave. The leverage of longer handles gives a cleaner cut through multiple layers.
Cutting Tool Selection Guide
| Cutting Tool | Best Pattern Type | Cut Quality | Speed | Skill Level |
|---|---|---|---|---|
| Utility knife (fresh blade) | All patterns | Excellent | Moderate | Beginner–Pro |
| Rotary cutter + straightedge | Flat sheets, straight lines | Excellent | Fast | Intermediate |
| Fine-toothed scissors | Curves, small trims | Good | Slow | Beginner |
| Craft shears / tin snips | Dense basketweave | Good | Moderate | Intermediate |
| Laser cutter (industrial) | High-volume production | Perfect | Very fast | Professional |
The Damp-Cutting Technique
Here is a tip we share with every new wholesale buyer: dampen your rattan webbing slightly before cutting. Not soaking wet—just lightly misted with a spray bottle. Damp fibers are more pliable. They compress under the blade rather than snapping and splitting. This alone reduces fraying by a noticeable margin.
After cutting, let the edges air dry. If you spot any loose strands, dab a tiny amount of clear-drying glue (like PVA) along the cut edge. This seals the fibers and prevents future unraveling.
Common Cutting Mistakes to Avoid
Do not use old, rusty scissors. Do not cut dry rattan with a dull blade. Do not pull the webbing while cutting—hold it flat and let the blade do the work. And never cut against the weave direction on open-mesh patterns like radio weave. Follow the natural grid lines of the weave for the cleanest edge.
In our quality control lab, we test cut samples from every batch. A clean edge is a sign of good fiber quality. But even the best rattan will fray if you use the wrong tool. Match your tool to the pattern and the project, and you will get professional results every time.
What specialized equipment do I need to properly soak and prepare my rattan rolls for a tight fit?
When we first started supplying rattan cane webbing to furniture factories in the Netherlands and Australia, we noticed a pattern. Factories that skipped proper soaking had the highest return rates. Dry rattan cracks during installation. It fights you instead of conforming to the frame. Soaking is not optional—it is foundational.
To properly soak and prepare rattan webbing, you need a soaking trough or large basin, warm water (not exceeding 70°C), a spray bottle for touch-ups, clean towels, and optionally adjustable tensioning clamps. Soak natural cane for 30 minutes until pliable, then install while still damp for a tight, wrinkle-free fit.

Why Soaking Matters
Natural rattan cane is harvested, dried, and woven. By the time it reaches your workshop, it is rigid. Bending or stretching dry rattan causes it to crack and snap. Soaking rehydrates the cellulose fibers, making them flexible and forgiving. The webbing conforms to curves, sits flat in grooves, and accepts staples without splitting.
After installation, the damp rattan dries and contracts slightly. This natural shrinkage creates extra tension across the frame, resulting in a drum-tight surface. This is why timing matters—install while damp, let it dry in place.
Soaking Equipment Checklist
You need a container large enough to fully submerge your webbing without folding it. Folding creates creases that are hard to remove. For standard furniture-sized pieces, a plastic storage tub or a purpose-built soaking trough works well. For larger rolls (used in cabinet runs or architectural panels), some factories use long, shallow troughs made from sheet metal or fiberglass.
Water temperature is important. Warm water between 40°C and 60°C speeds up absorption. Some suppliers recommend saltwater at 60–70°C, especially for humid climates. The salt acts as a mild preservative and can help prevent mold growth during drying. However, saltwater-soaked rattan may stiffen slightly faster once it dries, so you need to work efficiently.
We generally recommend plain warm water for most projects. Save the saltwater method for tropical environments where mold is a genuine concern.
Soaking Time Guidelines
Do not over-soak. Rattan that sits in water too long becomes mushy. The fibers weaken and the weave can distort. Thirty minutes is the standard for most cane webbing thicknesses (3mm–5mm strand). Thicker weaves may need up to 45 minutes. Thinner open-mesh patterns may only need 15–20 minutes.
Test the webbing by gently bending a corner. It should flex without cracking. If it still feels stiff, give it five more minutes. If it feels limp and overly soft, you have gone too far.
Post-Soak Handling
After soaking, lift the webbing out and lay it flat on clean towels. Blot off excess water—do not wring or twist the material. Wringing distorts the weave pattern permanently.
Keep a spray bottle handy during installation. If the rattan starts drying out before you finish, a light mist keeps it workable. This is especially important in air-conditioned workshops or dry climates.
Tensioning Clamps for Even Stretch
Professional installers sometimes use adjustable tensioning clamps to hold the webbing taut across the frame opening before inserting the spline. These clamps grip the webbing edges and apply even outward tension. This prevents sagging and ensures the final surface is uniformly tight.
For smaller shops, spring clamps or binder clips along the frame edges work as a budget alternative. The key is even tension in all four directions before you lock the spline in place.
Soaking Medium Comparison
There is an ongoing debate between warm water and saltwater soaking. Here is a quick comparison based on feedback from our clients and our own factory testing.
Plain warm water is simpler, cheaper, and works for 90% of projects. Saltwater adds mold resistance but requires faster installation since it stiffens the material sooner after removal. For factories in Thailand, India, and the Philippines—where our rattan webbing ships regularly—we often suggest trying both methods on sample pieces to see which suits the local humidity.
The bottom line: invest in proper soaking equipment. A $30 plastic trough and a $5 spray bottle can be the difference between a flawless installation and a cracked, uneven mess.
Conclusion
The right tools transform rattan cane webbing installation from frustrating guesswork into a smooth, repeatable process. Invest in quality hand tools, match your power tools to your production volume, and never skip soaking. Your finished furniture will show the difference.
Footnotes
1. Found a comprehensive guide on types of staple guns, including manual ones. ↩︎
2. Explains the purpose and types of mallets in woodworking. ↩︎
3. Found an authoritative Wikipedia page defining and describing a spline roller. ↩︎
4. Found a product page with a clear description of a caning awl’s use from a woodworking supplier. ↩︎
5. Found an authoritative guide on types of wood glue from a well-known home improvement publication. ↩︎
6. Found a clear explanation of what an air compressor is and how it works. ↩︎
7. Found a comprehensive guide explaining what rattan cane webbing is. ↩︎
8. Discusses the operation and safety of pneumatic tools. ↩︎
9. Found a clear explanation of what a rotary cutter is and its benefits. ↩︎
10. Provides essential safety guidelines for using utility knives. ↩︎

